Archive
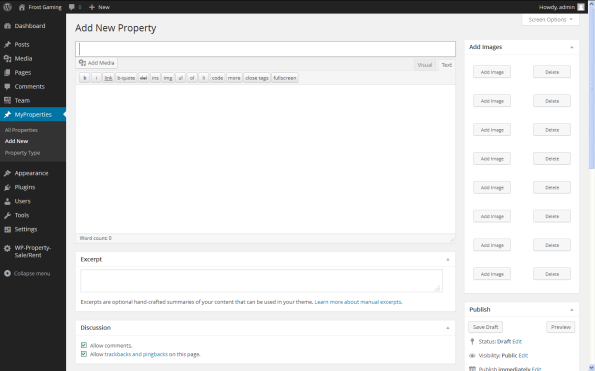
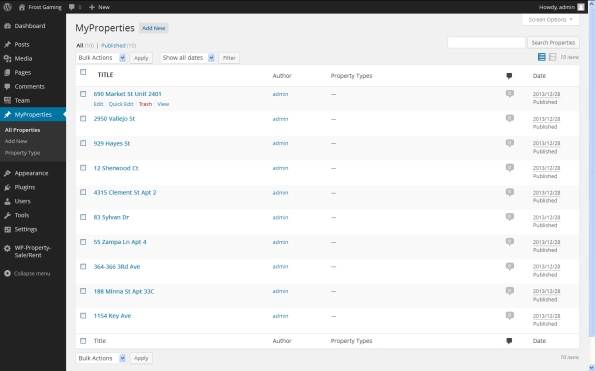
2014 – FIRST PLUGIN ” WP Property Sale/Rent “
WP Property Sale/Rent for creating and managing real estate agents and people who are willing to list their property. https://selvabalaji.wordpress.com
Great options to list properties on your own WordPress website. WP Property Sale/Rent for creating and managing highly real estate agents and people who are willing to list their property listing on their own WordPress site.
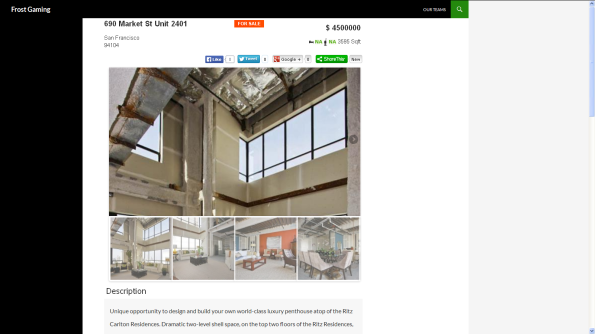
WP Property Sale/Rent is the WordPress plugin for creating and managing highly customization real estate, property management, and completely custom listings showcase websites. Turn your WordPress powered site into a real estate site. Create listings, upload images, display a dynamic map, slideshow, agent information,Google Maps, Send A Inquiry to agents Directly, Image slide show, and much more.
As always, integration is seamless, the system is expandable and customization, functionality is rich, and we are here to support it.

If you are looking to build a site where you can list property for sale or rent, this is the plugin you need.
Features
- Add Property
- Add multiple property photos
- Advanced property search
- jQuery slider in property detailed view
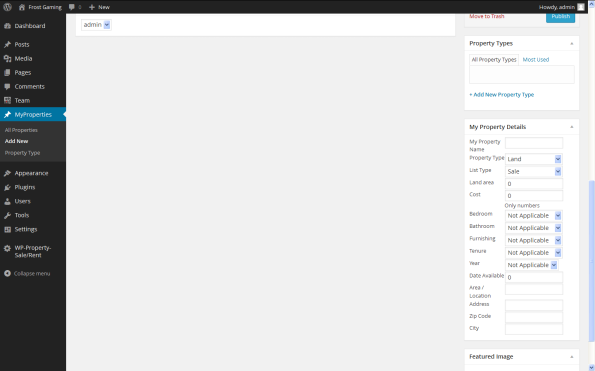
- property options so you can add any type of property listing
- multiple categories
- Property search widget.
- Advanced search widget and custom page.
- Custom property listing page
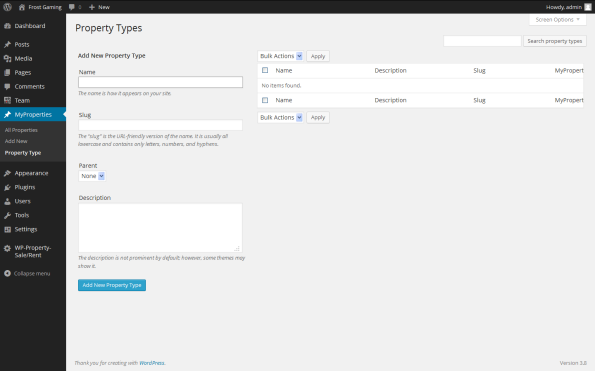
- Custom manage-able property types
- Manage the number of property listing per page
Advanced property search page
- Create a normal page in your wordpress website
- Editor of the page, add this short code [PROPERTY_ADVANCED_SEARCH]
Welcome New Year 2014
Hello Guys,

Wishes to everyone who online on this post.
Wish you all the best to you and your family for your bright future.
This year may come the biggest joy and joy so that you can’t explain that.
You all are invited here to wish Happy New Year 2014 each other.
You can easily wish each other just commenting below.
You have a big opportunity to start the new work today, you can enjoy yourself and motivate yourself by opting the following positive lines: –
Say to yourself every morning:
-Today is going to be a great day!
-I can handle more than I think I can!
-Things don’t get better by worrying about them!
-I can be satisfied if I try to do my best!
-There is always something to be happy about!
-I’m going to make someone happy today!
-It’s not good to be down!
-We always have an option!
-Life is great, make the most of it!
BE AN Optimist!
Best Wishes to all
Balt (selvabalaji)
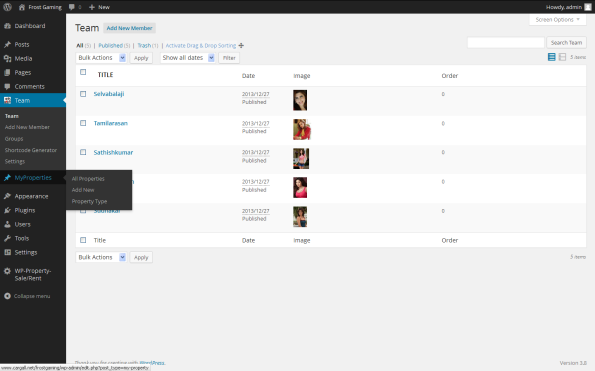
My Team Plugin for WordPress
We are happy to release “My Team” a new WordPress to display team/staff members. You can also display a set of pictures and information in different layouts.
Nowadays, WordPress is more than just a blog. And behind such website is a team. The plugin acknowledges those guys, by creating a template which anyone can copy in his theme directory and have a page ready for the people behind it. The plugin provides the administrator with a nice interface to add/edit/delete the team members. The plugin is under active development so keep checking the page. The plugin uses the short-code given at
http://wordpress.org/plugins/wp-my-team/
Features:
You can display the entries in 4 different main ways
- Grid view.
- Grid view with Information on hover.
- Table list view.
- Number of Columns.
- Image Shapes and effects.
- Text Align.
- Special Settings.
- Image Sizes.
- Email Settings.
- Single Page Settings.
- Auto Generation Shortcode & PHP Function.

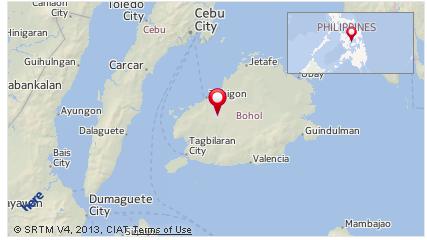
20 dead as magnitude-7.1 earthquake hits the Philippines

A magnitude-7.1 earthquake struck central Philippines on Tuesday, leaving at least 20 people dead and rattling many who were celebrating a religious holiday.
The quake, which struck early in the morning, crumbled a number of buildings and sent panicked people streaming into the streets, witnesses said.
At least 15 were killed in the city of Cebu, four were killed in the province of Bohol and one died in the province of Siquijor, said Maj. Reynaldo Balido,a spokesman for the Philippines Office of Civil Defense.
Most of those killed were hit by falling rubble, the Philippines News Agency reported.
7.1 earthquake rocks Philippines
At least 33 people were missing, and authorities were checking into reports of people trapped in collapsed buildings in Cebu and Bohol, the agency reported.
The quake was centered about 385 miles (619 kilometers) south-southeast of Manila, near Catigbian, and its depth was 12 miles (20 kilometers), according to the U.S. Geological Survey said.
Maryann Zamora, a communications specialist with the charity World Vision, reported seeing glass and concrete in the streets of Cebu City, about 37 miles (60 kilometers) north of the epicenter.
“Right now we are in the streets because it is unsafe to be inside,” she said by phone, her voice shaking as one of more than 10 aftershocks hit. “Tell everyone to pray for us.”
Tuesday was a national holiday — the beginning of the Muslim festival of Eid ul Adha.
There was no widespread threat of a tsunami, the Pacific Tsunami Warning Center said, but it warned that earthquakes this large can sometimes cause tsunamis within 61 miles (100 kilometers) of the epicenter.
Catigbian, which has a population of 23,000, is in the province of Bohol.
Tourist Robert Michael Poole said he was riding a bike in Bohol when the earthquake struck and cracked the road right in front of him.
“It was very strong,” Poole said. “I live in Tokyo. I am used to earthquakes. But this one was very strong. It shocked a lot of people here.”
Poole said he was able to move around and document some of the destruction, including a giant church that was decimated.
“Lucky thing is that it is a holiday here today and it happened at a time when nobody was in the church,” Poole said
Get any Website Page Title From URL in PHP
Hey guys,here below describe the how to get the page title form any website page using URL. Here for getting the page title we are using the file_get_contents function.This one also achieve using fopen( ) but in some servers disabled this function now a days due to some security reasons.
Here below shows the PHP code to get the page title form the URL.
<!--?php
function pageTitle($page_url)
{
     $read_page=file_get_contents($page_url);
     preg_match("/<title.*?>[\n\r\s]*(.*)[\n\r\s]*<\/title>/", $read_page, $page_title);
      if (isset($page_title[1]))
      {
            if ($page_title[1] == '')
            {
                  return $page_url;
            }
            $page_title = $page_title[1];
            return trim($page_title);
      }
      else
      {
            return $page_url;
      }
}

?>
Jquery Timeago Implementation with PHP.
Nowadays timeago is the most important functionality in social networking sites, it helps to updating timestamps automatically. Recent days I received few requests from 9lessons readers that asked me how to implement timeago plugin with dynamic loading live data using PHP. In this post I am just presenting a simple tip to implement timeago in a better way.
Why Live Query
LiveQuery utilizes the power of jQuery selectors by binding events or firing callbacks for matched elements auto-magically, even after the page has been loaded and the DOM updated.
Code
Contains javascipt code. $(this).timeago()- here this element is refers to timeagoclass selector of the anchor tag.
// <![CDATA[
javascript” src=”js/jquery.min.js”>
// ]]>
// <![CDATA[
javascript” src=”js/jquery.livequery.js”>
// ]]>
// <![CDATA[
javascript” src=”js/jquery.timeago.js”>
// ]]>
<script type=”text/javascript”>
$(document).ready(function(){
$(“.timeago”).livequery(function() // LiveQuery
{
$(this).timeago(); // Calling Timeago Funtion
});
});
</script>//HTML & PHP Code
<!–?php
$time=time(); // Current timestamp eg: 1371612613
$mtime=date(“c”, $time); // Converts to date formate 2013-06-19T03:30:13+00:00
?>You opened this page <a href=’#’ class=’timeago’ title=”<!–?php echo$mtime; ?>“></a>
Login with Facebook using PHP SDK in CakePHP
Here we used PHP SDK 3.0 and CakePHP 2.X for the process of authentication and authorizing users for your app.
For Creating an App, which you can obtain from the App Dashboard.
You need App Id and App Secret for integration of the facebook login in cakephp.
In this CakePHP module we included the Facebook PHP SDK 3.0 in vendors of the app directory.And we define Some variables in Core.php
And We create one file which is facebook.php in config folder for the define of AppId and Appsecret.
$config=array('Facebook'=>array('appId'=>'YOUR APP ID','secret'=>'YOUR APP SECRET',));
We create one Controller which is FacebookCpsController.php
<?phpApp::uses('Controller','Controller');App::import('Vendor','Facebook',array('file'=>'Facebook'.DS.'facebook.php'));classFacebookCpsControllerextendsAppController {public$name='FacebookCps';public$uses=array();publicfunctionindex(){$this->layout=false;}functionlogin(){Configure::load('facebook');$appId=Configure::read('Facebook.appId');$app_secret=Configure::read('Facebook.secret');=newFacebook(array('appId'=>$appId,'secret'=>$app_secret,));$loginUrl=->getLoginUrl(array('scope'=>'email,read_stream, publish_stream, user_birthday, user_location, user_work_history, user_hometown, user_photos','redirect_uri'=> BASE_URL.'facebook_cps/facebook_connect','display'=>'popup'));$this->redirect($loginUrl);}functionfacebook_connect(){Configure::load('facebook');$appId=Configure::read('Facebook.appId');$app_secret=Configure::read('Facebook.secret');=newFacebook(array('appId'=>$appId,'secret'=>$app_secret,));$user=->getUser();if($user){try{$user_profile=->api('/me');$params=array('next'=> BASE_URL.'facebook_cps/facebook_logout');$logout=->getLogoutUrl($params);$this->Session->write('logout',$logout);}catch(FacebookApiException$e){error_log($e);$user= NULL;}}else{$this->Session->setFlash('Sorry.Please try again','default',array('class'=>'msg_req'));$this->redirect(array('action'=>'index'));}}functionfacebook_logout(){$this->Session->delete('User');$this->Session->delete('logout');$this->redirect(array('action'=>'index'));}}?>
Here We create two view files for the FacebookCpsController which are located in app/View/FacebookCps directory.
index.ctp
<!--DOCTYPE html PUBLIC"-//W3C//DTD XHTML 1.0 Transitional//EN""http://www.w3.org/TR/xhtml1/DTD/xhtml1-transitional.dtd"><head><meta http-equiv="Content-Type"content="text/html; charset=utf-8"/><title>Login with Facebook In CakePHP</title><?phpecho$this->Html->script('oauthpopup'); ?><script type="text/javascript">$(document).ready(function(){$('#facebook').click(function(e){$.oauthpopup({path:'facebook_cps/login',width:600,height:300,callback:function(){window.location.reload();}});e.preventDefault();});});</script></head><body><?php$ses_user=$this->Session->read('User');$logout=$this->Session->read('logout');if(!$this->Session->check('User') &&empty($ses_user)) {echo$this->Html->image('facebook.png',array('id'=>'facebook','style'=>'cursor:pointer;float:left;margin-left:550px;'));}else{echo'<img src="https://graph.facebook.com/'.$ses_user['id'] .'/picture" width="30" height="30"/><div>'.$ses_user['name'].'</div>';echo'<a href="'.$logout.'">Logout</a>';}?></body></html>
facebook_connect.ctp
<script type="text/javascript">window.close();</script>
Here I used one jquery plugin oauthpopup.jswhich is used for popup
(this file is located in app/webroot/js directory)
oauthpopup.js
(function (jQuery) {
jQuery.oauthpopup = function (options) {
options.windowName = options.windowName || ‘ConnectWithOAuth’;
options.windowOptions = options.windowOptions || ‘location=0,status=0,width=’+options.width+’,height=’+options.height+’,scrollbars=1′;
options.callback = options.callback || function () {
window.location.reload();
};
var that = this;
that._oauthWindow = window.open(options.path, options.windowName, options.windowOptions);
that._oauthInterval = window.setInterval(function () {
if (that._oauthWindow.closed) {
window.clearInterval(that._oauthInterval);
options.callback();
}
}, 1000);
};
})(jQuery);
In the PHP SDK 3.0,we change the facebook.php file.For the Session We uses the CakePHP core data source which is CakeSession. facebook.php file is located at app/Vendor/Facebook directory
facebook.php
//included this line the above classApp::uses('CakeSession','Model/Datasource');publicfunction__construct($config) {if(!session_id()) {//insted of session_start() we used CakeSession::start()CakeSession::start();}parent::__construct($config);if(!empty($config['sharedSession'])) {$this->initSharedSession();}}
Facebook introduces video on Instagram
 NEW YORK: Facebook is adding video to its popular photo-sharing app Instagram, following in the heels of Twitter’s growing video-sharing app, Vine.
Instagram co-founder Kevin Systrom said on Thursday that users will be able to record and share 15-second clips by tapping a video icon in the app. They can also apply filters to videos to add contrast, make them black and white or different hues.
“This is the same Instagram we all know and love but it moves,” he said at an event held at Facebook’s Menlo Park, California, headquarters.
Vine, which launched in January, has 13 million users and lets people create and share 6-second video clips. Instagram has 100 million users, up from 20 million when Facebook bought the company more than a year ago. If users like it, Facebook’s move could propel mobile video sharing into the mainstream.
To use the video feature, Instagram users can tap on the same camera icon they use to snap photos. A new video camera icon will appear on the right side. Tap it and a screen with a red video button will let you record clips of sunsets, kids running in parks or co-workers staring at their computer screens.
The app will record as long as your finger is on the red button or for 15 seconds, whichever comes first. Not unlike Vine, taking your finger off the button will stop the recording, allowing you to shoot the scene from a different angle or record something else altogether. Once you have 15 seconds of footage, you can play it from the beginning and post it on Instagram to share with others.
Given Vine’s popularity, “it is perhaps more surprising that Facebook has not introduced video for Instagram sooner. There is no doubt Twitter will move quickly to up the ante on Vine and this could undercut Facebook’s efforts with video on Instagram,” said Eden Zoller, principal consumer analyst at Ovum, a technology research firm.
Step-by-Step guide to Facebook Conversion Tracking
Step 1: Once you log in to your ‘Ads Manager’ tab, click on the Conversion Tracking button on the left side bar.

Step 2: Then click on the ‘Create Conversion Pixel’ tab to begin the process.

Step 3: You will be directed to this pop-up, which will ask you for a:
1. Name: An appropriate name will help you remember what you are tracking. (Example: Lead Generation – GATE Ad)
2. Category: This will help you decide the type of action that you want to track on your site. You can choose from the following:
1. Checkouts
2. Registrations
3. Leads
4. Key Page Views
5. Adds to Cart
6. Other Website Conversions
(For the purpose of this example, we have selected ‘Leads’).

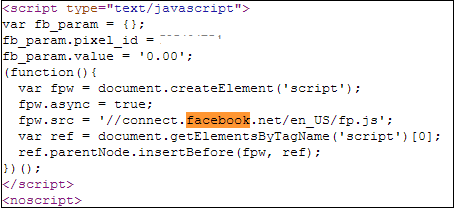
Step 4: You will be able to see a pop-up window with a JavaScript code. This is the code that you will have to add to the page where the conversion will happen. This will let you track the conversions back to ads which you are running on Facebook.

The code should be placed on the page that a user will finally see when the transaction is complete.
Here is the tricky part. The code should not go on all pages. For that matter, it should not even go to the landing page of your product. The code should be placed on the page that a user will finally see when the transaction is complete.
For Example: If you want to track when students register for your GATE coaching, paste the code on the registration confirmation page/thank you page and not on the form that they need to submit.
How do you confirm that your conversion is working properly?
1. Check that the javascript snippet has been placed on the correct conversion page. Visit the page where the pixel has been embedded, right click and go to ‘View Page Source’ to find the pixel. The code should have the tag of the HTML. See image below.
2. Check that Facebook is receiving the conversion events from your website. Go to the conversion tracking tab in your Ads Manager account. There you will see a list of the conversion tracking pixels that you have created. If the conversion tracking pixel has been successfully implemented and a conversion event has been recorded, it will be reflected in the Pixel Status column. If the status shows active, it means that the page which contains the pixel has been viewed by users. If it shows inactive, it means that over the last 24 hours, the page with the pixel has not been viewed.

3.Later, when you create your Facebook ad , you need to check the track conversions box under the campaign, pricing and schedule tab to enable tracking.

Important security bulletin for WordPress users
A large distributed brute force attack against WordPress websites is understood to be occurring recently across the internet. A large botnet with thousands of attacking servers is attempting to log in by cycling through different usernames and passwords to get into the WordPress Admin dashboard. This is a global attack which is affecting thousands of servers globally.
To ensure that your websites are secure and safeguarded from this attack, we recommend the following steps to be implemented immediately if you are using WordPress:
1) Update your WordPress installation to the latest available version. If you have any plugins and themes installed under WordPress, please make sure that you update them to the latest version as well.
2) Use a strong alphanumeric password for your WordPress Admin login. You can use a password generator like http://www.strongpasswordgenerator.com
3) Password protect the WordPress admin directory (wp-admin) so that it will have an additional protection. You can do that through cPanel > Security > Password Protect Directories
Note: If it breaks the Ajax functionality or shows 404 errors in the dashboard, you may have to add the following in .htaccess file:
Order allow,deny
Allow from all
Satisfy any
4) If you have a static IP address, you can lock down the WordPress Admin access using .htaccess file with the following rules:
RewriteEngine on
RewriteCond %{REQUEST_URI} ^/wp-login\.php(.*)$ [OR]
RewriteCond %{REQUEST_URI} ^/wp-admin$
RewriteCond %{REMOTE_ADDR} !^72\.72\.72\.72$ [OR]
RewriteCond %{REMOTE_ADDR} !^72\.72\.72\.73$ [OR]
RewriteCond %{REMOTE_ADDR} !^72\.72\.72\.74$
RewriteRule ^(.*)$ – [R=403,L]
(Replace 72.72.72.72, 72.72.72.73, 72.72.72.74 with your actual PC IPs)
5) Install security plugins like:
http://wordpress.org/extend/plugins/limit-login-attempts/
http://wordpress.org/extend/plugins/better-wp-security/
PHP Image and Audio Upload Function
Function in PHP to upload an image and audio to the MYSQL database and move the uploaded file:
//fileUpload(“location of file”,”table”,”file_name_in_table”,”condition1″,”condition2″,”file type”)
function fileUpload($location,$table,$name,$condition1,$condition2,$T)
{
//image upload
if($T == “I”) :
$new_name = time(). “-”. $_FILES["image"]["name"] ;
$target = $location. $new_name ;

if ((($_FILES["image"]["type"] == “image/gif”) ||
($_FILES["image"]["type"] == “image/png”) ||
($_FILES["image"]["type"] == “image/jpeg”) ||
($_FILES["image"]["type"] == “image/pjpeg”)))
{ $err = 0; }

else { $err = 2; $_SESSION['errorMessage'] = “Invalid file format!!”; }

if (file_exists($target)) { $err = 1; $_SESSION['errorMessage'] =
 “Filename already exists!!”; }

if($err!= 1 && $err!=2) {
move_uploaded_file($_FILES["image"]["tmp_name"], $target);
mysql_query(“UPDATE $table SET $name = ‘$new_name’ WHERE
$condition1=’$condition2′ “) or die(‘Upload error’.mysql_error());
$_SESSION['addMessage'] = “Action succesfully!!”;
}

endif;

//audio upload
if($T== “A”) :

$new_name = time(). “-”. $_FILES["audio"]["name"] ;
$target = $location. $new_name ;

if ((($_FILES["audio"]["type"] == “image/gif”) ||
($_FILES["audio"]["type"] == “image/png”) ||
 ($_FILES["audio"]["type"] == “image/jpeg”) ||
($_FILES["audio"]["type"] == “image/pjpeg”)))
{ $err = 0; }

else { $err = 2; $_SESSION['errorMessage'] = “Invalid file format!!”; }

if (file_exists($target)) { $err = 1;
$_SESSION['errorMessage'] = “Filename already exists!!”; }

if($err!= 1 && $err!=2) {
move_uploaded_file($_FILES["audio"]["tmp_name"], $target);
mysql_query(“UPDATE $table SET $name = ‘$new_name’
WHERE $condition1=’$condition2′ “) or die(‘Upload error’.mysql_error());
}

endif;

}
Upload Cover Photo to Facebook via PHP
Here is a tutorial to upload a Cover Photo on Facebook via PHP. We will need Facebook Application ID and Secret, and Facebook files from Github.com then upload to your web space only the src folder. Now create a file called upload.php and upload it to your web space. Open upload.php with notepad and add this code:
<?php

ini_set('display_errors', 1);
 error_reporting(E_ALL);

 require 'src/facebook.php';

 $facebook = new Facebook(array(
 'appId' => "xxxxxxxxxxxxxxxxxxx", //Facebook App ID
 'secret' => "xxxxxxxxxxxxxxxxxxx", // Facebook App Secret
 "cookie" => true,
 'fileUpload' => true
 ));

 $user_id = $facebook->getUser();

 if($user_id == 0 || $user_id == "")
 {
 $login_url = $facebook->getLoginUrl(array(
 'redirect_uri' => 'https://selvabalaji.wordpress.com/upload.php?cover='.$_GET['cover'].'', // Replace with your site url
 'scope' => "publish_stream,user_photos"));

 echo "<script type='text/javascript'>top.location.href = '$login_url';</script>";
 exit();
 }

 //get user album
 $albums = $facebook->api("/me/albums");
 $album_id = "";
 foreach($albums["data"] as $item){
 if($item["type"] == "cover_photo"){
 $album_id = $item["id"];
 break;
 }
 }

 //set timeline cover atributes
 $full_image_path = realpath($_GET['cover']);
 $args = array('message' => 'Uploaded from hhttps://selvabalaji.wordpress.com/');
 $args['image'] = '@' . $full_image_path;

 //upload cover photo to Facebook
 $data = $facebook->api("/me/photos", 'post', $args);
 $picture = $facebook->api('/'.$data['id']);

 $fb_image_link = 'http://www.facebook.com/profile.php?preview_cover='.$data['id'].''; //redirect to uploaded facebook cover and change it
 echo "<script type='text/javascript'>top.location.href = '$fb_image_link';</script>";
?>
Now that just type in the URL of your site followed by the name of the image file and you’re done!
Example : http://yoursitename.com/upload.php?cover=selvabalaji.gif
Today – WordPress New Version 3.5 Released
On December 11, 2012, WordPress Version 3.5, named for jazz drummer Elvin Jones, was released to the public. For more information on this enhancement and bug-fix release, read the WordPress Blog, and see the Changelog for 3.5.
Highlights
- New Media Manager
- Beautiful interface: A streamlined, all-new experience
- Create galleries faster with drag-and-drop reordering, inline caption editing, and simplified controls
- Insert multiple images at once with Shift/Ctrl+click
- New Default Theme – Twenty Twelve
- Simple, flexible, elegant
- Mobile-first, responsive design
- Gorgeous Open Sans typeface
- Uses the latest Theme Features
- Admin Enhancements
- New Welcome Screen
- Retina-Ready (HiDPI) Admin
- Hide Link Manager for new installs
- Better accessibility for screenreaders, touch devices, and keyboard users
- More polish on admin screens, including a new color picker
- For Developers
- WP_Comment_Query and WP_User_Query accept now meta queries just like WP_Query
- Meta queries now support querying for objects without a particular meta key
- Post objects are now instances of a WP_Post class, which improves performance and caching
- Multisite’s switch_to_blog() is now significantly faster and more reliable
- WordPress has added the Underscore and Backbone JavaScript libraries
- TinyMCE, jQuery, jQuery UI, and SimplePie have all been updated to the latest versions
- Image Editing API for cropping, scaling, etc., that uses ImageMagick as well as GD
- XML-RPC: Now always enabled and supports fetching users, managing post revisions, searching
- New “show_admin_column” parameter for register_taxonomy() allows automatic creation of taxonomy columns on associated post-types.
What’s New
Dashboard
- Switch to prompt text in QuickPress to accommodate longer translated input labels
- Button styles updated throughout Dashboard to more modern, rectangular shape
- Help Text improvements throughout
Posts
- Rename the “HTML” editor tab to “Text”
- Prevent child categories from being visually promoted to the top level after Quick Edit
Media
- Add oEmbed suport for SoundCloud.com, SlideShare.net, and Instagram.com
- New Media Manager: Insert multiple galleries per post and independently order images
Accessibility
- Add visible focus within admin screens for better accessibility.
- Add “Skip to content” link to all screens in the admin.
- Add “Skip to toolbar” accessibility shortcut in the admin.
- Add ability to log out of user account without mouse input.
- Add “tab out” of the plugins and themes editors textareas.
Links
- Link Manager is hidden for new installs and for any existing installs that have no links (all sites with existing links are left as is). This can be restored with Link Manager Plugin
- Display links in widget if no link categories
Appearance
- Widgets menu is hidden if your theme hasn’t defined any sidebars
- Improve display of available custom headers with jQuery Masonry
Plugins
- Plugins favorited on WordPress.org can be viewed per user and directly installed from within the Dashboard. (Marking plugins as favorite on WordPress.Org)
Users
- Display name defaults to first name and last name for new users
- Force the user to explicitly choose between content deletion and reassignment when deleting users
Settings
- Remove Settings Privacy Screen and relocate Search Engine Visibility option to Settings Reading Screen
- Remove oEmbed options from the Settings Media Screen. Width adheres to theme’s content width, height is 1.5 times width
- Enable XML-RPC by default, remove Writing Settings option
- Remove AtomPub from core, can be re-enabled with a plugin
- Hide charset option in Settings Reading Screen in new installs, default to UTF-8
Multisite
- Multisite installs now work with WordPress in a subdirectory
- Turn off ms-files.php by default
- File quotas disabled by default on new installs
Related articles
- WordPress 3.5 at the Horizon (wpzoom.com)
- 15 Useful, Little-Known WordPress Plugins to Add to Your Collection | RYP Marketing (rypmarketing.com)
- 10 Things You Need to Know About WordPress 3.5 (technosailor.com)
- WordPress 3.5 “Elvin” Released (wordpress.org)
- WordPress 3.5 brings new photo flow, mobile-first default theme, and Retina support (thenextweb.com)
- WordPress Reaches 3.5, Rides The Coltrane (thepowerbase.com)
- WordPress 3.5 Released (sucuri.net)
- WordPress 3.5 “Elvin” Launches With A Completely New Media Manager, Retina Support, Responsive Default Theme (techcrunch.com)
- WordPress releases latest WP version [WordPress 5.0] – [WordPress News] (bloggingmatters.net)
Today RAJINI’S BIRTHDAY 12-12-12

English: Rajinikanth at the audio release of Enthiran (Photo credit: Wikipedia)
Superstar Rajinikanth celebrates his 60th birthday today and he will be spending the day with his family. Rajini’s birthday is no less than a festival for his fans the world over.
It is reported that his family and close friends have organized a Shashitabadapoorthi puja (60th birthday celebrations) at the famous Tirukkadiyur temple near Tiruchi. However, it should come to no one’s surprise that Rajini’s fans will be lining up for special poojas and welfare activities for their favourite idol.
Shivaji Rao Gaekwad was on December 12, 1949 and had very humble beginnings. He served as a ticket collector in a local shuttle bus in Bangalore when he was discovered by the legendary K. Balachander who renamed him Rajinikanth.
The year has been exceptional for Rajini. Breaking all box office records Endhiran has emerged as the biggest hit ever. There have also been two new additions to his family. Daughter Aishwarya Rajinikanth, who is married to actor Dhanush gave birth to a baby boy and his other daughter Soundarya Rajinikanth got married to industrialist Ashwin Kumar.
selvabalaji.wordpress.com wishes Rajinikanth a very happy birthday!
Related articles
- SUPERSTAR RAJINIKANTH – For the Day We Were Waiting 12.12.12 (ktrmurali.wordpress.com)
- Super Star is his First Name: Happy Birthday Rajinikanth (kanaamedia.com)
- ‘Rajinikanth: The Definitive Biography’ released next week (digitalspy.co.uk)
- It was a small role, but people would remember him (thehindu.com)
- Thumbing through the superstar’s life (thehindu.com)
Watch Thuppakki Movie Online HQ (youtube)

Vijay’s Thuppaki Review – First Day First Show Report
One of the key reasons for Thuppaki’s sky high expectations is because the movie marks the beginning of Vijay’s strategy to working with top rung directors (barring Shankar’s Nanban which was a faithful remake of 3 Idiots). This is probably the best line-up of crew members and technicians for a Vijay movie. On the casting side, Kajal Aggarwal, Vidyut, Sathyan, Jayaram have provided the required support for Vijay to showcase his talent. Does the script keep you engaged throughout the running time of 2 hour 45 minutes? Will Thuppaki uplift the festive mood this Diwali? Definitely, Yes.
The story opens in Mumbai with a bomb blast in a public bus. Jagdish (Vijay) is on a mission to find the terrorist gang and people behind the blast. There are twists and unexpected turns along the way. The story has enough ammo to fire up Vijay’s fan base.
Thuppakki is Vijay; Vijay is Thuppakki
Vijay has carried the movie from start to finish with his self-assured confidence and trade-mark style. The script makes frequent switch-overs from intense sleeper cell scenes to commercial love/comedy scenes. Vijay was able to make some bumpy transitions look convincing with his acting abilities. As always, Vijay dances effortlessly and comedy comes to him naturally. Vijay’s costumes, pleasant looks and mischievous expressions will surely win him more female fans. Vijay looks fit and younger in his toned muscular physique.
Story, Direction and Screenplay
AR Murugadoss’ engaging story is narrated in gray tones balanced with commercially colourful compromises. The movie may have minor similarities to Ramana which has worked out well again. Murugadoss has done his homework by consulting ex-CBI chief Karthikeyan and the details are blended in nicely while dumbing it down for audience. AR Murugadoss has intentionally slowed down the pacing and narration in critical scenes (e.g., Hospital security chief conversation in the terrace) to get the message across. The dialogues about common people’s (un)willingness to put their life at risk to fight terrorism are well written and delivered by Vijay. Also, the hero putting his sister in a high-risk operation provides the impetus and emotional connect with the audience.
It is interesting to note that the villain (Vidyut) tracks down the hero instead of other way around, which is usually seen. Another aspect which is told subtlely is Vijay’s undercover act passing off as a common man similar to the way terrorist sleeper cells operate. Vijay’s exterminating the sleeper cell operations in Mumbai is not revealed to his lover, family or others (except his cop friend Sathyan). This aspect could have been underlined a bit for additional impact and stronger appreciation for Jagdish’s character.
The love/comedy scenes and songs definitely stick out like sore thumb since they are not integrated well with the story line. It is understandable why AR Murugadoss had to make these compromises. We are pointing this out without really complaining since such intrusions have become essential to satisfy the fan base and common audience with diverse set of expectations.
Highlights
- Stylish portrayal of Vijay in anti-terrorism operations have a perfect closure with mass elements. For instance, scenes such as simultaneous execution of 12-for-12 sleeper cell killings at precisely the same minute, sister rescue scenes with sniffer dog, and the final scene where he symbolically blows up the ship with his hand gesture and subsequent punch dialogue before villain killing are sure treats for fans.
- AR Murugadoss seems to have taken a tip from his association with Aamir Khan in Ghajini Hindi remake. Upon Aamir’s insistence, some emotional scenes involving Asin’s memory were added after climax action sequences in Hindi version. AR Murugadoss has used similar finish in Thuppakki giving a nice emotional touch and meaning to the movie by extolling the virtues of army.
- Kajal has done her role exceptionally well in perking up the lighter moments with her expressions, dance moves in songs and chirpy love scenes laced with humour. Kajal has good scope in both “Antarctica” song (interesting concept) and “Alaika Laika” (showcasing her dance moves). Kajal’s presence enlivens the scenes and songs for people looking for relief from action scenes.
- Santhosh Sivan‘s Cinematography and Sreekar Prasad‘s editing keep the narration tight despite relatively long running time. The candid capture of Mumbai adds to the style and character of the city. Santosh’s fast working style is critical to the successful shooting of scenes in real locations in Mumbai. Harris scores big in the final minutes with his song (“Poi Varavaa“) dedicated to army jawans which is sure to leave a lump in your throat. Harris’ BGM keeps up the pace and makes the operations look convincing with his theme track.
What could have been better?
- Song picturizations look low-budget. Almost 4 out of 5 songs solely rely on Vijay’s dance moves, which gets a bit repetitive for general public. AR Murugadoss and Santhosh Sivan have pulled out some of the old tricks of picturizing the songs in big stadiums, by using bright incandescent lights in the background to make it look richer. Vijay’s introduction song “Kutti Puli Kootam” and opening fight scenes are speed breakers right after the word “go”.
- Screenplay could have been tighter. Even though the individual scenes were riveting, the bigger purpose required to latch the audience interest lacks full conviction. The objective of killing the head of sleeper-cell (Vidyut) lacks macro-connection resulting in lack of depth for Vijay vs Vidyut’s clash. Some of the lengthy climax fight sequences in the ship could have been trimmed. The final 10+ minutes of man-to-man combat scenes with Vidyut led to some chatter among audience.
Bottomline
With right promotions and word of mouth reaching out to neutral and family audience, Thuppakki is well positioned to get tagged along with Ghilli and Pokiri.
Reviewer Rating – ![]()
Paradesi First Look – bala ready for next national award!
Thupakki Songs
Thupakki Tamil Movie
01.Kutti Puli Koottam
Artist(s): Hariharan, Tippu, Narayana, Satyan, Ranina Reddy
Lyricist: Viveka02.Antarctica
Artist(s): Vijay Prakash, Krish, Rajeev, Devan
Lyricist: Karky03.Poi Varavaa
Artist(s): Karthik, Chinmayee
Lyricist: Pa. Vijay04.Google Google
Artist(s): Vijay, Andrea Jeremiah, Joe, Krishna Iyer
Lyricist: Karky05.Vennilave
Artist(s): Hariharan, Bombay Jayashri
Lyricist: Na. Muthukumar06.Alaikaa Laikaa
Artist(s): Javed Ali, Sayanora Philip, Sharmila
Lyricist: Pa. Vijay
Related articles
- Thuppakki (துப்பாக்கி) Music Review (arunsankar.wordpress.com)
- Thuppakki Music Album Review (kanaamedia.com)
- Thuppaki (5inetune.com)
- Thuppakki-Trailer (madaboutmoviez.com)
MySQL (Photo credit: Wikipedia)
This article teaches you how to create pagination like twitter using jquery, PHP and MySQL. The content can be loaded at the end of old content when we scroll the page. Your can create your own pagination after completing this article. It is very easy to implement, you can just copy and paste the code. Please follow the steps given below to create your won pagination style.
1. Create table in MySQL using following query statement
CREATE TABLE IF NOT EXISTS `job`  (  `job_id` INT(11) NOT
 NULL AUTO_INCREMENT,    `job_name` INT(11) NOT NULL,
 PRIMARY KEY (`job_id`)  )
 ENGINE=MYISAM DEFAULT CHARSET=latin1 AUTO_INCREMENT=1 ;
2. Create database connection file ie connection.php
$DB_Username = "root";
  $DB_Password = "";
 $DB_DATABASE = "database_name";
 $DB_HOST     = "localhost";
  $Connect = @mysql_connect($DB_HOST, $DB_Username, $DB_Password)
 or die("Couldn't connect to MySQL:
" . mysql_error() . "
" . mysql_errno());
//select database
$Db = @mysql_select_db($DB_DATABASE, $Connect)
 or die("Couldn't select database:
" . mysql_error(). "
" . mysql_errno());
3. Create index.php where you can write following codes
<?php
/*
Author: selvaBalaji
Email:selvabalaji@gmail.com
Date: oct 26 2012
*/
include(“connection.php”);
if(isset($_GET[‘lastID’]) && is_numeric($_GET[‘lastID’]))
$lastID =intval($_GET[‘lastID’]);
if(!isset($_GET[‘lastID’]))
{
?>
<!DOCTYPE html>
<html xmlns=”http://www.w3.org/1999/xhtml”>
<head>
<script type=”text/javascript”
src=”http://ajax.googleapis.com/ajax/libs/jquery/1.3.0/jquery.min.js”>
</script>
<style>
#loader {
border:1px solid #ccc;
padding:10px;
margin:10px 0 0 0;
text-align:center;
}
.contentpane{}
.rowHolder{
border:1px solid #ccc;
padding:10px;
margin:10px 0 0 0;
}
</style>
<script type=”text/javascript”>
$(document).ready(function(){
function lastRecord()
{
$(‘div#loader’).html(‘<img src=”loader.gif” alt=”Loading…”>’);
$.post(“index.php?lastID=”+$(“.contentpane table tr:last”).attr(“id”),
function(data){
if (data != “”) {
$(“.contentpane table tr:last”).after(data);
}
$(‘div#loader’).empty();
});
};
$(window).scroll(function(){
if ($(window).scrollTop() == $(document).height() – $(window).height()){
lastRecord();
}
});});
</script>
</head>
<body>
<h1>Pagination </h1>
<p class=”hr” style=”padding:2px 0 2px 0;”></p>
<div class=”contentpane”>
<table width=”100%” border=”0″ cellpadding=”0″ cellspacing=”0″>
<?php
$sql=”SELECT * FROM job ORDER BY job_id DESC limit 30″;
$result = mysql_query($sql);
while($record = mysql_fetch_array($result))
{
$lastID = $record[‘job_id’];
?>
<tr id=”<?php echo $record[‘job_id’];?>”>
<td><div class=”rowHolder”><?php echo $record[‘job_name’];?></div></td>
</tr>
<?php
}
?>
</table>
</div>
<div id=”loader”></div>
</body>
</html>
<?php
}
else
{
$sql=”SELECT * FROM job WHERE job_id < $lastID
ORDER BY job_id DESC LIMIT 3″;
$result = mysql_query($sql);
while($record = mysql_fetch_array($result))
{
?>
<tr id=”<?php echo $record[‘job_id’];?>”>
<td><div class=”rowHolder”><?php echo $record[‘job_name’];?></div></td>
</tr>
<?php
}
}
?>
Login with Google Account OAuth

Sample database design
(
id INT PRIMARY KEY AUTO_INCREMENT,
email VARCHAR(50) UNIQUE,
fullname VARCHAR(100),
firstname VARCHAR(50),
lastname VARCHAR(50),
google_id VARCHAR(50),
gender VARCHAR(10),
dob VARCHAR(15),
profile_image TEXT,
gpluslink TEXT
)


Verify your domain ownership with HTML file upload or including META tag.
Google will provide you OAuth consumer key and OAuth consumer secret key.
Create client ID OAuth Console here.

Create client ID.

Here the application OAuth client ID and client secret.

You can find this in srcfolder, here you have to configure application OAuth keys, Consumer keys and redirection callback URL.
// OAuth2 Settings, you can get these keys at https://code.google.com/apis/console Step 6 keys ‘oauth2_client_id’ => ‘App Client ID’, ‘oauth2_client_secret’ => ‘App Client Secret’,’oauth2_redirect_uri’ => ‘http://yoursite.com/gplus/index.php’,// OAuth1 Settings Step 3 keys.
‘oauth_consumer_key’ => ‘OAuth Consumer Key’,
‘oauth_consumer_secret’ => ‘OAuth Consumer Secret’,
google_login.php
Google plus login system. Just include the file in index.php
<?php require_once ‘src/apiClient.php’; require_once ‘src/contrib/apiOauth2Service.php’; session_start(); $client = new apiClient(); setApplicationName(“Google Account Login”); $oauth2 = new apiOauth2Service($client); if (isset($_GET[‘code’])) { $client->authenticate(); $_SESSION[‘token’] = $client->getAccessToken(); $redirect = ‘http://’ . $_SERVER[‘HTTP_HOST’] . $_SERVER[‘PHP_SELF’]; header(‘Location: ‘ . filter_var($redirect, FILTER_SANITIZE_URL));}if (isset($_SESSION[‘token’])) {
$client->setAccessToken($_SESSION[‘token’]);
}if (isset($_REQUEST[‘logout’])) {
unset($_SESSION[‘token’]);
unset($_SESSION[‘google_data’]); //Google session data unset
$client->revokeToken();
}if ($client->getAccessToken())
{
$user = $oauth2->userinfo->get();
$_SESSION[‘google_data’]=$user; // Storing Google User Data in Session
header(“location: home.php”);
$_SESSION[‘token’] = $client->getAccessToken();
} else {
$authUrl = $client->createAuthUrl();
}if(isset($personMarkup)):
print $personMarkup;
endifif(isset($authUrl))
{
echo “<a href=”$authUrl”>Google Account Login</a>”;
} else {
echo “Logout“;
}
?>
home.php
Contains PHP code inserting Google plus session details into users table.
<?php
session_start();
include(‘db.php’); //Database Connection.
if (!isset($_SESSION[‘google_data’])) {
// Redirection to application home page.
header(“location: index.php”);
}
else
{
//echo print_r($userdata);
$userdata=$_SESSION[‘google_data’];
$email =$userdata[’email’];
$googleid =$userdata[‘id’];
$fullName =$userdata[‘name’];
$firstName=$userdata[‘given_name’];
$lastName=$userdata[‘family_name’];
$gplusURL=$userdata[‘link’];
$avatar=$userdata[‘picture’];
$gender=$userdata[‘gender’];
$dob=$userdata[‘birthday’];
//Execture query
$sql=mysql_query(“insert into users(email,fullname,firstname,lastname,google_id,gender,dob,profile_image,gpluslink) values(‘$email’,’$fullName’,’$firstName’,’$lastName’,’$googleid’,’$gender’,’$dob’,’$avatar’,’$gplusURL’)”);
?>db.php
Database Configuration file.<?php
$mysql_hostname = “localhost”;
$mysql_user = “username”;
$mysql_password = “password”;
$mysql_database = “databasename”;
$bd = mysql_connect($mysql_hostname, $mysql_user, $mysql_password) or die(“Could not connect database”);
mysql_select_db($mysql_database, $bd) or die(“Could not select database”);
?>
Related articles
- PHP OAuth API (phpclasses.org)
- basic_oauth 0.1.5 (pypi.python.org)
- How to store sensitive userdata in mysql using php (stackoverflow.com)
Unzip a Zip File in php
<!--?php
if(exec("unzip $location",$arr)){ mkdir($newLocation); for($i = 1;$i< count($arr);$i++){ $file = trim(preg_replace("~inflating: ~","",$arr[$i])); copy($location.'/'.$file,$newLocation.'/'.$file); unlink($location.'/'.$file); } return TRUE; }else{ return FALSE; } }?>//Use the code as following:<!--?phpinclude 'functions.php';if(unzip('zipedfiles/selvabalaji.zip','unziped/myNewZip')) echo 'Success!';else echo 'Error';?>Subscribe Via Email

Agaram Foundation

29,Vijay Enclave Krishna Street,
T.Nagar, Chennai - 600 017
Tamil Nadu, India.
Telephone : +91 44 4350 6361
Mobile : +91 98418 91000
Email : info@agaram.in
Site Info

![]()
 SELVABALAJI NEWS
- An error has occurred; the feed is probably down. Try again later.
Vistor Location
Unknown Feed
- An error has occurred; the feed is probably down. Try again later.
Unknown Feed
- An error has occurred; the feed is probably down. Try again later.
Unknown Feed
- An error has occurred; the feed is probably down. Try again later.
LeadSquared
- Into the Unknown: Embracing a Bold, Student-First Strategy for Enrollment Success
- Top 10 Sales Gamification Tools For 2024
- Top 9 CRMNext Alternatives in 2024
- Closing the Deal: 6 Surefire Strategies to Exceed Your Sales Targets
- Sales Automation 101:Unclog your Sales Pipeline
- KRA of Sales Manager and How to Track Performance
- Top 10 Healthcare CRM in the United States
- Why Do 70% of Online Inquiries Drop Off?
- Top 6 Paramantra Alternatives for Real-Estate Businesses in 2024
- Top 10 Spotio Alternatives for Field Reps
singershalini
- Untitled
- Pop Shalini Verified #Spotify Artist Playlist
- Pop Shalini's Interesting reads #Murakami
- Pop Shalini performs for Harris Jeyraj's concert with Benny Dayal and Haricharan
- Pop Shalini sings Vandhe Mataram
- Pop Shalini Sings her famous song Mudhal Naal Indru - Unaale Unaale
- Pop Shalini wishes Superstar RajiniKanth on the Dada Saheb Phalke Award
- A song for a Rainy day from my first album #Shalini - Chinna Chinna Mazhai thooral
- ipopshalini Verified Artiste sings Ranjha from Shershaah
- Chennai Floods
Flickr Photos


Advertsiment


Recent Comments