Archive
How to Hunt for a Job Using Social Media

Securing a job is the tough part, but scouting an open position? All it takes is a strategic scroll through your favorite social media accounts.
Sites like Twitter and Facebook can be fun and frivolous, but they’re also viable business opportunities. Plumbing through accounts, hashtags and personal pages could help launch next potential career.
Want to find a writing opportunity in a town near you? Just look up a hashtag on Twitter. Want to stay up to date with a company’s career openings? “Like” them on Facebook. Want to create a beautiful resume that’ll catch a recruiter’s or hiring manager’s eye? Head over to Pinterest.
Here’s how to land your perfect job via social media.
1. Twitter

In 140 characters or less, Twitter can help you find your dream gig. It’s teeming with job applications and professional networking pages, if you know where to find them.
a. Searches: Use that search bar to look for terms that apply to the job you want. For best results, type in words like “jobs,” “hiring” and other specifics that apply to your desired field and location; for example, “writer” and “New York City.”
b. Hashtags: Typing #jobs and #hiring will result in a plethora of tweets from those seeking employees. Employers who want to cast a wide net will often tweet out job applications, with accompanying hashtags.
c. Tweet often: Though it depends on your career of choice, tweeting is a great way to network with like-minded folks in your profession. Follow businesses and people you’re interested in and don’t be afraid to send them the occasional tweet. (On that note, make sure your Twitter account is polished and professional).
d. Follow away: There are dozens and dozens of Twitter accounts dedicated to posting job applications. Go to the search bar and type in “jobs,” then click “People” on the left-hand side. You’ll soon see all the Twitter accounts with “jobs” in the username and can gleefully press the “Follow” button.
2. Facebook
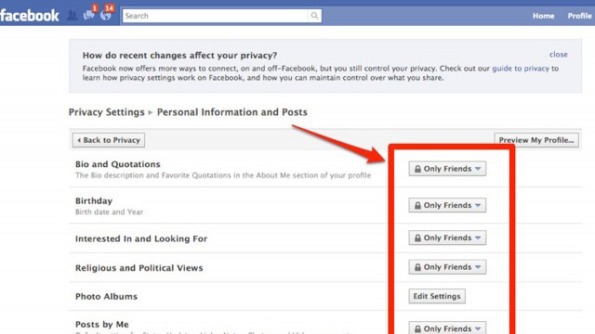
Facebook is an undeniable social media juggernaut. According to its representatives, these are the top tips for trying to get a job through Facebook:
a. “Like” some pages: Most companies strive for dynamic social media presences, and Facebook Pages are engagement 101. By “Liking” them, you can get daily updates about their activity. Plus, they will likely post links to available job applications.
b. Private/Public: Take a thorough look at your privacy settings on Facebook, and make sure you know exactly how others view your Timeline. However, you should consider setting your work and education info public, enabling others to see your professional history.
c. Stay updated: Make sure all of your work and education info is up to date and reflects your current position and past experience.
d. Add “Professional Skills:” A few months ago, Facebook added a “Professional Skills” portion to the “About” section. Underneath work and education, add skills you’ve acquired, optimizing your professional appeal.
3. LinkedIn
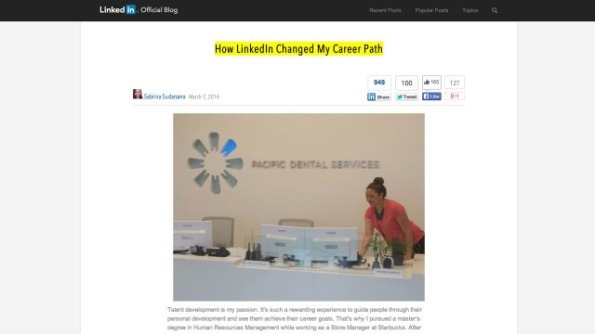
Perhaps the most obvious of job hunting sites, LinkedIn is the network of choice for professionals.
a. Connect: Unlike Facebook, it’s a little less creepy to connect with strangers on LinkedIn, because everyone there is looking for networking opportunities. Connect to people who have careers you’re interested in, and search around for those who might only be one degree away from you. For inspiration, check out the member stories portion of LinkedIn’s blog, where users share their success anecdotes about networking through the site.
b. Jobs Board: Not only does the site provide you with advice and connections, but it also has a jobs board highlighting available opportunities in nearly every field.
c. Endorsements and recommendations: There’s a portion of your profile dedicated to glowing recommendations and endorsements from your peers. Try to get as many as you can, and your page’s likability will instantly boost.
d. Share more: According to LinkedIn’s Career Expert, Nicole Williams, sharing articles or content with your network boosts your chances 10 times for getting contacted by a recruiter. When you share content, it proves your knowledge in the industry.
e. List all the things: Your profile is 12 times more likely to be viewed by a hiring manager if you have a detailed list of work experience, Williams says. The more robust your profile is, the more experienced and hirable you look.
4. Tumblr
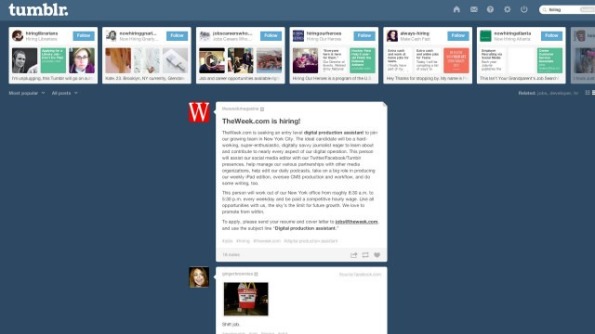
You can use Tumblr, that vast Internet playground of GIFs and rabid fandoms, for help in the job search.
a. Search tags: In the search bar, look for tagged terms like “hiring” and “jobs.” It’s a bit harder to separate the wheat from the chaff in the tag-happy blogging community, but you’ll still be able to find plenty of cool companies advertising open jobs via Tumblr.
b. Start Tumbling: This is especially important if you’re the creative type. A Tumblr account attuned to your interests, and full of your own original content, automatically ups your unique appeal to employers. In addition, a good Tumblr following can lead to job offers from employers who happened to stumble upon your site.
5. Pinterest

Yes, Pinterest is more than just a pretty place to find wedding inspiration and delicious recipes.
a. Pin your résumé: Tired of the standard, one-sheet format? Use a Pinterest board to “pin” your résumé. You can highlight certain aspects of your experience and add photos and links. See Rachael G. King, a social media manager at Sidecar who created a “living résumé.”
b. Follow these pages: For a never-ending well of job tips and opportunities, follow these seven helpful Pinterest boards.
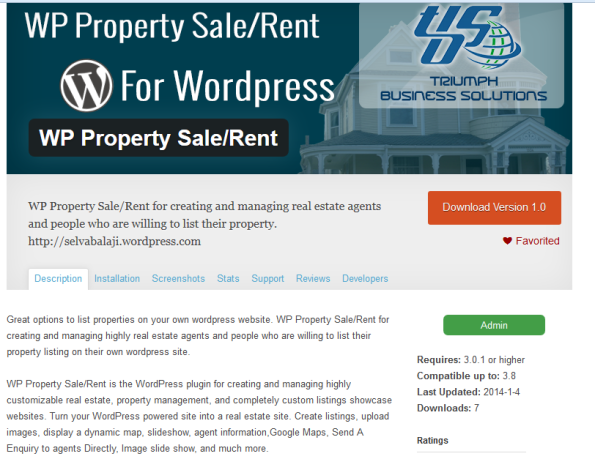
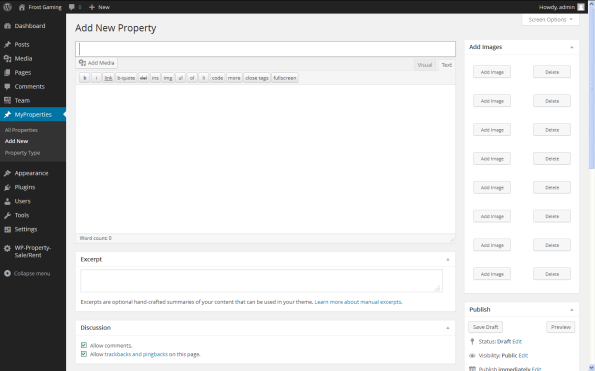
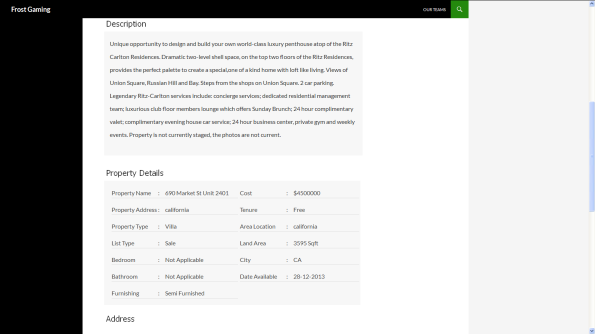
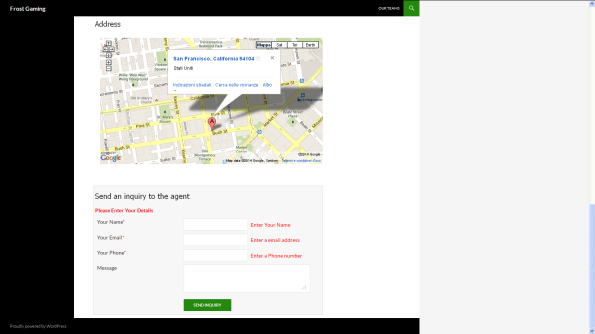
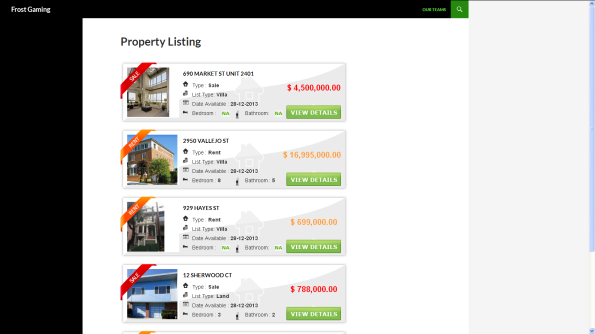
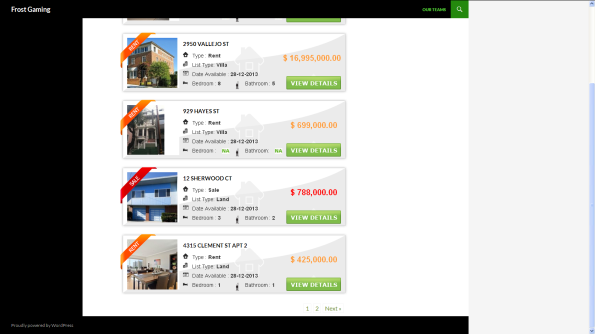
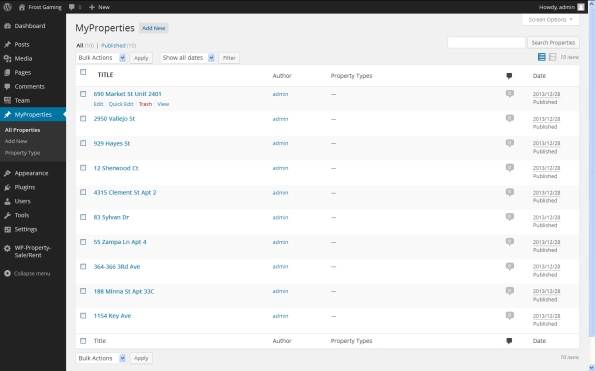
2014 – FIRST PLUGIN ” WP Property Sale/Rent “
WP Property Sale/Rent for creating and managing real estate agents and people who are willing to list their property. https://selvabalaji.wordpress.com
Great options to list properties on your own WordPress website. WP Property Sale/Rent for creating and managing highly real estate agents and people who are willing to list their property listing on their own WordPress site.
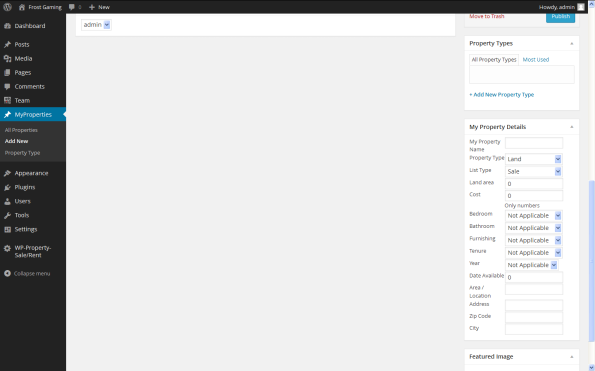
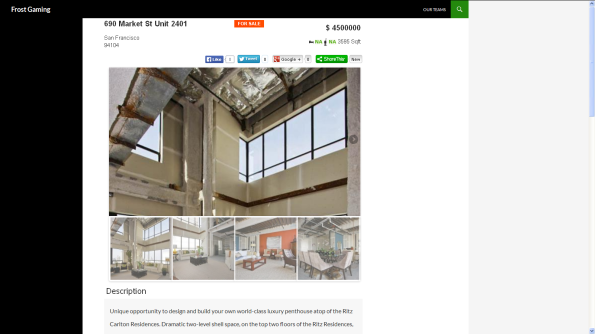
WP Property Sale/Rent is the WordPress plugin for creating and managing highly customization real estate, property management, and completely custom listings showcase websites. Turn your WordPress powered site into a real estate site. Create listings, upload images, display a dynamic map, slideshow, agent information,Google Maps, Send A Inquiry to agents Directly, Image slide show, and much more.
As always, integration is seamless, the system is expandable and customization, functionality is rich, and we are here to support it.
If you are looking to build a site where you can list property for sale or rent, this is the plugin you need.
Features
- Add Property
- Add multiple property photos
- Advanced property search
- jQuery slider in property detailed view
- property options so you can add any type of property listing
- multiple categories
- Property search widget.
- Advanced search widget and custom page.
- Custom property listing page
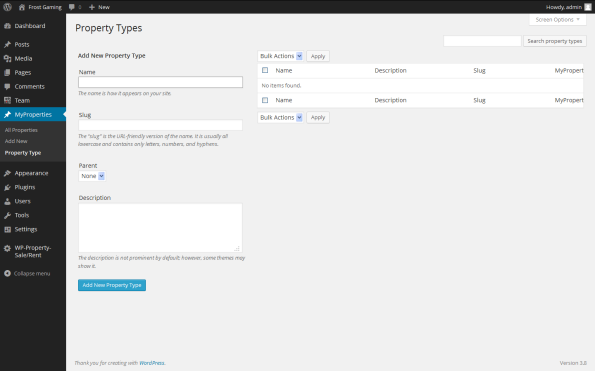
- Custom manage-able property types
- Manage the number of property listing per page
Advanced property search page
- Create a normal page in your wordpress website
- Editor of the page, add this short code [PROPERTY_ADVANCED_SEARCH]
Welcome New Year 2014
Hello Guys,

Wishes to everyone who online on this post.
Wish you all the best to you and your family for your bright future.
This year may come the biggest joy and joy so that you can’t explain that.
You all are invited here to wish Happy New Year 2014 each other.
You can easily wish each other just commenting below.
You have a big opportunity to start the new work today, you can enjoy yourself and motivate yourself by opting the following positive lines: –
Say to yourself every morning:
-Today is going to be a great day!
-I can handle more than I think I can!
-Things don’t get better by worrying about them!
-I can be satisfied if I try to do my best!
-There is always something to be happy about!
-I’m going to make someone happy today!
-It’s not good to be down!
-We always have an option!
-Life is great, make the most of it!
BE AN Optimist!
Best Wishes to all
Balt (selvabalaji)
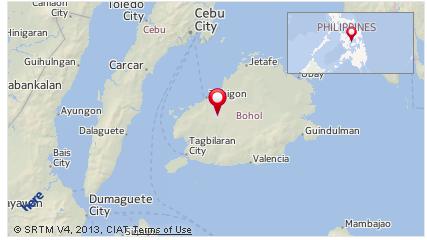
20 dead as magnitude-7.1 earthquake hits the Philippines

A magnitude-7.1 earthquake struck central Philippines on Tuesday, leaving at least 20 people dead and rattling many who were celebrating a religious holiday.
The quake, which struck early in the morning, crumbled a number of buildings and sent panicked people streaming into the streets, witnesses said.
At least 15 were killed in the city of Cebu, four were killed in the province of Bohol and one died in the province of Siquijor, said Maj. Reynaldo Balido,a spokesman for the Philippines Office of Civil Defense.
Most of those killed were hit by falling rubble, the Philippines News Agency reported.
7.1 earthquake rocks Philippines
At least 33 people were missing, and authorities were checking into reports of people trapped in collapsed buildings in Cebu and Bohol, the agency reported.
The quake was centered about 385 miles (619 kilometers) south-southeast of Manila, near Catigbian, and its depth was 12 miles (20 kilometers), according to the U.S. Geological Survey said.
Maryann Zamora, a communications specialist with the charity World Vision, reported seeing glass and concrete in the streets of Cebu City, about 37 miles (60 kilometers) north of the epicenter.
“Right now we are in the streets because it is unsafe to be inside,” she said by phone, her voice shaking as one of more than 10 aftershocks hit. “Tell everyone to pray for us.”
Tuesday was a national holiday — the beginning of the Muslim festival of Eid ul Adha.
There was no widespread threat of a tsunami, the Pacific Tsunami Warning Center said, but it warned that earthquakes this large can sometimes cause tsunamis within 61 miles (100 kilometers) of the epicenter.
Catigbian, which has a population of 23,000, is in the province of Bohol.
Tourist Robert Michael Poole said he was riding a bike in Bohol when the earthquake struck and cracked the road right in front of him.
“It was very strong,” Poole said. “I live in Tokyo. I am used to earthquakes. But this one was very strong. It shocked a lot of people here.”
Poole said he was able to move around and document some of the destruction, including a giant church that was decimated.
“Lucky thing is that it is a holiday here today and it happened at a time when nobody was in the church,” Poole said
7 Reasons Why WordPress Made PHP Popular, not PHP Frameworks – PHP Classes blog
7 Reasons Why WordPress Made PHP Popular, not PHP Frameworks
1. WordPress is the Most Popular PHP Application
Counting the number of search results on several popular search sites may seem to be a way to measure the relative popularity of a technology, language, application or a product.
However, that way does not seem to be very reliable method. When a search site changes its algorithms, you may see changes in the results that really do not have to do so much changes in the popularity of those technologies.
A more reliable way to measure the relative popularity of a technology is to resort to Google Trends. This is a site that Google provides to show the evolution of the relative number of searches done by given keywords over time.
As you may see in the following Google Trends chart, WordPress is much more popular than other PHP applications like Joomla, Drupal, Magento (which is Zend Framework based).
Google Trends: WordPress, Joomla, Drupal, Magento, Zend Framework

2. WordPress alone is much more popular than any PHP framework
Google Trends: WordPress, Zend Framework, Symfony PHP, CakePHP

3. WordPress does not use third-party PHP frameworks
WordPress has been using some third-party components but they are not really full-stack frameworks. This implies WordPress never needed a full-stack framework to be built. The use of such frameworks would hardly make a difference to its popularity.
4. Applications make technologies popular, not components
In the chart above you may notice that Magento is much more popular than Zend Framework. Magento is built on Zend Framework. This seems to imply that what makes applications popular is whether they solve users problems, not the components that they are built on.
WordPress is also popular because it is useful to many users. When users need to host a WordPress installation they need to seek a PHP hosting service. So they know at least superficially what is PHP and that they need PHP hosting.
This means that WordPress helped making PHP even more popular. The more installations there are of WordPress, the more PHP becomes popular.
5. The Extensible WordPress plugin ecosystem
One of the most important reasons that made WordPress popular is the myriad of plugins that were developed to provide additional features.
There are WordPress plugins for practically everything, including those that can turn it into other applications besides being a blog system. There are plugins that can turn it into forums, e-commerce sites, trouble ticket systems, etc., anything.
If WordPress as blog application was already popular, it became even more popular as a platform that can be turned into any type of application.
6. Non-Programmers develop in PHP just because of WordPress
If you need a site that requires certain features that WordPress does not have, you can develop new plugins to extend WordPress further and taylor it to your needs.
Many of the WordPress users were not really programmers. They started programming because they needed to have features in WordPress for which there was no suitable plugin providing them.
This means that many non-programmers had to learn PHP to be able to develop new WordPress plugins. That helped making PHP more popular even among non-programmers.
7. Pragmatism is better than Purism
In sum I could say that WordPress and PHP in general became popular because they can be used to address practical needs of many users.
Neither WordPress nor PHP are examples of software projects that are technically beautiful, are consistent, always follow well-thought project plans and adopt praised design patterns.
But that does not matter. They were created by people with a very pragmatic sense. They were focused on solving real world needs.
As for many of the PHP frameworks, they seem to have been developed in a totally different planet. They are often developed by purist people that seem to be more concerned with the number of design patterns they employ in the framework components than with being pragmatic and solve real PHP application needs.
To make it worse, many PHP frameworks systematically adopt practices of other frameworks developed for other languages. That raises totally unnecessary difficulties for PHP developers that try to use them.
One example of this problem is the configuration formats. In the Java world it is still usual to use XML as format for storing configuration values. XML is a portable format that can be written by humans. It was certainly a progress when compared with binary formats used to serialize data structures by C++ applications in the past.
This was a fine solution in the year 2000 but the fact is that XML is a drag. You need to keep opening and closing tags for every value. Sometimes values are stored as tag attributes, other times as tag values. It is often a pain to use.
Then Ruby On Rails came with the promise to get rid of some of the pains of the Java world habits. Instead of using XML, they decided to use YAML, which is a simplified markup language. It is simpler than XML but it is yet another format that you need to learn.
Several PHP frameworks were built copying Ruby on Rails practices, including the use of YAML as configuration format. Many years have passed and they still used YAML.
If you are a PHP developer, the format you are most familiar with is PHP. Why don’t these PHP frameworks make the lives of PHP developers better and adopt PHP scripts as configuration formats? PHP scripts can even be cached and so be loaded much faster.
In the worst case, if you need to use a more portable format, why these PHP frameworks do not use the JSON format to store configuration values? JSON is JavaScript. Every PHP developer knows JavaScript. It is only natural to adopt JSON nowadays.
Unfortunately many PHP frameworks as still stuck with formats that are not a natural choice for PHP developers, like XML, YAML or even INI (a legacy format of the Windows world).
I always get this feeling that PHP frameworks are not meant to please PHP developers. They seem to have been thought to please Java or Ruby developers. To make it worse, many of the newer PHP frameworks keep copying the same mistakes of older frameworks.
Obviously there are exceptions. There are indeed some PHP frameworks that were developed in a more pragmatic way for PHP developers. You can easily learn them without having to learn about Java or Ruby frameworks first.
Unfortunately those seem to not be the PHP frameworks that get more visibility. Maybe it is time for the PHP framework developers rethink their approach and think more about the PHP developers than about developers of other languages.
Shall I develop My Sites with WordPress or with a PHP Framework?
One frequent dilemma that PHP developers have is whether they should develop sites on top of WordPress or develop them from scratch based on a existing PHP framework?
This is a tough call. If the site is a blog, it may be an obvious choice to create it based on WordPress and save lots of development time. If the site is more than a blog but there are plugins for the functionality you need, WordPress may still be the best option.
Now if your site is very different than a blog, the amount of code that you would reuse from WordPress would be much less when compared to the whole project size. In that case, it may be better to start the development of the site from scratch.
If you still need a blog, you can use WordPress in a separate domain or a separate directory of your site.
For the bulk of the functionality you need to develop, you can use a existing PHP framework to gain some development time, or use your own framework if you have a good capable framework to address your needs.
Personally I tend to go for the last option. I can have more control of my project, but I am well aware that this route can take me more time to develop and fix eventual bugs in the code.
Frameworks are good when they enforce a productive method
Despite of the problems described above that many PHP frameworks have, for some people adopting a framework is probably the best solution, especially if it is what is called a “opinionated framework”.
That is what are called frameworks that impose a certain development methodology. This means that there is only one way to develop applications with those frameworks.
The reason why this is a good solution for some developers is because they do not have a well defined development methodology. This means that they do not know how to start, how to progress and how to deploy an application, unless somebody tells them how to do it.
Since opinionated frameworks impose a certain development method, the developers learn how to develop their applications following the methodology imposed by the framework.
One example of opinionated framework is Ruby on Rails. PHP frameworks that are inspired in Ruby On Rails tend to be also opinionated.
Opinions are not Facts
Well this article is just about my opinion and my experience of as developer that has been creating software for several decades now.
But opinions are just that, points of view of specific people. Expressing an opinion does not mean it is the only way to interpret the facts.
Just like the Tiobe Index people expressed their opinion stating that PHP popularity growth was due to Zend Framework 2 release last year, other people may express a different interpretation of the facts.
What do you think? Do you have a different opinion about what was discussed in this article? Post a comment to tell what you think.
Get any Website Page Title From URL in PHP
Hey guys,here below describe the how to get the page title form any website page using URL. Here for getting the page title we are using the file_get_contents function.This one also achieve using fopen( ) but in some servers disabled this function now a days due to some security reasons.
Here below shows the PHP code to get the page title form the URL.
<!--?php
function pageTitle($page_url)
{
     $read_page=file_get_contents($page_url);
     preg_match("/<title.*?>[\n\r\s]*(.*)[\n\r\s]*<\/title>/", $read_page, $page_title);
      if (isset($page_title[1]))
      {
            if ($page_title[1] == '')
            {
                  return $page_url;
            }
            $page_title = $page_title[1];
            return trim($page_title);
      }
      else
      {
            return $page_url;
      }
}

?>
Login with Facebook using PHP SDK in CakePHP
Here we used PHP SDK 3.0 and CakePHP 2.X for the process of authentication and authorizing users for your app.
For Creating an App, which you can obtain from the App Dashboard.
You need App Id and App Secret for integration of the facebook login in cakephp.
In this CakePHP module we included the Facebook PHP SDK 3.0 in vendors of the app directory.And we define Some variables in Core.php
And We create one file which is facebook.php in config folder for the define of AppId and Appsecret.
$config=array('Facebook'=>array('appId'=>'YOUR APP ID','secret'=>'YOUR APP SECRET',));
We create one Controller which is FacebookCpsController.php
<?phpApp::uses('Controller','Controller');App::import('Vendor','Facebook',array('file'=>'Facebook'.DS.'facebook.php'));classFacebookCpsControllerextendsAppController {public$name='FacebookCps';public$uses=array();publicfunctionindex(){$this->layout=false;}functionlogin(){Configure::load('facebook');$appId=Configure::read('Facebook.appId');$app_secret=Configure::read('Facebook.secret');=newFacebook(array('appId'=>$appId,'secret'=>$app_secret,));$loginUrl=->getLoginUrl(array('scope'=>'email,read_stream, publish_stream, user_birthday, user_location, user_work_history, user_hometown, user_photos','redirect_uri'=> BASE_URL.'facebook_cps/facebook_connect','display'=>'popup'));$this->redirect($loginUrl);}functionfacebook_connect(){Configure::load('facebook');$appId=Configure::read('Facebook.appId');$app_secret=Configure::read('Facebook.secret');=newFacebook(array('appId'=>$appId,'secret'=>$app_secret,));$user=->getUser();if($user){try{$user_profile=->api('/me');$params=array('next'=> BASE_URL.'facebook_cps/facebook_logout');$logout=->getLogoutUrl($params);$this->Session->write('logout',$logout);}catch(FacebookApiException$e){error_log($e);$user= NULL;}}else{$this->Session->setFlash('Sorry.Please try again','default',array('class'=>'msg_req'));$this->redirect(array('action'=>'index'));}}functionfacebook_logout(){$this->Session->delete('User');$this->Session->delete('logout');$this->redirect(array('action'=>'index'));}}?>
Here We create two view files for the FacebookCpsController which are located in app/View/FacebookCps directory.
index.ctp
<!--DOCTYPE html PUBLIC"-//W3C//DTD XHTML 1.0 Transitional//EN""http://www.w3.org/TR/xhtml1/DTD/xhtml1-transitional.dtd"><head><meta http-equiv="Content-Type"content="text/html; charset=utf-8"/><title>Login with Facebook In CakePHP</title><?phpecho$this->Html->script('oauthpopup'); ?><script type="text/javascript">$(document).ready(function(){$('#facebook').click(function(e){$.oauthpopup({path:'facebook_cps/login',width:600,height:300,callback:function(){window.location.reload();}});e.preventDefault();});});</script></head><body><?php$ses_user=$this->Session->read('User');$logout=$this->Session->read('logout');if(!$this->Session->check('User') &&empty($ses_user)) {echo$this->Html->image('facebook.png',array('id'=>'facebook','style'=>'cursor:pointer;float:left;margin-left:550px;'));}else{echo'<img src="https://graph.facebook.com/'.$ses_user['id'] .'/picture" width="30" height="30"/><div>'.$ses_user['name'].'</div>';echo'<a href="'.$logout.'">Logout</a>';}?></body></html>
facebook_connect.ctp
<script type="text/javascript">window.close();</script>
Here I used one jquery plugin oauthpopup.jswhich is used for popup
(this file is located in app/webroot/js directory)
oauthpopup.js
(function (jQuery) {
jQuery.oauthpopup = function (options) {
options.windowName = options.windowName || ‘ConnectWithOAuth’;
options.windowOptions = options.windowOptions || ‘location=0,status=0,width=’+options.width+’,height=’+options.height+’,scrollbars=1′;
options.callback = options.callback || function () {
window.location.reload();
};
var that = this;
that._oauthWindow = window.open(options.path, options.windowName, options.windowOptions);
that._oauthInterval = window.setInterval(function () {
if (that._oauthWindow.closed) {
window.clearInterval(that._oauthInterval);
options.callback();
}
}, 1000);
};
})(jQuery);
In the PHP SDK 3.0,we change the facebook.php file.For the Session We uses the CakePHP core data source which is CakeSession. facebook.php file is located at app/Vendor/Facebook directory
facebook.php
//included this line the above classApp::uses('CakeSession','Model/Datasource');publicfunction__construct($config) {if(!session_id()) {//insted of session_start() we used CakeSession::start()CakeSession::start();}parent::__construct($config);if(!empty($config['sharedSession'])) {$this->initSharedSession();}}
Protect Your WordPress Site!
How Vulnerable Is WordPress to Hackers?
WordPress makes managing, updating and changing your blog incredibly simple – and that’s only one reason why millions of people are using it today. Due to this popularity, the platform was recently put under attack by hackers using a “botnet” strategy to take down numerous sites. This botnet attack was a large scale DDOS (direct denial of service) attack that crippled thousands of sites and put their data at risk.
Before you panic and switch your blog management software, there are a few things you need to know first. The good news is—you don’t need to stop using WordPress—you just need to be a little smarter when it comes to using it.
Why Is WordPress Vulnerable?
WordPress is easily one of the most popular blog management tools in existence and that means that it’s also a favorite of hackers. It’s unfortunately relatively easy to crack into a WordPress site due to the defaults such as the user name, that the software picks and site owners don’t change. There’s nothing inherently wrong with WordPress however, it’s simply a matter of being aware and taking the appropriate measures to secure your site.
How to Protect Your WordPress Site
Luckily, it’s pretty easy to secure your WordPress site. The first step is to make sure you’re using a more complicated password that includes letters, numbers and characters and that you are changing it often. Instead of using the “admin” default log-in, change your username to something more obscure. You can also take advantage of the “dual stage” log-in that WordPress offers to further secure your data and prevent most brute force or DDOS attacks.
It’s also important to keep your WordPress version updated and lastly, consider installing a security plug-in that will help create yet another layer of defense to keep your data safe.
Personally, I have found that blue-host does an excellent job with word press sites.
For more information please click here
http://www.bluehost.com/track/bluehostusa
WordPress 3.5.2 Security Release
WordPress security team resolved seven security issues, and this release also contains some additional security hardening.
This is the second maintenance release of 3.5, fixing 12 bugs.
Go to your Dashboard » Updates and do it with 1 click.
The security fixes included:
- Blocking server-side request forgery attacks, which could potentially enable an attacker to gain access to a site.
- Disallow contributors from improperly publishing posts, reported by Konstantin Kovshenin, or reassigning the post’s authorship, reported by Luke Bryan.
- An update to the SWFUpload external library to fix cross-site scripting vulnerabilities. Reported by mala and Szymon Gruszecki.
- Prevention of a denial of service attack, affecting sites using password-protected posts.
- An update to an external TinyMCE library to fix a cross-site scripting vulnerability. Reported by Wan Ikram.
- Multiple fixes for cross-site scripting. Reported by Andrea Santese and Rodrigo.
- Avoid disclosing a full file path when a upload fails. Reported by Jakub Galczyk.
Download WordPress 3.5.2 or update now from the Dashboard → Updates menu in your site’s admin area.
DEVELOPERS : If you are testing WordPress 3.6, please note thatWordPress 3.6 Beta 4 (zip) includes fixes for these security issues.Download WordPress 3.6
Facebook introduces video on Instagram
 NEW YORK: Facebook is adding video to its popular photo-sharing app Instagram, following in the heels of Twitter’s growing video-sharing app, Vine.
Instagram co-founder Kevin Systrom said on Thursday that users will be able to record and share 15-second clips by tapping a video icon in the app. They can also apply filters to videos to add contrast, make them black and white or different hues.
“This is the same Instagram we all know and love but it moves,” he said at an event held at Facebook’s Menlo Park, California, headquarters.
Vine, which launched in January, has 13 million users and lets people create and share 6-second video clips. Instagram has 100 million users, up from 20 million when Facebook bought the company more than a year ago. If users like it, Facebook’s move could propel mobile video sharing into the mainstream.
To use the video feature, Instagram users can tap on the same camera icon they use to snap photos. A new video camera icon will appear on the right side. Tap it and a screen with a red video button will let you record clips of sunsets, kids running in parks or co-workers staring at their computer screens.
The app will record as long as your finger is on the red button or for 15 seconds, whichever comes first. Not unlike Vine, taking your finger off the button will stop the recording, allowing you to shoot the scene from a different angle or record something else altogether. Once you have 15 seconds of footage, you can play it from the beginning and post it on Instagram to share with others.
Given Vine’s popularity, “it is perhaps more surprising that Facebook has not introduced video for Instagram sooner. There is no doubt Twitter will move quickly to up the ante on Vine and this could undercut Facebook’s efforts with video on Instagram,” said Eden Zoller, principal consumer analyst at Ovum, a technology research firm.
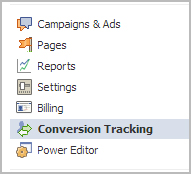
Step-by-Step guide to Facebook Conversion Tracking
Step 1: Once you log in to your ‘Ads Manager’ tab, click on the Conversion Tracking button on the left side bar.
Step 2: Then click on the ‘Create Conversion Pixel’ tab to begin the process.

Step 3: You will be directed to this pop-up, which will ask you for a:
1. Name: An appropriate name will help you remember what you are tracking. (Example: Lead Generation – GATE Ad)
2. Category: This will help you decide the type of action that you want to track on your site. You can choose from the following:
1. Checkouts
2. Registrations
3. Leads
4. Key Page Views
5. Adds to Cart
6. Other Website Conversions
(For the purpose of this example, we have selected ‘Leads’).

Step 4: You will be able to see a pop-up window with a JavaScript code. This is the code that you will have to add to the page where the conversion will happen. This will let you track the conversions back to ads which you are running on Facebook.

The code should be placed on the page that a user will finally see when the transaction is complete.
Here is the tricky part. The code should not go on all pages. For that matter, it should not even go to the landing page of your product. The code should be placed on the page that a user will finally see when the transaction is complete.
For Example: If you want to track when students register for your GATE coaching, paste the code on the registration confirmation page/thank you page and not on the form that they need to submit.
How do you confirm that your conversion is working properly?
1. Check that the javascript snippet has been placed on the correct conversion page. Visit the page where the pixel has been embedded, right click and go to ‘View Page Source’ to find the pixel. The code should have the tag of the HTML. See image below.
2. Check that Facebook is receiving the conversion events from your website. Go to the conversion tracking tab in your Ads Manager account. There you will see a list of the conversion tracking pixels that you have created. If the conversion tracking pixel has been successfully implemented and a conversion event has been recorded, it will be reflected in the Pixel Status column. If the status shows active, it means that the page which contains the pixel has been viewed by users. If it shows inactive, it means that over the last 24 hours, the page with the pixel has not been viewed.

3.Later, when you create your Facebook ad , you need to check the track conversions box under the campaign, pricing and schedule tab to enable tracking.

How to create Facebook Ads in 8 Steps
Like Facebook says it, “Over 1 billion people. We’ll help you reach the right ones.”
The ultimate goal for any marketer/business owner is to convert his leads into customers. However, for leads to convert, you need to get hold of them first, right? Running ads on social media biggie, Facebook is a time tested approach to grab attention and get more leads for your business.
There are multiple ways to run ads/promoted posts on Facebook. Today, I will discuss how to create Facebook ads in 8 simple steps. Let us take the example of a GATE coaching institute trying to capture student leads through Facebook. For those of you who don’t know, GATE stands for Graduate Aptitude Test in Engineering, and is an all India examination for Engineering in MSc, MTech and PhD programmes. (This article is relevant for Facebook beginners).
Here is how to create Facebook ads
Step 1 – Logging into Facebook
Log into your Facebook account using your personal or business profile and go to the ‘Advertise’ page. You will get this in the drop down menu next to the settings button on your home page.

Step 2 – Start Creating Your Ad
You will be led to this page as shown below. Click on the “Create an Ad” tab to begin the process of creating an ad for Facebook.

Step 3 – Select Facebook Page/Landing Page to Promote
The words, ‘What do you want to advertise?’ in the next section are pretty much comprehensible. This is where you choose the place, page, app or event that you would like to promote. For example: Here we are advertising a page which is dedicated toward GATE coaching.You can also add your own URL or landing page. Check out how you can create a Facebook Landing Page for lead capture.

Step 4 – Set the Ad Objective
Your next step is named, ‘What would you like to do?’ Here you can choose to:
- Get more page likes: Drive more Facebook users to your ad/page.
- Promote page posts: Promote a particular post out of all the posts that you have made on your page, ex. a blog post, picture etc. This will not only enhance your reach, but also your chances to be placed in news feeds – the center column of your home page.
- See advanced options: Drive traffic to your website. You can configure your advanced creative and pricing options. This is so intricate that you can also bid for the number of clicks on a particular post. (Remember, each category is different and offers different features to help you target your audience better.)
Since our main goal here is to collect leads and get better control over our ads, we will opt for the ‘See Advanced Options’.

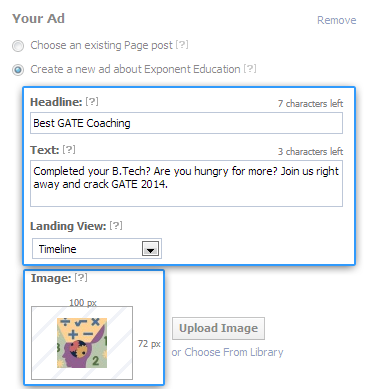
Step 5 – Create the Ad copy
You begin designing ‘Your ad’ here. FB ads are simple, comprising 25 character headline and a 90 character description. You can also add a thumbnail photograph measuring 100 pixels x 72 pixels here. Make sure to keep it very relevant for your audience. For instance, if you are a GATE institute, this would be a good ad copy:
Looking for Best Coaching for GATE? Join Now – 1 Week Free Trial Period!
You can then set the landing page of the ad. For instance, you can choose to land the visitors on your Facebook Page’s timeline, or a lead capture page (when you are aiming at lead capture, it is recommended that you set a landing page, instead of directing people to the timeline). Here’s how you can create one and the image on your right shows how your ad will look.
*Do go through these guidelines before you create your ad copy.*
Step 6 – Choose your Audience
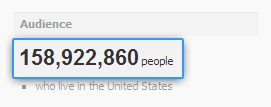
Next, you narrow down your target audience under the ‘Choose your audience’ category. Before we begin, in the image shown below, see the number of people under ‘Audience’ section before the filters have been set.
This is the most important step, as this is where you choose your perfect target.
- Location: You can micro target by location (state/city/zip code). Ex: Students on Facebook giving GATE ‘14 exams will be India specific only. If you are a physical institute based in Bangalore, you might want to choose by city: Bangalore, Nelamangala, Hosur etc.
- Age: You can also target by age. Ex: GATE will mostly include students who have completed/ pursuing their B.Tech – 22-24 years.
- Gender: You can also choose gender, based on the kind of ad you are advertising. Here, since we are talking about exam specific ads, gender will be categorized as ‘All’.
- Precise Interests: Under the ‘Precise Interests’ section, you can choose interests that you are looking for in your target audience. In this case, your interests can be Engineering, IIT, studies etc. Once you have entered precise interest, you don’t have to choose the broader interest.

If you have opted for the ‘Advanced options’ under the ad category, you can also detail down to relationship status, languages spoken, college attended and workplace. By the process of trial and error, you can boil down your audience from a whopping 167 million users in the US to as few as 1 lakh people in India or a particular city.
Now, take a look at the image shown below which shows the targeted audience once the filters have been set.

Step 7 – Campaign Pricing and Schedule Options
This step is ‘Campaign, Pricing and Schedule’ for your Facebook ad.
- Choose the currency, country and time zone in which you are placing your ad.
- The ‘New Campaign Name’ should be distinct and definite.
- Next, choose how much you are willing to spend for your ad campaign. You can choose from a daily budget or a lump sum amount that you will spend for as long as the ad runs. (Payments on Facebook are either pay-per-click – you pay every time someone clicks your ad or per thousand impressions – you pay every time 1000 people see your ad.) We have opted for the Pay-per-click payment service.

Step 8 – Review your Ad
Once you ‘Review your ad’, you will be able to see the details of your ads that you have fed and how your ad will look. Next, you will be prompted to make payments for your ad. You can use a credit/debit card, PayPal or Facebook ad coupon.

Facebook will hold your ad for review for a minimum of 24 hours. Your ad will either appear in news feeds or in the right column of any page in search results.Later, you can use the ‘Ads Manager tool’ to keep track of your ads’ progress.
So, this is how to create a Facebook ad: Basic News-feed ad. Be creative, think outside the box and you are good to go. For further queries, please do visit Facebook’s Help Centre or leave us a comment and we will get back to you ASAP.
12 Rules For a Happy Marriage

1. Never be angry at the same time as your spouse.
2. Never yell at each other unless the house is on fire.
3. Yield to the wishes of the other as an exercise in self-discipline if you can’t think of a
better reason.
4. If you have a choice between making your self or your mate look good – choose your
mate.
5. If you feel you must criticize, do so lovingly.
6. Never bring up a mistake of the past.
7. Neglect the whole world rather than each other.
8. Never let the day end without saying at least one complimentary thing to your partner.
9. Never meet without an affectionate welcome.
10. Never go to bed mad.
11. When you made a mistake, talk it out and ask for forgiveness.
12. Remember, it takes two to make an argument. The one who is wrong is the one who will
be doing most of the talking.
My Photo

PHP Innovation Award Winner of 2012

The PHP Programming Innovation Award Winner of 2012 was announced. An interview with the winner, Karl Holz from Canada, was one of the main topics of the episode 33 of the Lately in PHP podcast conducted by Manuel Lemos and Ernani Joppert.
They also discussed the usual batch of PHP topics of interest like Zend Optimizer+ source code that was released, the PHP 5.5 feature freeze and roadmap, as well an article that compares PHP to an Hobbit, as well other languages to Lord Of The Rings story characters.
Listen to the podcast, or watch the podcast video, or read the transcript to learn about these and other interesting PHP topics.
Viswaroopam Review on Net
Viswaroopam


 . Omar who was in the control room asked Farouk to capture Viswa photo and traced his email and when

WordPress Tips and Tricks
I have some Wp tips and tricks
- When you do a return in a post or page, you always get a double space. If you want it single, simply press on your keyboard.
- Creating a powerful password for your admin login is the first step in making your site more secure. The second is to change that password monthly.
- To get your readers to click through to your full post, stop it at exactly the spot where they will be most curious to read the next sentence. Every post has such a spot (or it should). To take advantage, stop the post there and insert the “read more” tag.
- If you have unused plugins or themes installed, and have not activated, delete them. This greatly beefs up site security.
- If you are looking for a WordPress developer to create your site, your first question should be: “Do you know php?” If they claim to be a developer (not a designer), but their answer is no, run!
- Don’t use a widget because it’s cool and shiny. Use it because it is useful to your reader.
- Whether it’s your WordPress blog or website, make sure that people are able to contact you. Don’t hide your contact info in size two font in the footer of the page. Make a separate, highly visible contact page.
- Remember, it’s WordPress. Capital W, capital P, no space between. If you land on a site and they call themselves a WordPress expert, but spell the name wrong, beware.
- When inserting a photo into your post or page, don’t forget the alt (alternate) tag. This is what Google looks for when it’s indexing images on the web and the big G doesn’t like a site with alt tags missing.
- If you have chosen to block search engines in your privacy setting during the construction of your blog or website, remember to turn it back on when you go live. Because that little sucker blocks them good.
- Keeping your plugins up-to-date is just as important as keeping your WordPress version up-to-date.
- Do you want to change your homepage to a static page rather than your blog? Can’t figure out what to do? Create a page for your homepage and one for your blog. Then go to settings >reading and change the settings on the “front page displays.”
- If you are self-hosted, back up your database and all your files regularly. Hear that? Back up, back up!
- Think about the theme you choose for your blog or website. Does it meet all your needs? Does it allow your site to grow as your business grows? Because if you decide to switch themes down the road, chances are it’s not a simple one-click process.
- If you fly off the handle or rant in a blog post, remember, the moment you hit that publish button, it appears on the web and to your RSS subscribers. If you are angry when you write a post, it’s always best to save it as a draft and revisit it later for one last look.
- Use a photo to provoke emotions in your blog post. Not only will you attract more readers, but they will remember your content longer.
- If you have only one row of tools when you are creating a page or post, simply click on the far right button, “show kitchen sink,” and you will get a whole second row of tools.
- If you are still using the default “admin” for your user name, it’s time to get rid of it. Create a new one, then delete the old one, assigning all posts and pages to your new user name. Otherwise you are giving hackers 50% of your login info.
- If you cannot find an option on your edit post or page window, check the tab “screen options” in the upper right corner. That feature may be hidden.
- To expand your editor window, grab the lower right, ridged corner and drag it.
- Be careful when you underline text. Readers still have a habit of thinking any underlined text is a link.
- Remember to turn off your comments on static pages. No one wants to comment on your about or contact page.
- Remove or replace the default blog tagline under your general settings. Otherwise, people will see that generic message that says, “Just Another WordPress Site.”
- And lastly, don’t be taken in by over-promises. Like most worthwhile things, WordPress has a learning curve.
Export html to ms excel file in php
In this article,I will explain how to export html to excel(.xls) file. we are going to export an HTML table (or any html data) to a MS Excel document as it is displayed on the HTML page.
it is very easy to export HTML data to excel in PHP. Lets see Below code
<!–?php
if(isset($_POST[‘excel’]) && $_POST[‘excel’])
{
# Download Excel (.xls) File…
header(‘Content-Type: application/force-download’);
header(‘Content-disposition: attachment; filename=ExportHtmlToExcel.xls’);
header(“Pragma: “);
header(“Cache-Control: “);
echo $_POST[‘excel’];
exit();
}
?>
<html>
<head>
<script>
function getHtmlData()
{
$(“#excel”).val(‘<table border=”1″>’+$(“#info”).clone().html()+'</table>’);
return true;
}
</script>
</head>
<title>Export HTML to Excel in PHP</title>
// <![CDATA[
src=’http://ajax.googleapis.com/ajax/libs/jquery/1.4.2/jquery.min.js’>
// ]]>
</head>
<body>
<form method=”post” onSubmit=”javascript:return getHtmlData()”>
<table border=”1″ id=”info”>
<tr>
<th>First Name : </th>
</tr>
<tr>
Test First Name
<td>Test Last Name</td>
</tr>
</table>
<input type=”hidden” id=”excel” name=”excel” value=””>
<br><br>
<input type=”submit” value=”Export HTML to Excel”>
</form>
</body>
</html>
PHP Image and Audio Upload Function
Function in PHP to upload an image and audio to the MYSQL database and move the uploaded file:
//fileUpload(“location of file”,”table”,”file_name_in_table”,”condition1″,”condition2″,”file type”)
function fileUpload($location,$table,$name,$condition1,$condition2,$T)
{
//image upload
if($T == “I”) :
$new_name = time(). “-”. $_FILES["image"]["name"] ;
$target = $location. $new_name ;

if ((($_FILES["image"]["type"] == “image/gif”) ||
($_FILES["image"]["type"] == “image/png”) ||
($_FILES["image"]["type"] == “image/jpeg”) ||
($_FILES["image"]["type"] == “image/pjpeg”)))
{ $err = 0; }

else { $err = 2; $_SESSION['errorMessage'] = “Invalid file format!!”; }

if (file_exists($target)) { $err = 1; $_SESSION['errorMessage'] =
 “Filename already exists!!”; }

if($err!= 1 && $err!=2) {
move_uploaded_file($_FILES["image"]["tmp_name"], $target);
mysql_query(“UPDATE $table SET $name = ‘$new_name’ WHERE
$condition1=’$condition2′ “) or die(‘Upload error’.mysql_error());
$_SESSION['addMessage'] = “Action succesfully!!”;
}

endif;

//audio upload
if($T== “A”) :

$new_name = time(). “-”. $_FILES["audio"]["name"] ;
$target = $location. $new_name ;

if ((($_FILES["audio"]["type"] == “image/gif”) ||
($_FILES["audio"]["type"] == “image/png”) ||
 ($_FILES["audio"]["type"] == “image/jpeg”) ||
($_FILES["audio"]["type"] == “image/pjpeg”)))
{ $err = 0; }

else { $err = 2; $_SESSION['errorMessage'] = “Invalid file format!!”; }

if (file_exists($target)) { $err = 1;
$_SESSION['errorMessage'] = “Filename already exists!!”; }

if($err!= 1 && $err!=2) {
move_uploaded_file($_FILES["audio"]["tmp_name"], $target);
mysql_query(“UPDATE $table SET $name = ‘$new_name’
WHERE $condition1=’$condition2′ “) or die(‘Upload error’.mysql_error());
}

endif;

}
Subscribe Via Email

Agaram Foundation

29,Vijay Enclave Krishna Street,
T.Nagar, Chennai - 600 017
Tamil Nadu, India.
Telephone : +91 44 4350 6361
Mobile : +91 98418 91000
Email : info@agaram.in
Site Info

![]()
 SELVABALAJI NEWS
- An error has occurred; the feed is probably down. Try again later.
Vistor Location
Unknown Feed
- An error has occurred; the feed is probably down. Try again later.
Unknown Feed
- An error has occurred; the feed is probably down. Try again later.
Unknown Feed
- An error has occurred; the feed is probably down. Try again later.
LeadSquared
- Into the Unknown: Embracing a Bold, Student-First Strategy for Enrollment Success
- Top 10 Sales Gamification Tools For 2024
- Top 9 CRMNext Alternatives in 2024
- Closing the Deal: 6 Surefire Strategies to Exceed Your Sales Targets
- Sales Automation 101:Unclog your Sales Pipeline
- KRA of Sales Manager and How to Track Performance
- Top 10 Healthcare CRM in the United States
- Why Do 70% of Online Inquiries Drop Off?
- Top 6 Paramantra Alternatives for Real-Estate Businesses in 2024
- Top 10 Spotio Alternatives for Field Reps
singershalini
- Untitled
- Pop Shalini Verified #Spotify Artist Playlist
- Pop Shalini's Interesting reads #Murakami
- Pop Shalini performs for Harris Jeyraj's concert with Benny Dayal and Haricharan
- Pop Shalini sings Vandhe Mataram
- Pop Shalini Sings her famous song Mudhal Naal Indru - Unaale Unaale
- Pop Shalini wishes Superstar RajiniKanth on the Dada Saheb Phalke Award
- A song for a Rainy day from my first album #Shalini - Chinna Chinna Mazhai thooral
- ipopshalini Verified Artiste sings Ranjha from Shershaah
- Chennai Floods
Flickr Photos


Advertsiment


Recent Comments