Archive
WordPress 3.5.2 Security Release
WordPress security team resolved seven security issues, and this release also contains some additional security hardening.
This is the second maintenance release of 3.5, fixing 12 bugs.
Go to your Dashboard » Updates and do it with 1 click.
The security fixes included:
- Blocking server-side request forgery attacks, which could potentially enable an attacker to gain access to a site.
- Disallow contributors from improperly publishing posts, reported by Konstantin Kovshenin, or reassigning the post’s authorship, reported by Luke Bryan.
- An update to the SWFUpload external library to fix cross-site scripting vulnerabilities. Reported by mala and Szymon Gruszecki.
- Prevention of a denial of service attack, affecting sites using password-protected posts.
- An update to an external TinyMCE library to fix a cross-site scripting vulnerability. Reported by Wan Ikram.
- Multiple fixes for cross-site scripting. Reported by Andrea Santese and Rodrigo.
- Avoid disclosing a full file path when a upload fails. Reported by Jakub Galczyk.
Download WordPress 3.5.2 or update now from the Dashboard → Updates menu in your site’s admin area.
DEVELOPERS : If you are testing WordPress 3.6, please note thatWordPress 3.6 Beta 4 (zip) includes fixes for these security issues.Download WordPress 3.6
Step-by-Step guide to Facebook Conversion Tracking
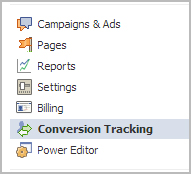
Step 1: Once you log in to your ‘Ads Manager’ tab, click on the Conversion Tracking button on the left side bar.
Step 2: Then click on the ‘Create Conversion Pixel’ tab to begin the process.

Step 3: You will be directed to this pop-up, which will ask you for a:
1. Name: An appropriate name will help you remember what you are tracking. (Example: Lead Generation – GATE Ad)
2. Category: This will help you decide the type of action that you want to track on your site. You can choose from the following:
1. Checkouts
2. Registrations
3. Leads
4. Key Page Views
5. Adds to Cart
6. Other Website Conversions
(For the purpose of this example, we have selected ‘Leads’).

Step 4: You will be able to see a pop-up window with a JavaScript code. This is the code that you will have to add to the page where the conversion will happen. This will let you track the conversions back to ads which you are running on Facebook.

The code should be placed on the page that a user will finally see when the transaction is complete.
Here is the tricky part. The code should not go on all pages. For that matter, it should not even go to the landing page of your product. The code should be placed on the page that a user will finally see when the transaction is complete.
For Example: If you want to track when students register for your GATE coaching, paste the code on the registration confirmation page/thank you page and not on the form that they need to submit.
How do you confirm that your conversion is working properly?
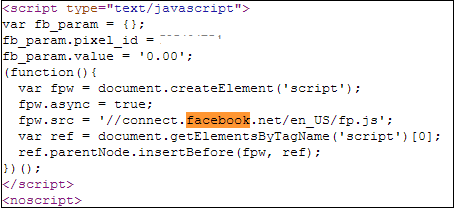
1. Check that the javascript snippet has been placed on the correct conversion page. Visit the page where the pixel has been embedded, right click and go to ‘View Page Source’ to find the pixel. The code should have the tag of the HTML. See image below.
2. Check that Facebook is receiving the conversion events from your website. Go to the conversion tracking tab in your Ads Manager account. There you will see a list of the conversion tracking pixels that you have created. If the conversion tracking pixel has been successfully implemented and a conversion event has been recorded, it will be reflected in the Pixel Status column. If the status shows active, it means that the page which contains the pixel has been viewed by users. If it shows inactive, it means that over the last 24 hours, the page with the pixel has not been viewed.

3.Later, when you create your Facebook ad , you need to check the track conversions box under the campaign, pricing and schedule tab to enable tracking.

How to create Facebook Ads in 8 Steps
Like Facebook says it, “Over 1 billion people. We’ll help you reach the right ones.”
The ultimate goal for any marketer/business owner is to convert his leads into customers. However, for leads to convert, you need to get hold of them first, right? Running ads on social media biggie, Facebook is a time tested approach to grab attention and get more leads for your business.
There are multiple ways to run ads/promoted posts on Facebook. Today, I will discuss how to create Facebook ads in 8 simple steps. Let us take the example of a GATE coaching institute trying to capture student leads through Facebook. For those of you who don’t know, GATE stands for Graduate Aptitude Test in Engineering, and is an all India examination for Engineering in MSc, MTech and PhD programmes. (This article is relevant for Facebook beginners).
Here is how to create Facebook ads
Step 1 – Logging into Facebook
Log into your Facebook account using your personal or business profile and go to the ‘Advertise’ page. You will get this in the drop down menu next to the settings button on your home page.

Step 2 – Start Creating Your Ad
You will be led to this page as shown below. Click on the “Create an Ad” tab to begin the process of creating an ad for Facebook.

Step 3 – Select Facebook Page/Landing Page to Promote
The words, ‘What do you want to advertise?’ in the next section are pretty much comprehensible. This is where you choose the place, page, app or event that you would like to promote. For example: Here we are advertising a page which is dedicated toward GATE coaching.You can also add your own URL or landing page. Check out how you can create a Facebook Landing Page for lead capture.

Step 4 – Set the Ad Objective
Your next step is named, ‘What would you like to do?’ Here you can choose to:
- Get more page likes: Drive more Facebook users to your ad/page.
- Promote page posts: Promote a particular post out of all the posts that you have made on your page, ex. a blog post, picture etc. This will not only enhance your reach, but also your chances to be placed in news feeds – the center column of your home page.
- See advanced options: Drive traffic to your website. You can configure your advanced creative and pricing options. This is so intricate that you can also bid for the number of clicks on a particular post. (Remember, each category is different and offers different features to help you target your audience better.)
Since our main goal here is to collect leads and get better control over our ads, we will opt for the ‘See Advanced Options’.

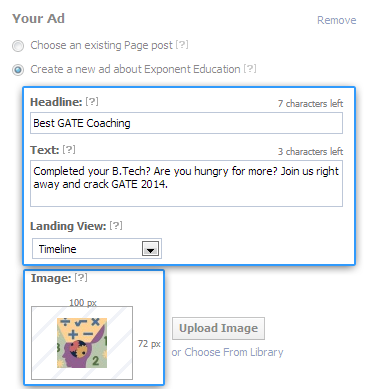
Step 5 – Create the Ad copy
You begin designing ‘Your ad’ here. FB ads are simple, comprising 25 character headline and a 90 character description. You can also add a thumbnail photograph measuring 100 pixels x 72 pixels here. Make sure to keep it very relevant for your audience. For instance, if you are a GATE institute, this would be a good ad copy:
Looking for Best Coaching for GATE? Join Now – 1 Week Free Trial Period!
You can then set the landing page of the ad. For instance, you can choose to land the visitors on your Facebook Page’s timeline, or a lead capture page (when you are aiming at lead capture, it is recommended that you set a landing page, instead of directing people to the timeline). Here’s how you can create one and the image on your right shows how your ad will look.
*Do go through these guidelines before you create your ad copy.*
Step 6 – Choose your Audience
Next, you narrow down your target audience under the ‘Choose your audience’ category. Before we begin, in the image shown below, see the number of people under ‘Audience’ section before the filters have been set.
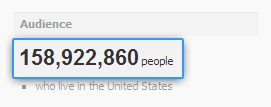
This is the most important step, as this is where you choose your perfect target.
- Location: You can micro target by location (state/city/zip code). Ex: Students on Facebook giving GATE ‘14 exams will be India specific only. If you are a physical institute based in Bangalore, you might want to choose by city: Bangalore, Nelamangala, Hosur etc.
- Age: You can also target by age. Ex: GATE will mostly include students who have completed/ pursuing their B.Tech – 22-24 years.
- Gender: You can also choose gender, based on the kind of ad you are advertising. Here, since we are talking about exam specific ads, gender will be categorized as ‘All’.
- Precise Interests: Under the ‘Precise Interests’ section, you can choose interests that you are looking for in your target audience. In this case, your interests can be Engineering, IIT, studies etc. Once you have entered precise interest, you don’t have to choose the broader interest.

If you have opted for the ‘Advanced options’ under the ad category, you can also detail down to relationship status, languages spoken, college attended and workplace. By the process of trial and error, you can boil down your audience from a whopping 167 million users in the US to as few as 1 lakh people in India or a particular city.
Now, take a look at the image shown below which shows the targeted audience once the filters have been set.

Step 7 – Campaign Pricing and Schedule Options
This step is ‘Campaign, Pricing and Schedule’ for your Facebook ad.
- Choose the currency, country and time zone in which you are placing your ad.
- The ‘New Campaign Name’ should be distinct and definite.
- Next, choose how much you are willing to spend for your ad campaign. You can choose from a daily budget or a lump sum amount that you will spend for as long as the ad runs. (Payments on Facebook are either pay-per-click – you pay every time someone clicks your ad or per thousand impressions – you pay every time 1000 people see your ad.) We have opted for the Pay-per-click payment service.

Step 8 – Review your Ad
Once you ‘Review your ad’, you will be able to see the details of your ads that you have fed and how your ad will look. Next, you will be prompted to make payments for your ad. You can use a credit/debit card, PayPal or Facebook ad coupon.

Facebook will hold your ad for review for a minimum of 24 hours. Your ad will either appear in news feeds or in the right column of any page in search results.Later, you can use the ‘Ads Manager tool’ to keep track of your ads’ progress.
So, this is how to create a Facebook ad: Basic News-feed ad. Be creative, think outside the box and you are good to go. For further queries, please do visit Facebook’s Help Centre or leave us a comment and we will get back to you ASAP.
PHP Innovation Award Winner of 2012

The PHP Programming Innovation Award Winner of 2012 was announced. An interview with the winner, Karl Holz from Canada, was one of the main topics of the episode 33 of the Lately in PHP podcast conducted by Manuel Lemos and Ernani Joppert.
They also discussed the usual batch of PHP topics of interest like Zend Optimizer+ source code that was released, the PHP 5.5 feature freeze and roadmap, as well an article that compares PHP to an Hobbit, as well other languages to Lord Of The Rings story characters.
Listen to the podcast, or watch the podcast video, or read the transcript to learn about these and other interesting PHP topics.
PHP Image and Audio Upload Function
Function in PHP to upload an image and audio to the MYSQL database and move the uploaded file:
//fileUpload(“location of file”,”table”,”file_name_in_table”,”condition1″,”condition2″,”file type”)
function fileUpload($location,$table,$name,$condition1,$condition2,$T)
{
//image upload
if($T == “I”) :
$new_name = time(). “-”. $_FILES["image"]["name"] ;
$target = $location. $new_name ;

if ((($_FILES["image"]["type"] == “image/gif”) ||
($_FILES["image"]["type"] == “image/png”) ||
($_FILES["image"]["type"] == “image/jpeg”) ||
($_FILES["image"]["type"] == “image/pjpeg”)))
{ $err = 0; }

else { $err = 2; $_SESSION['errorMessage'] = “Invalid file format!!”; }

if (file_exists($target)) { $err = 1; $_SESSION['errorMessage'] =
 “Filename already exists!!”; }

if($err!= 1 && $err!=2) {
move_uploaded_file($_FILES["image"]["tmp_name"], $target);
mysql_query(“UPDATE $table SET $name = ‘$new_name’ WHERE
$condition1=’$condition2′ “) or die(‘Upload error’.mysql_error());
$_SESSION['addMessage'] = “Action succesfully!!”;
}

endif;

//audio upload
if($T== “A”) :

$new_name = time(). “-”. $_FILES["audio"]["name"] ;
$target = $location. $new_name ;

if ((($_FILES["audio"]["type"] == “image/gif”) ||
($_FILES["audio"]["type"] == “image/png”) ||
 ($_FILES["audio"]["type"] == “image/jpeg”) ||
($_FILES["audio"]["type"] == “image/pjpeg”)))
{ $err = 0; }

else { $err = 2; $_SESSION['errorMessage'] = “Invalid file format!!”; }

if (file_exists($target)) { $err = 1;
$_SESSION['errorMessage'] = “Filename already exists!!”; }

if($err!= 1 && $err!=2) {
move_uploaded_file($_FILES["audio"]["tmp_name"], $target);
mysql_query(“UPDATE $table SET $name = ‘$new_name’
WHERE $condition1=’$condition2′ “) or die(‘Upload error’.mysql_error());
}

endif;

}
Today – WordPress New Version 3.5 Released
On December 11, 2012, WordPress Version 3.5, named for jazz drummer Elvin Jones, was released to the public. For more information on this enhancement and bug-fix release, read the WordPress Blog, and see the Changelog for 3.5.
Highlights
- New Media Manager
- Beautiful interface: A streamlined, all-new experience
- Create galleries faster with drag-and-drop reordering, inline caption editing, and simplified controls
- Insert multiple images at once with Shift/Ctrl+click
- New Default Theme – Twenty Twelve
- Simple, flexible, elegant
- Mobile-first, responsive design
- Gorgeous Open Sans typeface
- Uses the latest Theme Features
- Admin Enhancements
- New Welcome Screen
- Retina-Ready (HiDPI) Admin
- Hide Link Manager for new installs
- Better accessibility for screenreaders, touch devices, and keyboard users
- More polish on admin screens, including a new color picker
- For Developers
- WP_Comment_Query and WP_User_Query accept now meta queries just like WP_Query
- Meta queries now support querying for objects without a particular meta key
- Post objects are now instances of a WP_Post class, which improves performance and caching
- Multisite’s switch_to_blog() is now significantly faster and more reliable
- WordPress has added the Underscore and Backbone JavaScript libraries
- TinyMCE, jQuery, jQuery UI, and SimplePie have all been updated to the latest versions
- Image Editing API for cropping, scaling, etc., that uses ImageMagick as well as GD
- XML-RPC: Now always enabled and supports fetching users, managing post revisions, searching
- New “show_admin_column” parameter for register_taxonomy() allows automatic creation of taxonomy columns on associated post-types.
What’s New
Dashboard
- Switch to prompt text in QuickPress to accommodate longer translated input labels
- Button styles updated throughout Dashboard to more modern, rectangular shape
- Help Text improvements throughout
Posts
- Rename the “HTML” editor tab to “Text”
- Prevent child categories from being visually promoted to the top level after Quick Edit
Media
- Add oEmbed suport for SoundCloud.com, SlideShare.net, and Instagram.com
- New Media Manager: Insert multiple galleries per post and independently order images
Accessibility
- Add visible focus within admin screens for better accessibility.
- Add “Skip to content” link to all screens in the admin.
- Add “Skip to toolbar” accessibility shortcut in the admin.
- Add ability to log out of user account without mouse input.
- Add “tab out” of the plugins and themes editors textareas.
Links
- Link Manager is hidden for new installs and for any existing installs that have no links (all sites with existing links are left as is). This can be restored with Link Manager Plugin
- Display links in widget if no link categories
Appearance
- Widgets menu is hidden if your theme hasn’t defined any sidebars
- Improve display of available custom headers with jQuery Masonry
Plugins
- Plugins favorited on WordPress.org can be viewed per user and directly installed from within the Dashboard. (Marking plugins as favorite on WordPress.Org)
Users
- Display name defaults to first name and last name for new users
- Force the user to explicitly choose between content deletion and reassignment when deleting users
Settings
- Remove Settings Privacy Screen and relocate Search Engine Visibility option to Settings Reading Screen
- Remove oEmbed options from the Settings Media Screen. Width adheres to theme’s content width, height is 1.5 times width
- Enable XML-RPC by default, remove Writing Settings option
- Remove AtomPub from core, can be re-enabled with a plugin
- Hide charset option in Settings Reading Screen in new installs, default to UTF-8
Multisite
- Multisite installs now work with WordPress in a subdirectory
- Turn off ms-files.php by default
- File quotas disabled by default on new installs
Related articles
- WordPress 3.5 at the Horizon (wpzoom.com)
- 15 Useful, Little-Known WordPress Plugins to Add to Your Collection | RYP Marketing (rypmarketing.com)
- 10 Things You Need to Know About WordPress 3.5 (technosailor.com)
- WordPress 3.5 “Elvin” Released (wordpress.org)
- WordPress 3.5 brings new photo flow, mobile-first default theme, and Retina support (thenextweb.com)
- WordPress Reaches 3.5, Rides The Coltrane (thepowerbase.com)
- WordPress 3.5 Released (sucuri.net)
- WordPress 3.5 “Elvin” Launches With A Completely New Media Manager, Retina Support, Responsive Default Theme (techcrunch.com)
- WordPress releases latest WP version [WordPress 5.0] – [WordPress News] (bloggingmatters.net)
Today RAJINI’S BIRTHDAY 12-12-12

English: Rajinikanth at the audio release of Enthiran (Photo credit: Wikipedia)
Superstar Rajinikanth celebrates his 60th birthday today and he will be spending the day with his family. Rajini’s birthday is no less than a festival for his fans the world over.
It is reported that his family and close friends have organized a Shashitabadapoorthi puja (60th birthday celebrations) at the famous Tirukkadiyur temple near Tiruchi. However, it should come to no one’s surprise that Rajini’s fans will be lining up for special poojas and welfare activities for their favourite idol.
Shivaji Rao Gaekwad was on December 12, 1949 and had very humble beginnings. He served as a ticket collector in a local shuttle bus in Bangalore when he was discovered by the legendary K. Balachander who renamed him Rajinikanth.
The year has been exceptional for Rajini. Breaking all box office records Endhiran has emerged as the biggest hit ever. There have also been two new additions to his family. Daughter Aishwarya Rajinikanth, who is married to actor Dhanush gave birth to a baby boy and his other daughter Soundarya Rajinikanth got married to industrialist Ashwin Kumar.
selvabalaji.wordpress.com wishes Rajinikanth a very happy birthday!
Related articles
- SUPERSTAR RAJINIKANTH – For the Day We Were Waiting 12.12.12 (ktrmurali.wordpress.com)
- Super Star is his First Name: Happy Birthday Rajinikanth (kanaamedia.com)
- ‘Rajinikanth: The Definitive Biography’ released next week (digitalspy.co.uk)
- It was a small role, but people would remember him (thehindu.com)
- Thumbing through the superstar’s life (thehindu.com)
India soon to be the biggest source of PHP developers?

The number of Indian PHP developers has been growing at a large pace in the last few years, when compared to other countries. A few years ago, India was just one of the top ten countries with more PHP developers. Now India is number 2 and is almost surpassing United States, which is still number 1.
While it is difficult to take such broad conclusions seriously based on member statistics of a single community, PHPClasses does have a large user base and can arguably be considered representative. Any article tagged India and software these days attract the usual crap about how Indian developers are the worst and how everybody who outsources to India never does it again. So I was surprised when some of the usually ‘silent’ majority of the client base who continue outsourcing development to India came out to defend their decision.
I did come away with a very interesting statistic; Indian developers have won most awards this year for their contribution against sizable competition. Most Indian developers I meet have difficulty understanding the concept of giving back to the community, so it’s always refreshing to see a number of people doing exactly that.
WP Google Drive Plugin
We are Released New wp google drive plugin to make back of your wordpress site files to google drive.
http://wordpress.org/extend/plugins/wp-google-drive/
Exclusive tutorial on How to Backup your WordPress blog to Google Drive. It is always recommended to backup your WordPress blog, which includes files (themes, plugins etc) and SQL tables (all your blog posts, comments, drafts etc are stored as tables in database).

Whenever your blog is gone (due to unsecured activities or some other reasons), these backups will help to get back your blog. In some cases, using 3rd party plugins and themes can also lead to malfunction of your blog, here also these backups helps to retain back your blog.
Reasons to Backup WordPress Blog to Google Drive
- Its a Google Product and is free to use up-to 5GB.
- Can get access to backups on any of the devices like Smartphones, Tablet PC’s, Laptops etc.
- Backups will be uploaded in quite less time (sometimes based on internet connection also).
- Highly Secure and reliable service, so there wont be any loss of data in the process.
- Backups can be shared with your blog partners (if have any) with a single click of mouse
How to Backup WordPress blog to Google Drive
Download and Install Google Drive for WordPress plugin from official WordPress plugin repository.
Google Drive for WordPress Plugin »
Here is the step-by-step guide that helps to backup your WordPress blog to Google Drive. Brief list of things you have to do in this tutorial:
- Follow this link Google APIs Console and login to your Google Account.


- Follow this link Google APIs Console and login to your Google Account.

- Go to “API Access” tab and click on “Create an OAuth 2.0 client ID”

- In the pop-up window, give a product name and upload logo before clicking on “Next” button.

- By default “Web Application” will be selected and don’t change it.

- In “Your site or hostname” section, click on “More Options” to expand link sections.

- Now, paste the link in the “Backup Settings” page here. Enter domain name in “JavaScripts” origin field.

- Click on “Create Client ID” and you have successfully created a Client ID using Google API Console.

- Copy the Client ID and Client Secret from API dashboard and paste them in “Backup Settings” page.

- You have to authorize the plugin by clicking on “Allow Access” button.

- Allow Access to the Plugin and the entire setup has been successfully installed.
Check Out : WordPress Plugin
How to automatically Backup WordPress blog to Google Drive
- Now, you can configure this plugin further by entering the custom folder ID of your Google Drive.
- Also define the maximum number of backups (use any positive integer in that field).
- Set the frequency of backup and everything will be automatically stored in your Google Drive.


Related articles
- 6 Tips For Hosting WordPress On Rackspace Cloud Sites (rackspace.com)
- 7 WP Plugins For My Content Curation Blog (contentcurationdesktop.com)
- How to Move WordPress Site to New Host: Zero Downtime (shoutmeloud.com)
- WordPress Plugins: The Best of the Best (boldlygoing.com)
Display Contents of Different File Formats Word/Excel/Powerpoint/PDF/RTF as HTML

HTML 4.01 vs HTML 5 illustrated (Photo credit: Glutnix)
This is a typical problem which I also raised on Stack Overflow (http://stackoverflow.com/questions/11061929/php-extract-text-from-different-file-formats-word-excel-powerpoint-pdf-rtf#comment14475398_11061929), but there seemed no single resource around the web to solve this particular problem, so since I have solved it I thought it would make sense to provide an approach and a solution, it can be refined better with time
Problem: We have a web application that allows different users to upload different files to share with others, the file types are limited. However just before downloading a file, the user needs to see a preview of the file contents, which is where it becomes tricky since each file type is different.
Approach:
1. Identify the extension of each file
2. Display the text or HMTL from each file using the appropriate library for the file type, since there is no unified library
The base class is https://gist.github.com/2941076 which requires the path to the file and the extension (since the extension is already stored in the database I do not try to extract it from the file)
The libraries used for the different types of files are the key to the solution:
1. MS Word Documents – LiveDocx Service within Zend Framework (http://www.phplivedocx.org/2009/08/13/convert-docx-doc-rtf-to-html-in-php/) the steps are:
– Create a Mail Merge Document using the word document as a template
– Connect to the LiveDocx service (here you need SOAP and SSL enabled on your local LAMP installation)
– Save the generated document, and render it as HTML
2. MS Excel – PHPExcel from Codeplex so simple its scary (http://phpexcel.codeplex.com)
– Create a PHP Excel class to read the file
– Create an HTML writer to render the HTML
– Save the HTML to a file and read its contents
3. PDF text extract – http://pastebin.com/hRviHKp1
– Create an instance of the PDF2Text class holding a reference to the PDF file
– Decode the PDF which extracts the text out of the file
d) Powerpoint – Work in Progress to be added later
More as I work in the power point extractions
Related articles
- PHP Report (phpclasses.org)
- Creating the Right Content Formats for your Digital Signage System (themarlincompany.com)
- create office files from python (stackoverflow.com)
- goPlimus 06/16/2012 (a.m.) (glossarist.typepad.com)
GOOGLE DRIVE
A few years ago, many storage online appeared on the web. The first one, in 2005, was Box.net, followed in 2008 by Dropbox.net, including the multi-platform synchronization.
In parallel, we also saw huge OS editors, like Apple, Microsoft, … providing their own solution as SkyDrive, iCloud, Ubuntu One.
Today, after so many years of rumors, GOOGLE DRIVE is born. It is presented basically as an upgrade of Google documents, and allows user to get, for free, up to 5Go of online disc space. User can also choose another month to month plan between those proposed: 25 Go for $ 2,49 per month, 100 Go for $4,99 per month, and up to 1To for $49.99 dollars per month.
But what distinguish this plateforme from others?
Google includes a lot of search tools, character recognition system, and a tools able to analyse the photos stored on its servers. More over, when Google Documents proposed to virtualize about 15 files directly on your browser, Google drive will allow you to open more than 30 files,also Illustrator, Photoshop, or HD video, even if you don’t have the adequat softwares on your computer.
Google Drive will also includes a lot of differents tools and useful applications: you will ba ble to synchronize your documents in order to find them really easily on your computer. If you have an Android phone, just download a small application, and all your files will be available on your phone. You will also be able to share photos made with your phone with all your contact through your personal space.
https://developers.google.com/drive/examples/php
https://developers.google.com/drive/
https://developers.google.com/drive/get_started
Related articles
- Comparing Google Drive, SkyDrive, and Dropbox storage (cbsnews.com)
- Google Drive, iCloud, Dropbox and More Compared: What’s the Best Cloud Option? [Google Drive] (gizmodo.com)
- What Is Google Drive? (gizmodo.com.au)
- Google Drive Launched With 5GB Free Storage (techmadly.com)
- Encryptors scramble to support Google Drive, SkyDrive (gigaom.com)
Social Gestures and the Social Web – Part I
FROM the Below Article was Copied from the website http://blog.engag.io/2012/04/15/social-gestures-and-the-social-web-part-i/
The Original Author – MR. William Mougayar
Social Gesturing is at the heart of the social web. Those little signals have a small footprint but a large impact.
The crowd-sourced nature of social gestures adds up to a lot of value. After all, Facebook with all its might was mostly based and founded on 3 basic social gestures: liking, sharing and linking, each taking a fraction of a second to accomplish.
I’ve been thinking a lot about the hierarchy of social gestures in terms of value and potential. And I came-up with the following way to organize them into a taxonomy where certain gestures are grouped with each other according to the objective they are meant to achieve and the purpose they target: People, Interests or Content.
The graph below is self-explanatory. The objective of social gesturing is to a) grab Attention, b) Express yourself, c) Curate interests (or content), d) develop Relationships, or e) Engage with people.
The most commonly used Social Gestures are Sharing, Linking and Liking when it comes to Content, and Following or Friending when it comes to People. But the area that holds the most promise is Engagement with People.
There is an ascending amount of time it takes to accomplish each gesture. If you look at the two extremes, Discussing something with someone is a lot more time-consuming than Clicking on content or Sharing it.
Personally, and for Engagio, I’m very interested in the gestures around Social Engagement. I think we’re just getting started in that segment, and I plan to cover more on that topic in Part II of this post.
In the meantime, what is your opinion on the following 3 questions:
- Are there other Social Gestures that you are seeing?
- Do you see new ones that are emerging?
- Which ones do you use the most?
Related articles
- Engagio: A Canadian Startup Story and the future of the Social Web (startupnorth.ca)
- Engagio wants to be your one-stop social inbox (gigaom.com)
- How to swear in Italian (afrahm.wordpress.com)
- Don’t Export Your American Hand Gestures [Infographic] (communicationstudies.com)
- ShadowPuppets prototype lets you pinch-to-zoom, click, and scroll with shadow gestures (theverge.com)
Engagio: Recognize & Build Relationships On Social Network Easily

Engagio helps you to track your online conversations and allows you to develop meaningful relationships from them. In short, it is your tool to find quality relationships.
Pitched as ‘Your inbox for online conversations and relationships’, it is a tool much like Gmail, but is for managing your conversations in social networking sites and commenting systems. Engagio gives you visibility about the people behind these conversations and reveals their social identities profile. It saves you much time and allows you to connect with others in a much better and deeper way.
Although social media has many advantages, sometimes we fall short of managing our many relationships on social networking sites. With so many friends, family members, colleagues, classmates and relatives in our contacts list, we miss out on building quality relationships with people who matter. Engagio helps you to do that and more.
Engagio believes that commenting and conversations are strong social signals. They are stronger than likes, shares and links. Comments are implicit linkages about people. After all, you only care to comment on somebody’s post and take time to do it when you like that person or what s/he has to say. Like is easy, commenting takes time and thought. Engagio studies all that and more, and give you full visibility into the potential relationships behind your comments and conversations.
The service is frictionless and derives implicit data from your normal, everyday interactions. It does not matter whether your conversations are on social networks or inside your Engagio inbox, Engagio tracks them all. You connect to your social networks and Engagio starts to track, record, analyze and report on your interaction activity.
All you need to do is to signup from the entry page or jump to your inbox. You can easily track your conversations on Facebook, LinkedIn, Twitter, Google+, Disqus-enabled sites, Hacker news comments, Foursquare and more. This is a wonderful service for everybody who wishes to build up on great relationships without putting in much time and effort.
Chat With Command Prompt
If you want personal chat with a friend

All you need is your friends IP address and Command Prompt.
Mobile Trading
The Procyon Holdings (PROHD) name is expanding again as we push out into another development area — the Android framework. When I abandoned my BlackBerry, the choice to move to the Android platform was an easy decision. Market saturation, the development community, and fluidity between devices make this platform shine.
I’ve been having a few end user problems with the current iteration of our trading website. First, the native Android Gingerbread browser lacks SVG support, an issue that has bewildered me since I read about it. I can solve this issue by using another browser such as Opera, but I would like to use the native one.
Also working with a HTML + Ajax website on a device with a touch interface feels like you are not getting the full user experience. I want to scroll down lists with my finder, click and hold to expose options, and speed around menus.
We had to expand our design and create a few new pieces to get data to the mobile world. New items include the creation of a daemon to simply database population, exposing data via XML, and working with an existing library to enable Push notifications.
Information Flow
The Daemon runs on our server, periodically pulls transactions from the Eve API, and places that information in our wallet table.
Our previous design was that you would have to hit the transactions webpage and it would trigger an update. Getting a page to refresh on a desktop connected via broadband versus a mobile phone is quite the different experience.
 Android has a framework called C2DM(Android Cloud to Device Messaging) which enables you to send lightweight push notifications to devices.
Our vision is that when a sell order clears, a large/special sale has occurred, or a significant milestone has been reached, we send a notice. This will be visible on phone’s Status Notification Bar and cause me to act if deemed important. I have been forgetting to buy or trade a particular item after the sell orders have cleared. Forget things — loose profit.
Getting data out of our database required the creation of a webservice to produce XML output from our wallet table.
Here is an example of the sale of one item in our XML feed:
<?xml version="1.0"?>
<TransactionList>
<Transaction>
<transactionDateTime>2012-04-19 06:21:04</transactionDateTime>
<typeID>21096</typeID>
<typeName>Cynosural Field Generator I</typeName>
<quantity>1</quantity>
<price>1948939.91</price>
<profit>147803</profit>
<stationName>STATION</stationName>
<icon>21096_32.png</icon>
</Transaction>
</TransactionList>
Alpha Screenshot
This screenshot is our first proof of concept. We’re able to get information from an XML feed, display it, and get/cache images from the Eve image server. Major credit goes to my trading and corporation partner James, who has been doing the development work and educating me on the Android framework.
There is a lot we want to do with the mobile version. Menus, tabs, charts, reports, and the ability to add items to a shopping cart/wish list are all things on the drawing board.
Future Collaboration
This project is our first exposure to the Android framework and after the initial learning curve, we might perhaps coolabrate with the Aideron Robotics team on Aura. So maybe some of our trading mechanics will make their way into the Aura application.
Explore the REST API

I have had the pleasure of working with the WordPress.com REST API over the past few weeks and am very excited to start “dogfooding” this resource everywhere I can.
One cool feature is that all the endpoints are self-documenting. In fact, the documentation for the REST API is built by the API itself! With this information we were able to build a console to help debug and explore the various resources that are now available through the new API. So let me introduce you to the new REST console for WordPress.com.
A word of caution: the console is only available when you are logged into WordPress.com and is hooked up to the live system, so be careful with your POST requests!
At its simplest you can supply the method, path, query, and body for the resource you wish to examine (it’s pre-populated with /me). Press “Submit” to see the response status for your request and an expandable JSON object that you can explore. All links listed under meta are active, so click one to make another request.
To get a better idea of what kind of parameters a request can take, select it under the “Reference” section. It will then provide an interface with some contextual help to let you know which path, query, and body parameters it accepts, what each of those parameters are for, and a field for you to provide the value.
Related articles
- Explore the REST API (developer.wordpress.com)
- How to analyze your Blog Traffic using WordPress Stats API (selvabalaji.wordpress.com)
- Apigee v2 Console: Making learning APIs as simple as possible, but not simpler (apigee.com)
- Phasing out old API, upgrade your WordPress plugins! (flattr.net)
- REST easy with JIRA 5 (blogs.atlassian.com)
Driving Traffic To Your Website
eMarketing and SEO (Search Engine Optimization)
People need to know who you are, and the products and services that you provide. This is accomplished in four strategic areas:
- SEO (Search Engine Optimization)
- Online advertising
- Links from other websites or Blogs
- Social Networks
SEO (Search Engine Optimization) is a way of adding strategic content to your webpages. These are keywords or phrases that pertain to your products or services. They may also be relevant to any value content that you provide, such as “how to guides”, video, white papers, etc. We’ll cover these later when we discuss capturing leads.

SEO is a process, not a one time job. It needs to be monitored and changed as needed. The goal is to raise your search engine rankings.
SEO is also about good coding, tags, and metadata. These elements are not seen, but are used by search engines to return SERP’s (Search Engine Result Pages) to Internet searches. This is what we call “organic” drivers, or a kind of “free advertising”. Basically relevant content and code for internet searches.
Incoming links from other websites are also very important, and rated highly among search engines. We will show you how to obtain more incoming links from larger websites.
Online advertising is crucial to the success of any eMarketing strategy. This is paid advertising with the major or local search engines such as Google, Yahoo, MSN, AOL, etc. Many large companies have full departments dedicated to creating and tracking online advertising campaigns. Online advertising is much more than creating an ad and letting it go. You can waste a lot of money if you don’t properly define your campaign, test it, and than track results. This requires constant monitoring and adjustment to maximize your investment and results.

A Sturm Media online advertising campaign consists of:
- Analysis of competition online advertising
- Development of keywords and phrases
- Creation of a landing pages with “Call to Action” (CTA)
- Ad copy for three test ads
- Automated lead capture and follow-up
Advertising can also be negotiated with other large websites that have extremely high traffic counts, or media buys for banner placement on groups of web pages or high traffic blogs. This is usually more expensive and done as a phase two or three implementation, after several successful search engine campaigns.
Links from other websites or blogs are not only important for SEO and search engine ranking, but as a direct connection to your website. A question we get often is how can we get more links to our website? The answer to the question is simple, but the implementation is not. Content, content, content… content is king and everyone wants it. Once you have compelling value content, you will see links from other websites and blogs increase.
Sturm Media has a proprietary blog creation tool that aggregates data in any targeted vertical. We can create blogs that augment advertising campaigns, and provide additional incoming links. The blogs are completely independent, and as such can provide company reviews and resource guides that promote our clients. This is our competition killer, and since we developed the methodology, we are the preeminent source for this type of online marketing.
Social Networking is popular and growing at exponential rates. Websites like Facebook, Linkedin, YouTube, Twitter, and many more are a way to reach hundreds of thousands of potential customers. Often, our clients think that they don’t have the time or the bandwidth for this type of marketing. We can show ways of implementing social networking into your plan that will take very little time. Social networking is a vital component of any strategic eMarketing plan.


Related articles
- The Logic Behind Search Engine Optimization Techniques (ronmedlin.com)
- What are best practice SEO techniques? (marketing.yell.com)
- What is pay-per-click advertising? (marketing.yell.com)
- What are backlinks and how can they improve SEO? (marketing.yell.com)
- Will custom web design help drive traffic? (marketing.yell.com)
Subscribe Via Email

Agaram Foundation

29,Vijay Enclave Krishna Street,
T.Nagar, Chennai - 600 017
Tamil Nadu, India.
Telephone : +91 44 4350 6361
Mobile : +91 98418 91000
Email : info@agaram.in
Site Info

![]()
 SELVABALAJI NEWS
- An error has occurred; the feed is probably down. Try again later.
Vistor Location
Unknown Feed
- An error has occurred; the feed is probably down. Try again later.
Unknown Feed
- An error has occurred; the feed is probably down. Try again later.
Unknown Feed
- An error has occurred; the feed is probably down. Try again later.
LeadSquared
- Into the Unknown: Embracing a Bold, Student-First Strategy for Enrollment Success
- Top 10 Sales Gamification Tools For 2024
- Top 9 CRMNext Alternatives in 2024
- Closing the Deal: 6 Surefire Strategies to Exceed Your Sales Targets
- Sales Automation 101:Unclog your Sales Pipeline
- KRA of Sales Manager and How to Track Performance
- Top 10 Healthcare CRM in the United States
- Why Do 70% of Online Inquiries Drop Off?
- Top 6 Paramantra Alternatives for Real-Estate Businesses in 2024
- Top 10 Spotio Alternatives for Field Reps
singershalini
- Untitled
- Pop Shalini Verified #Spotify Artist Playlist
- Pop Shalini's Interesting reads #Murakami
- Pop Shalini performs for Harris Jeyraj's concert with Benny Dayal and Haricharan
- Pop Shalini sings Vandhe Mataram
- Pop Shalini Sings her famous song Mudhal Naal Indru - Unaale Unaale
- Pop Shalini wishes Superstar RajiniKanth on the Dada Saheb Phalke Award
- A song for a Rainy day from my first album #Shalini - Chinna Chinna Mazhai thooral
- ipopshalini Verified Artiste sings Ranjha from Shershaah
- Chennai Floods
Flickr Photos


Advertsiment


Recent Comments