Archive
Step-by-Step guide to Facebook Conversion Tracking
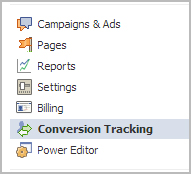
Step 1: Once you log in to your ‘Ads Manager’ tab, click on the Conversion Tracking button on the left side bar.
Step 2: Then click on the ‘Create Conversion Pixel’ tab to begin the process.

Step 3: You will be directed to this pop-up, which will ask you for a:
1. Name: An appropriate name will help you remember what you are tracking. (Example: Lead Generation – GATE Ad)
2. Category: This will help you decide the type of action that you want to track on your site. You can choose from the following:
1. Checkouts
2. Registrations
3. Leads
4. Key Page Views
5. Adds to Cart
6. Other Website Conversions
(For the purpose of this example, we have selected ‘Leads’).

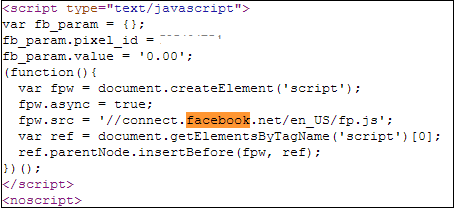
Step 4: You will be able to see a pop-up window with a JavaScript code. This is the code that you will have to add to the page where the conversion will happen. This will let you track the conversions back to ads which you are running on Facebook.

The code should be placed on the page that a user will finally see when the transaction is complete.
Here is the tricky part. The code should not go on all pages. For that matter, it should not even go to the landing page of your product. The code should be placed on the page that a user will finally see when the transaction is complete.
For Example: If you want to track when students register for your GATE coaching, paste the code on the registration confirmation page/thank you page and not on the form that they need to submit.
How do you confirm that your conversion is working properly?
1. Check that the javascript snippet has been placed on the correct conversion page. Visit the page where the pixel has been embedded, right click and go to ‘View Page Source’ to find the pixel. The code should have the tag of the HTML. See image below.
2. Check that Facebook is receiving the conversion events from your website. Go to the conversion tracking tab in your Ads Manager account. There you will see a list of the conversion tracking pixels that you have created. If the conversion tracking pixel has been successfully implemented and a conversion event has been recorded, it will be reflected in the Pixel Status column. If the status shows active, it means that the page which contains the pixel has been viewed by users. If it shows inactive, it means that over the last 24 hours, the page with the pixel has not been viewed.

3.Later, when you create your Facebook ad , you need to check the track conversions box under the campaign, pricing and schedule tab to enable tracking.

Social Gestures and the Social Web – Part I
FROM the Below Article was Copied from the website http://blog.engag.io/2012/04/15/social-gestures-and-the-social-web-part-i/
The Original Author – MR. William Mougayar
Social Gesturing is at the heart of the social web. Those little signals have a small footprint but a large impact.
The crowd-sourced nature of social gestures adds up to a lot of value. After all, Facebook with all its might was mostly based and founded on 3 basic social gestures: liking, sharing and linking, each taking a fraction of a second to accomplish.
I’ve been thinking a lot about the hierarchy of social gestures in terms of value and potential. And I came-up with the following way to organize them into a taxonomy where certain gestures are grouped with each other according to the objective they are meant to achieve and the purpose they target: People, Interests or Content.
The graph below is self-explanatory. The objective of social gesturing is to a) grab Attention, b) Express yourself, c) Curate interests (or content), d) develop Relationships, or e) Engage with people.
The most commonly used Social Gestures are Sharing, Linking and Liking when it comes to Content, and Following or Friending when it comes to People. But the area that holds the most promise is Engagement with People.
There is an ascending amount of time it takes to accomplish each gesture. If you look at the two extremes, Discussing something with someone is a lot more time-consuming than Clicking on content or Sharing it.
Personally, and for Engagio, I’m very interested in the gestures around Social Engagement. I think we’re just getting started in that segment, and I plan to cover more on that topic in Part II of this post.
In the meantime, what is your opinion on the following 3 questions:
- Are there other Social Gestures that you are seeing?
- Do you see new ones that are emerging?
- Which ones do you use the most?
Related articles
- Engagio: A Canadian Startup Story and the future of the Social Web (startupnorth.ca)
- Engagio wants to be your one-stop social inbox (gigaom.com)
- How to swear in Italian (afrahm.wordpress.com)
- Don’t Export Your American Hand Gestures [Infographic] (communicationstudies.com)
- ShadowPuppets prototype lets you pinch-to-zoom, click, and scroll with shadow gestures (theverge.com)
Engagio: Recognize & Build Relationships On Social Network Easily

Engagio helps you to track your online conversations and allows you to develop meaningful relationships from them. In short, it is your tool to find quality relationships.
Pitched as ‘Your inbox for online conversations and relationships’, it is a tool much like Gmail, but is for managing your conversations in social networking sites and commenting systems. Engagio gives you visibility about the people behind these conversations and reveals their social identities profile. It saves you much time and allows you to connect with others in a much better and deeper way.
Although social media has many advantages, sometimes we fall short of managing our many relationships on social networking sites. With so many friends, family members, colleagues, classmates and relatives in our contacts list, we miss out on building quality relationships with people who matter. Engagio helps you to do that and more.
Engagio believes that commenting and conversations are strong social signals. They are stronger than likes, shares and links. Comments are implicit linkages about people. After all, you only care to comment on somebody’s post and take time to do it when you like that person or what s/he has to say. Like is easy, commenting takes time and thought. Engagio studies all that and more, and give you full visibility into the potential relationships behind your comments and conversations.
The service is frictionless and derives implicit data from your normal, everyday interactions. It does not matter whether your conversations are on social networks or inside your Engagio inbox, Engagio tracks them all. You connect to your social networks and Engagio starts to track, record, analyze and report on your interaction activity.
All you need to do is to signup from the entry page or jump to your inbox. You can easily track your conversations on Facebook, LinkedIn, Twitter, Google+, Disqus-enabled sites, Hacker news comments, Foursquare and more. This is a wonderful service for everybody who wishes to build up on great relationships without putting in much time and effort.
Chat With Command Prompt
If you want personal chat with a friend

All you need is your friends IP address and Command Prompt.
Mobile Trading
The Procyon Holdings (PROHD) name is expanding again as we push out into another development area — the Android framework. When I abandoned my BlackBerry, the choice to move to the Android platform was an easy decision. Market saturation, the development community, and fluidity between devices make this platform shine.
I’ve been having a few end user problems with the current iteration of our trading website. First, the native Android Gingerbread browser lacks SVG support, an issue that has bewildered me since I read about it. I can solve this issue by using another browser such as Opera, but I would like to use the native one.
Also working with a HTML + Ajax website on a device with a touch interface feels like you are not getting the full user experience. I want to scroll down lists with my finder, click and hold to expose options, and speed around menus.
We had to expand our design and create a few new pieces to get data to the mobile world. New items include the creation of a daemon to simply database population, exposing data via XML, and working with an existing library to enable Push notifications.
Information Flow
The Daemon runs on our server, periodically pulls transactions from the Eve API, and places that information in our wallet table.
Our previous design was that you would have to hit the transactions webpage and it would trigger an update. Getting a page to refresh on a desktop connected via broadband versus a mobile phone is quite the different experience.
 Android has a framework called C2DM(Android Cloud to Device Messaging) which enables you to send lightweight push notifications to devices.
Our vision is that when a sell order clears, a large/special sale has occurred, or a significant milestone has been reached, we send a notice. This will be visible on phone’s Status Notification Bar and cause me to act if deemed important. I have been forgetting to buy or trade a particular item after the sell orders have cleared. Forget things — loose profit.
Getting data out of our database required the creation of a webservice to produce XML output from our wallet table.
Here is an example of the sale of one item in our XML feed:
<?xml version="1.0"?>
<TransactionList>
<Transaction>
<transactionDateTime>2012-04-19 06:21:04</transactionDateTime>
<typeID>21096</typeID>
<typeName>Cynosural Field Generator I</typeName>
<quantity>1</quantity>
<price>1948939.91</price>
<profit>147803</profit>
<stationName>STATION</stationName>
<icon>21096_32.png</icon>
</Transaction>
</TransactionList>
Alpha Screenshot
This screenshot is our first proof of concept. We’re able to get information from an XML feed, display it, and get/cache images from the Eve image server. Major credit goes to my trading and corporation partner James, who has been doing the development work and educating me on the Android framework.
There is a lot we want to do with the mobile version. Menus, tabs, charts, reports, and the ability to add items to a shopping cart/wish list are all things on the drawing board.
Future Collaboration
This project is our first exposure to the Android framework and after the initial learning curve, we might perhaps coolabrate with the Aideron Robotics team on Aura. So maybe some of our trading mechanics will make their way into the Aura application.
Google to bring cheap Android tablets
The internet giant is reportedly set to launch a sub-Rs 10,000 tablet later this year.

Google has said that it will focus more on lower end tablets.
“There’s been a lot of success on some lower-priced tablets that run Android, maybe not the full Google version of Android, but we definitely believe that there is going to be a lot of success at the lower end of the market. It’s definitely an area we think is important and we’re quite focused on,” Larry Page, Google’s chief executive officer, was reported as saying.
Currently, there are a lot of cheap Android tablets in the market but these are mostly from lesser known manufacturers.
Google’s direct involvement in low cost Android tablets could be revolutionary. In fact, the online giant is reportedly set to launch a sub $200 (Rs 10,000) device this year itself. The tablet is said to have a 7 inch display with Android 4.0 operating system, a quad core processor, and WiFi for internet access.
Billa II – Teaser Promo
 Ajith is back with Billa II after the successful 2007 flick Billa which was directed by Vishnuvardhan. Expected to release on 25th May, Billa II is supposed to be a prequel to Billa ( unlike Don-2 which was a sequel ) and talks about how David, an ordinary man from coastal Tamil Nadu becomes the dreaded don Billa. Directed by Chakri Toleti and also starring Parvathy Omanakuttan, Bruna Abdullah, Vidyut Jamwal and Sudhanshu Pandey in supporting roles who all make their debut in Tamil cinema, the film has music by Yuvan Shankar Raja and R.D.Rajasekharis the DOP.
Expected to be the big ticket summer Tamil release, watch this interesting teaser for now.
ORU KAL ORU KANNADI – REVIEW
 RED GIANT MOVIES UDHAYANIDHI STALIN PRESENTS:
A Movie Story & Directed by Rajesh M who has done the film neatly in commercial and full of comedy.
The producer Udhayanidhi himself is the Hero of the film with Santhanam making full comedy. Heroine is Hansika, Saranya Ponvanna Udhayanidhi mother, Uma Padbhanan Hansika’s mother and father is Shiyaji Shinde. With varadha rajan and others.
From the beginning itself the movie moves in the comedy track and full of comedy mixed with stunts, songs in foreign locations. Songs are all good, music by Harris Jayraj, Camera Balasubramniam, Lyrics Na Muthukumar, Arts: Jacy, Choreography: Dinesh, Stunts Rajasekar, Editing Vivek Harshan PRO: Nikil
Very neatly and in commercial and comedy fully with excellent timings by both Udyanidhi and santhanam speaks about the story. Udhayanidhi being produced many films is hero in this and does not looks like a new actor and done his part in very good manner with Hansika a beauty fitted perfectly for the Hero.
An wonderful comedy mixed commercial movie with all credits.
Kumar srinivas
Photo/video journalist
Related articles
- Oru Kal Oru Kannadi (5inetune.com)
- Audio Beat: Oru Kal Oru Kannadi (thehindu.com)
- Shot Cuts: Woman power (thehindu.com)
- Hansika Motwani says she is not a snob (ibnlive.in.com)
- The Blacks Only Comedy Show is back! (jasonvonberg.wordpress.com)
Explore the REST API

I have had the pleasure of working with the WordPress.com REST API over the past few weeks and am very excited to start “dogfooding” this resource everywhere I can.
One cool feature is that all the endpoints are self-documenting. In fact, the documentation for the REST API is built by the API itself! With this information we were able to build a console to help debug and explore the various resources that are now available through the new API. So let me introduce you to the new REST console for WordPress.com.
A word of caution: the console is only available when you are logged into WordPress.com and is hooked up to the live system, so be careful with your POST requests!
At its simplest you can supply the method, path, query, and body for the resource you wish to examine (it’s pre-populated with /me). Press “Submit” to see the response status for your request and an expandable JSON object that you can explore. All links listed under meta are active, so click one to make another request.
To get a better idea of what kind of parameters a request can take, select it under the “Reference” section. It will then provide an interface with some contextual help to let you know which path, query, and body parameters it accepts, what each of those parameters are for, and a field for you to provide the value.
Related articles
- Explore the REST API (developer.wordpress.com)
- How to analyze your Blog Traffic using WordPress Stats API (selvabalaji.wordpress.com)
- Apigee v2 Console: Making learning APIs as simple as possible, but not simpler (apigee.com)
- Phasing out old API, upgrade your WordPress plugins! (flattr.net)
- REST easy with JIRA 5 (blogs.atlassian.com)
Subscribe Via Email

Agaram Foundation

29,Vijay Enclave Krishna Street,
T.Nagar, Chennai - 600 017
Tamil Nadu, India.
Telephone : +91 44 4350 6361
Mobile : +91 98418 91000
Email : info@agaram.in
Site Info

 SELVABALAJI NEWS
- An error has occurred; the feed is probably down. Try again later.
Vistor Location
Unknown Feed
- An error has occurred; the feed is probably down. Try again later.
Unknown Feed
- An error has occurred; the feed is probably down. Try again later.
Unknown Feed
- An error has occurred; the feed is probably down. Try again later.
LeadSquared
- Into the Unknown: Embracing a Bold, Student-First Strategy for Enrollment Success
- Top 10 Sales Gamification Tools For 2024
- Top 9 CRMNext Alternatives in 2024
- Closing the Deal: 6 Surefire Strategies to Exceed Your Sales Targets
- Sales Automation 101:Unclog your Sales Pipeline
- KRA of Sales Manager and How to Track Performance
- Top 10 Healthcare CRM in the United States
- Why Do 70% of Online Inquiries Drop Off?
- Top 6 Paramantra Alternatives for Real-Estate Businesses in 2024
- Top 10 Spotio Alternatives for Field Reps
singershalini
- Untitled
- Pop Shalini Verified #Spotify Artist Playlist
- Pop Shalini's Interesting reads #Murakami
- Pop Shalini performs for Harris Jeyraj's concert with Benny Dayal and Haricharan
- Pop Shalini sings Vandhe Mataram
- Pop Shalini Sings her famous song Mudhal Naal Indru - Unaale Unaale
- Pop Shalini wishes Superstar RajiniKanth on the Dada Saheb Phalke Award
- A song for a Rainy day from my first album #Shalini - Chinna Chinna Mazhai thooral
- ipopshalini Verified Artiste sings Ranjha from Shershaah
- Chennai Floods
Flickr Photos


Advertsiment


Recent Comments