Archive
Billa 2 – First Review from a fan in Chennai!

The reason why ajithkumar accepted to act or to even think of a prequel is evident. It has strong-hitting script.
And the film starts with a voice from behind re-visiting an ordinary coastal men’s life. Ajith as an ordinary coastal man starting to live his life pretty simple with his region people..He gets introduced to a drug and weapon dealers by his coastal head , he agrees to work for them considering the poor livelihood of his family, as predicted he was being cheated by the dealers and whole kundos captured him and his coastal people and made them to Agathigal for money which they gonna get later !
Thereby, heroeines enter and fall for ajith’s pity situation and bad lights he undergo , how ajith learns all the arts from them and transform as an Underworld don who gets control of entire network after the death of Sudhanshu Pandey form a rest of the Story.
You would have known this is a simple story and coming to the performance by lead artists.
Ajith (david) when reforms as don shown with his slick and style appearance and dialogues, but failed to justify the character when being Agathi. He looked unselected for the refugee role no offence meant, he still has not come out of Mankatha hangover. He could have reduced his weight though. And he excels in transforming show and in some places he over acted and emoted in poor sense. Bruna Abdullah & Parvathy appeared too much sexy and too much show off and nothing more for their role. Some scenes should’ve been deleted for adult content .
Vidhyut as side-villain rocked in looks. But his voice dubbing was not matched.
Music was good in parts. Madhurai Ponnu and Unakule Mirugam were poorly picturised. Other three was good. BGM had no new compositions, Yuvan just re-used the old_billa part 1 themes here.
Cinematography was Awesome. Red Epic worked to some extent but in some places it looked so contrast and dull grey which harms some audience..
There were lots of violence scenes present and some sexually explicit content could have been avoided although it rated Adultery film.
climax was not convincing and they’ve missed the point what makes Ajith as David Billa and less was said on it. The film is noway near to entertaining mankatha in terms of content and scenes. I did not enjoy the film as i enjoyed Mankatha.
Positives :-
-Ajith’s performance as Transforming a Don(david billa)
-2nd half locations
Negatives :-
– Ajith as coastalman(David) was miscast
-1st half was so dragging
– Dialogues given to other non tamil artists except Ajith were pretty rubbish.
-mindless violenc scenes and back sound
-Adultery scenes in some parts were used extreme
-Climax so illogical and not convincing.
-Predictable Scenes towards the end.
WP Google Drive Plugin
We are Released New wp google drive plugin to make back of your wordpress site files to google drive.
http://wordpress.org/extend/plugins/wp-google-drive/
Exclusive tutorial on How to Backup your WordPress blog to Google Drive. It is always recommended to backup your WordPress blog, which includes files (themes, plugins etc) and SQL tables (all your blog posts, comments, drafts etc are stored as tables in database).

Whenever your blog is gone (due to unsecured activities or some other reasons), these backups will help to get back your blog. In some cases, using 3rd party plugins and themes can also lead to malfunction of your blog, here also these backups helps to retain back your blog.
Reasons to Backup WordPress Blog to Google Drive
- Its a Google Product and is free to use up-to 5GB.
- Can get access to backups on any of the devices like Smartphones, Tablet PC’s, Laptops etc.
- Backups will be uploaded in quite less time (sometimes based on internet connection also).
- Highly Secure and reliable service, so there wont be any loss of data in the process.
- Backups can be shared with your blog partners (if have any) with a single click of mouse
How to Backup WordPress blog to Google Drive
Download and Install Google Drive for WordPress plugin from official WordPress plugin repository.
Google Drive for WordPress Plugin »
Here is the step-by-step guide that helps to backup your WordPress blog to Google Drive. Brief list of things you have to do in this tutorial:
- Follow this link Google APIs Console and login to your Google Account.


- Follow this link Google APIs Console and login to your Google Account.

- Go to “API Access” tab and click on “Create an OAuth 2.0 client ID”

- In the pop-up window, give a product name and upload logo before clicking on “Next” button.

- By default “Web Application” will be selected and don’t change it.

- In “Your site or hostname” section, click on “More Options” to expand link sections.

- Now, paste the link in the “Backup Settings” page here. Enter domain name in “JavaScripts” origin field.

- Click on “Create Client ID” and you have successfully created a Client ID using Google API Console.

- Copy the Client ID and Client Secret from API dashboard and paste them in “Backup Settings” page.

- You have to authorize the plugin by clicking on “Allow Access” button.

- Allow Access to the Plugin and the entire setup has been successfully installed.
Check Out : WordPress Plugin
How to automatically Backup WordPress blog to Google Drive
- Now, you can configure this plugin further by entering the custom folder ID of your Google Drive.
- Also define the maximum number of backups (use any positive integer in that field).
- Set the frequency of backup and everything will be automatically stored in your Google Drive.


Related articles
- 6 Tips For Hosting WordPress On Rackspace Cloud Sites (rackspace.com)
- 7 WP Plugins For My Content Curation Blog (contentcurationdesktop.com)
- How to Move WordPress Site to New Host: Zero Downtime (shoutmeloud.com)
- WordPress Plugins: The Best of the Best (boldlygoing.com)
Import Yahoo contact to website / download CSV

Written in PHP and using cURL, this script imports the names and email addresses from your yahoo account (yahoo id and password needed to login to yahoo from the script and retreive the address book).
<!–?php–>
ob_start();
session_start();
require ‘globals.php’;
require ‘oauth_helper.php’;
require ‘yahoo_function.php’;// Callback can either be ‘oob’ or a url whose domain must match
// the domain that you entered when registering your application$callback='<your call back URL>’;
if($_REQUEST[‘oauth_verifier’] != ”) {
$request_token = $_REQUEST[‘oauth_token’];
$oauth_verifier = $_REQUEST[‘oauth_verifier’];
$request_token_secret = $_SESSION[‘request_token_secret’];$accessToken = get_access_token(OAUTH_CONSUMER_KEY, OAUTH_CONSUMER_SECRET,$request_token, $request_token_secret,$oauth_verifier, false, true, true);
$access_token = urldecode($accessToken[3][‘oauth_token’]);
$access_token_secret = urldecode($accessToken[3][‘oauth_token_secret’]);
$guid = $accessToken[3][‘xoauth_yahoo_guid’];$callcont = callcontact(OAUTH_CONSUMER_KEY, OAUTH_CONSUMER_SECRET, $guid, $access_token, $access_token_secret, false, true);
print ‘Total Email COntact :’ .$callcont[‘contacts’][‘total’];
print ‘<br/><br/>’;print ‘asda’.($callcont[‘contacts’][‘total’]);
for($i=0; $i<=$callcont[‘contacts’][‘total’];$i++) {
print ‘<br/><br/>’;
print $callcont[‘contacts’][‘contact’][$i][‘fields’][0][‘value’];
print ‘<br/><br/>’;
}}else{
$retarr = get_request_token(OAUTH_CONSUMER_KEY, OAUTH_CONSUMER_SECRET,$callback, false, true, true);
if (! empty($retarr)){
$request_token = $retarr[3][‘oauth_token’];
$request_token_secret = $retarr[3][‘oauth_token_secret’];
$request_url = urldecode($retarr[3][‘xoauth_request_auth_url’]);
$_SESSION[‘request_token_secret’] = $request_token_secret;
header(“location:https://api.login.yahoo.com/oauth/v2/request_auth?oauth_token=”.$request_token);
}
exit(0);
}
?>
Yahoo_function.php
<?php
function get_request_token($consumer_key, $consumer_secret, $callback, $usePost=false, $useHmacSha1Sig=true, $passOAuthInHeader=false)
{
$retarr = array(); // return value
$response = array();$url = ‘https://api.login.yahoo.com/oauth/v2/get_request_token’;
$params[‘oauth_version’] = ‘1.0’;
$params[‘oauth_nonce’] = mt_rand();
$params[‘oauth_timestamp’] = time();
$params[‘oauth_consumer_key’] = $consumer_key;
$params[‘oauth_callback’] = $callback;// compute signature and add it to the params list
if ($useHmacSha1Sig) {
$params[‘oauth_signature_method’] = ‘HMAC-SHA1‘;
$params[‘oauth_signature’] =
oauth_compute_hmac_sig($usePost? ‘POST‘ : ‘GET’, $url, $params,
$consumer_secret, null);
} else {
$params[‘oauth_signature_method’] = ‘PLAINTEXT‘;
$params[‘oauth_signature’] =
oauth_compute_plaintext_sig($consumer_secret, null);
}// Pass OAuth credentials in a separate header or in the query string
if ($passOAuthInHeader) {$query_parameter_string = oauth_http_build_query($params, FALSE);
$header = build_oauth_header($params, “yahooapis.com”);
$headers[] = $header;
} else {
$query_parameter_string = oauth_http_build_query($params);
}// POST or GET the request
if ($usePost) {
$request_url = $url;
logit(“getreqtok:INFO:request_url:$request_url”);
logit(“getreqtok:INFO:post_body:$query_parameter_string”);
$headers[] = ‘Content-Type: application/x-www-form-urlencoded‘;
$response = do_post($request_url, $query_parameter_string, 443, $headers);
} else {
$request_url = $url . ($query_parameter_string ?
(‘?’ . $query_parameter_string) : ” );logit(“getreqtok:INFO:request_url:$request_url”);
$response = do_get($request_url, 443, $headers);
}
// extract successful response
if (! empty($response)) {
list($info, $header, $body) = $response;
$body_parsed = oauth_parse_str($body);
if (! empty($body_parsed)) {
logit(“getreqtok:INFO:response_body_parsed:”);}
$retarr = $response;
$retarr[] = $body_parsed;
}return $retarr;
}
function get_access_token($consumer_key, $consumer_secret, $request_token, $request_token_secret, $oauth_verifier, $usePost=false, $useHmacSha1Sig=true, $passOAuthInHeader=true)
{
$retarr = array(); // return value
$response = array();$url = ‘https://api.login.yahoo.com/oauth/v2/get_token’;
$params[‘oauth_version’] = ‘1.0’;
$params[‘oauth_nonce’] = mt_rand();
$params[‘oauth_timestamp’] = time();
$params[‘oauth_consumer_key’] = $consumer_key;
$params[‘oauth_token’]= $request_token;
$params[‘oauth_verifier’] = $oauth_verifier;// compute signature and add it to the params list
if ($useHmacSha1Sig) {
$params[‘oauth_signature_method’] = ‘HMAC-SHA1’;
$params[‘oauth_signature’] =
oauth_compute_hmac_sig($usePost? ‘POST’ : ‘GET’, $url, $params,
$consumer_secret, $request_token_secret);
} else {
$params[‘oauth_signature_method’] = ‘PLAINTEXT’;
$params[‘oauth_signature’] =
oauth_compute_plaintext_sig($consumer_secret, $request_token_secret);
}// Pass OAuth credentials in a separate header or in the query string
if ($passOAuthInHeader) {
$query_parameter_string = oauth_http_build_query($params, false);
$header = build_oauth_header($params, “yahooapis.com”);
$headers[] = $header;
} else {
$query_parameter_string = oauth_http_build_query($params);
}// POST or GET the request
if ($usePost) {
$request_url = $url;
logit(“getacctok:INFO:request_url:$request_url”);
logit(“getacctok:INFO:post_body:$query_parameter_string”);
$headers[] = ‘Content-Type: application/x-www-form-urlencoded’;
$response = do_post($request_url, $query_parameter_string, 443, $headers);
} else {
$request_url = $url . ($query_parameter_string ?
(‘?’ . $query_parameter_string) : ” );
logit(“getacctok:INFO:request_url:$request_url”);
$response = do_get($request_url, 443, $headers);
}// extract successful response
if (! empty($response)) {
list($info, $header, $body) = $response;
$body_parsed = oauth_parse_str($body);
if (! empty($body_parsed)) {
logit(“getacctok:INFO:response_body_parsed:”);
//print_r($body_parsed);
}
$retarr = $response;
$retarr[] = $body_parsed;
}
return $retarr;
}
function callcontact($consumer_key, $consumer_secret, $guid, $access_token, $access_token_secret, $usePost=false, $passOAuthInHeader=true)
{
$retarr = array(); // return value
$response = array();$url = ‘http://social.yahooapis.com/v1/user/’ . $guid . ‘/contacts’;
$params[‘format’] = ‘json’;
$params[‘view’] = ‘compact’;
$params[‘oauth_version’] = ‘1.0’;
$params[‘oauth_nonce’] = mt_rand();
$params[‘oauth_timestamp’] = time();
$params[‘oauth_consumer_key’] = $consumer_key;
$params[‘oauth_token’] = $access_token;// compute hmac-sha1 signature and add it to the params list
$params[‘oauth_signature_method’] = ‘HMAC-SHA1’;
$params[‘oauth_signature’] =
oauth_compute_hmac_sig($usePost? ‘POST’ : ‘GET’, $url, $params,
$consumer_secret, $access_token_secret);// Pass OAuth credentials in a separate header or in the query string
if ($passOAuthInHeader) {
$query_parameter_string = oauth_http_build_query($params, true);
$header = build_oauth_header($params, “yahooapis.com”);
$headers[] = $header;
} else {
$query_parameter_string = oauth_http_build_query($params);
}// POST or GET the request
if ($usePost) {
$request_url = $url;
logit(“callcontact:INFO:request_url:$request_url”);
logit(“callcontact:INFO:post_body:$query_parameter_string”);
$headers[] = ‘Content-Type: application/x-www-form-urlencoded’;
$response = do_post($request_url, $query_parameter_string, 80, $headers);
} else {
$request_url = $url . ($query_parameter_string ?
(‘?’ . $query_parameter_string) : ” );
logit(“callcontact:INFO:request_url:$request_url”);
$response = do_get($request_url, 80, $headers);
}// extract successful response
if (! empty($response)) {
list($info, $header, $body) = $response;
if ($body) {
logit(“callcontact:INFO:response:”);json_pretty_print($body);
}
$retarr = $response;
}
$contactsRes = json_decode($retarr[2],true);
return $contactsRes;
}
?>
Related articles
- Google OAuth for Installed Apps PHP Example (ioncannon.net)
- 2-legged OAuth with OAuth 1.0 and 2.0 (architects.dzone.com)
- Enterprise APIs and OAuth: Have it All (sys-con.com)
- Introduction to the Magento REST APIs with oAuth in Version 1.7 (aschroder.com)
Facebook buys facial-recognition startup

Image via CrunchBase

Image via CrunchBase
Facebook Inc (FB.O) is paying $55 million to $60 million to buy Face.com, according to people familiar with the matter, acquiring the company that provides the facial-recognition technology used by the world’s largest social network to help users identify and tag photos.
The deal bolsters one of Facebook’s most popular features — the sharing and handling of photos — but the use of the startup’s
has spurred concerns about user privacy.
The No. 1 social network will pay cash and stock for Face.com, potentially paying as much as $60 million, two sources with knowledge of the deal said. Media reports in past weeks have pegged the transaction at $80 million to $100 million.
Neither Facebook nor Face.com disclosed terms of the deal, which is expected to close in coming weeks.
Facebook, which will acquire the technology and the employees of the 11-person Israeli company, said in a statement that the deal allows the company to bring a “long-time technology vendor in house.”
Face.com, which has raised nearly $5 million from investors including Russian Web search site Yandex (YNDX.O), launched its first product in 2009. The company makes standalone applications that consumers can use to help them identify photos of themselves and of their friends on Facebook, as well as providing the technology that Facebook has integrated into its service.
Facebook uses the technology to scan a user’s newly uploaded photos, compares faces in the snapshots with previous pictures, then tries to match faces and suggest name tags. When a match is found, Facebook alerts the person uploading the photos and invites them to “tag,” or identify, the person in the photo.
Responding to inquiries from U.S. and European privacy advocates, Facebook last year made it easier for users to opt out of its controversial facial-recognition technology for photographs posted on the website, an effort to address concerns that it had violated consumers’ privacy.
The deal is the latest in a string of acquisitions by Facebook in recent months, including the $1 billion acquisition of mobile photo-sharing service Instagram. U.S. antitrust regulators are undertaking an extended review of the Instagram deal, which Facebook expects to close by the end of the year.
Shares of Facebook, which continue to trade below the price at which they were offered during the initial public offering in May, closed Monday’s regular session up 4.7 percent at $31.41.
Related articles
- Facebook buys Face.com facial recognition company (huffingtonpost.com)
- Facebook to buy facial-recognition startup (business.financialpost.com)
- Even bigger Big Brother: Facebook purchases Israeli facial recognition company Face.com (EndtheLie.com)
- Facebook buys facial recognition startup Face.com (venturebeat.com)
- Facebook buys facial-recognition startup (stuff.co.nz)
Mozilla launches Thimble, a new tool that makes creating a website simple
In 1997, making a website seemed like the simplest thing in the world. Of course, it wasn’t — there was all sorts of HTML code involved, and making a professional-looking site took almost as much work then as it does now. But there were tools available to make it seem easy — Tripod and Geocities had templates and tutorials, and Netscape Navigator had a decent WYSIWYG web creation tool built in.
Fast forward 15 years, and creating a website seems like an endeavor best left to the professionals. But Mozilla, carriers of the old Netscape crown, wants to change that perception with Thimble, a web-creation tool that promises to make the act of creating a website easier than ever.
Aside from a basic page creation tool, Thimble has a number of interesting tutorials built in to help teach you HTML, and by extension, how to create your own page. One of the tutorials, called Hack a Map, gets you started by showing you some pretty advanced code. But the tutorial isn’t about learning the advanced code, it’s about learning the basic errors that are causing the page at the left to show up incorrectly. Thimble will show you exactly where the website is broken — say, in showing you where a missing HTML tag should go. Even though you’re doing light work, you’re doing that work on a complicated page. The whole process feels far more enjoyable than your usual tutorial, as if you’re learning by doing something important. Even if that something important is a map filled with a Minecraft pig, CatBread, and a triple rainbow.
If you’re curious, you can check out Thimble over at the Mozilla website. And who knows, while playing around with pictures of cats, you might actually wind up learning something.
How to Make a Slick Ajax Contact Form with jQuery and PHP
Contact forms can be useful way for visitors to contact the owner of a site. They’re easy to use, and since they don’t expose the site owner’s email address in the page, they cut down on spam too.
However, contact forms can also be cumbersome, especially as they’re usually on a separate page. The visitor has to visit the contact form page, fill in the details, view yet another response page, and then try to make their way back to the page they were originally reading.
Fortunately, Ajax gives us a way round this problem. By embedding the form in the page, and submitting the form data via Ajax, the user never has to leave the current page. It also provides a smoother experience for the user.
In this tutorial we’ll build a nice-looking, embedded Ajax contact form that the user can summon up by clicking a link in the page. Along the way, we’ll explore various topics, including:
- HTML5 form fields
- How to use fallback techniques to make the form function even if the browser has JavaScript turned off
- Using CSS techniques to create attractive forms
- Writing a secure form mailer using PHP
- Animating page elements with jQuery, and, of course…
- Using jQuery to make Ajax requests
Before you begin, check out the finished product by clicking the View Demo button above. This opens a new page with some dummy content, and a couple of “Send us an email” links. Click one of these links to display the form.
Step 1: Create the markup
Let’s start with the HTML for our page. This includes the form itself — we’ll hide it initially using JavaScript when the page loads — and also some dummy content and a couple of “Send us an email” links that will display the form when clicked:
|
1
2
3
4
5
6
7
8
9
10
11
12
13
14
15
16
17
18
19
20
21
22
23
24
25
26
27
28
29
30
31
32
33
34
35
36
37
38
39
40
41
42
43
44
45
46
47
48
49
50
51
52
53
54
55
56
57
|
<!doctype html><html lang="en"><head><title>A Slick Ajax Contact Form with jQuery and PHP</title></head><body><div id="content"> <p style="padding-bottom: 50px; font-weight: bold; text-align: center;"><a href="#contactForm">~ Send us an email ~</a></p> <!-- Content here --> <p style="padding-top: 50px; font-weight: bold; text-align: center;"><a href="#contactForm">~ Send us an email ~</a></p> </div><form id="contactForm" action="processForm.php" method="post"> <h2>Send us an email...</h2> <li> <input type="text" name="senderName" id="senderName" placeholder="Please type your name" required="required" maxlength="40" /> </li> <li> <label for="senderEmail">Your Email Address</label> <input type="email" name="senderEmail" id="senderEmail" placeholder="Please type your email address" required="required" maxlength="50" /> </li> <li> <label for="message" style="padding-top: .5em;">Your Message</label> <textarea name="message" id="message" placeholder="Please type your message" required="required" cols="80" rows="10" maxlength="10000"></textarea> </li> </ul> <div id="formButtons"> <input type="submit" id="sendMessage" name="sendMessage" value="Send Email" /> <input type="button" id="cancel" name="cancel" value="Cancel" /> </div></form><div id="sendingMessage" class="statusMessage"><p>Sending your message. Please wait...</p></div><div id="successMessage" class="statusMessage"><p>Thanks for sending your message! We'll get back to you shortly.</p></div><div id="failureMessage" class="statusMessage"><p>There was a problem sending your message. Please try again.</p></div><div id="incompleteMessage" class="statusMessage"><p>Please complete all the fields in the form before sending.</p></div></body></html> |
I’ve omitted the dummy content in the above code, since it’s not relevant to the tutorial.
The form sends its data to a processForm.php script that does the actual emailing. (We’ll write this PHP script in a moment.) By setting the form’s action attribute to "processForm.php", we ensure that the form is usable even with JavaScript disabled. Later, our JavaScript will read this action attribute so that it knows where to send the Ajax request.
The form itself uses some HTML5 form features such as placeholders, the email field type, and the required attribute to ensure that all the fields have been filled in. We’ll also add JavaScript validation for browsers that don’t yet support HTML5 validation.
Step 2: Add the CSS

Now we’ll add the CSS to our HTML page in order to style the page and form. The bulk of the CSS positions the form and status messages in the centre of the window, and styles the form and form fields.
|
1
2
3
4
5
6
7
8
9
10
11
12
13
14
15
16
17
18
19
20
21
22
23
24
25
26
27
28
29
30
31
32
33
34
35
36
37
38
39
40
41
42
43
44
45
46
47
48
49
50
51
52
53
54
55
56
57
58
59
60
61
62
63
64
65
66
67
68
69
70
71
72
73
74
75
76
77
78
79
80
81
82
83
84
85
86
87
88
89
90
91
92
93
94
95
96
97
98
99
100
101
102
103
104
105
106
107
108
109
110
111
112
113
114
115
116
117
118
119
120
121
122
123
124
125
126
127
128
129
130
131
132
133
134
135
136
137
138
139
140
141
142
143
144
145
146
147
148
149
150
151
152
153
154
155
156
157
158
159
160
161
162
163
164
165
166
167
168
169
170
171
172
173
174
175
176
177
178
179
180
181
182
183
184
185
186
187
188
189
190
191
192
193
194
195
196
197
198
199
200
201
202
203
204
205
206
207
208
209
210
211
212
213
214
215
216
217
218
219
220
221
222
223
224
225
226
227
228
229
230
231
232
233
234
235
236
237
238
239
240
241
242
243
244
245
246
247
248
249
250
251
252
253
254
255
256
257
258
259
260
261
262
263
264
265
266
267
268
269
270
271
272
273
274
275
276
277
278
279
280
281
282
283
284
285
286
287
288
289
290
291
292
293
294
295
296
|
<style type="text/css">/* Add some margin to the page and set a default font and colour */body { margin: 30px; font-family: "Georgia", serif; line-height: 1.8em; color: #333;}/* Set the content dimensions */#content { width: 800px; padding: 50px; margin: 0 auto; display: block; font-size: 1.2em;}#content h2 { line-height: 1.5em;}/* Add curved borders to various elements */#contactForm, .statusMessage, input[type="submit"], input[type="button"] { -moz-border-radius: 10px; -webkit-border-radius: 10px; border-radius: 10px;}/* Style for the contact form and status messages */#contactForm, .statusMessage { color: #666; background-color: #ebedf2; background: -webkit-gradient( linear, left bottom, left top, color-stop(0,#dfe1e5), color-stop(1, #ebedf2) ); background: -moz-linear-gradient( center bottom, #dfe1e5 0%, #ebedf2 100% ); border: 1px solid #aaa; -moz-box-shadow: 0 0 1em rgba(0, 0, 0, .5); -webkit-box-shadow: 0 0 1em rgba(0, 0, 0, .5); box-shadow: 0 0 1em rgba(0, 0, 0, .5); opacity: .95;}/* The form dimensions */#contactForm { width: 40em; height: 33em; padding: 0 1.5em 1.5em 1.5em; margin: 0 auto;}/* Position the form in the middle of the window (if JavaScript is enabled) */#contactForm.positioned { position: fixed; top: 0; bottom: 0; left: 0; right: 0; margin-top: auto; margin-bottom: auto;}/* Dimensions and position of the status messages */.statusMessage { display: none; margin: auto; width: 30em; height: 2em; padding: 1.5em; position: fixed; top: 0; bottom: 0; left: 0; right: 0;}.statusMessage p { text-align: center; margin: 0; padding: 0;}/* The header at the top of the form */#contactForm h2 { font-size: 2em; font-style: italic; letter-spacing: .05em; margin: 0 0 1em -.75em; padding: 1em; width: 19.5em; color: #aeb6aa; background: #dfe0e5 url('images/stamp.jpg') no-repeat 15em -3em; /* http://morguefile.com/archive/display/606433 */ border-bottom: 1px solid #aaa; -moz-border-radius: 10px 10px 0 0; -webkit-border-radius: 10px 10px 0 0; border-radius: 10px 10px 0 0;}/* Give form elements consistent margin, padding and line height */#contactForm ul { list-style: none; margin: 0; padding: 0;}#contactForm ul li { margin: .9em 0 0 0; padding: 0;}#contactForm input, #contactForm label { line-height: 1em;}/* The field labels */label { display: block; float: left; clear: left; text-align: right; width: 28%; padding: .4em 0 0 0; margin: .15em .5em 0 0; font-weight: bold;}/* The fields */input, textarea { display: block; margin: 0; padding: .4em; width: 67%; font-family: "Georgia", serif; font-size: 1em; border: 1px solid #aaa; -moz-border-radius: 5px; -webkit-border-radius: 5px; border-radius: 5px; -moz-box-shadow: rgba(0,0,0,.2) 0 1px 4px inset; -webkit-box-shadow: rgba(0,0,0,.2) 0 1px 4px inset; box-shadow: rgba(0,0,0,.2) 0 1px 4px inset; background: #fff;}textarea { height: 13em; line-height: 1.5em; resize: none;}/* Place a border around focused fields, and hide the inner shadow */#contactForm *:focus { border: 1px solid #66f; outline: none; box-shadow: none; -moz-box-shadow: none; -webkit-box-shadow: none;}/* Display correctly filled-in fields with a green background */input:valid, textarea:valid { background: #dfd;}/* The Send and Cancel buttons */input[type="submit"], input[type="button"] { float: right; margin: 2em 1em 0 1em; width: 10em; padding: .5em; border: 1px solid #666; -moz-border-radius: 10px; -webkit-border-radius: 10px; border-radius: 10px; -moz-box-shadow: 0 0 .5em rgba(0, 0, 0, .8); -webkit-box-shadow: 0 0 .5em rgba(0, 0, 0, .8); box-shadow: 0 0 .5em rgba(0, 0, 0, .8); color: #fff; background: #0a0; font-size: 1em; line-height: 1em; font-weight: bold; opacity: .7; -webkit-appearance: none; -moz-transition: opacity .5s; -webkit-transition: opacity .5s; -o-transition: opacity .5s; transition: opacity .5s;}input[type="submit"]:hover,input[type="submit"]:active,input[type="button"]:hover,input[type="button"]:active { cursor: pointer; opacity: 1;}input[type="submit"]:active, input[type="button"]:active { color: #333; background: #eee; -moz-box-shadow: 0 0 .5em rgba(0, 0, 0, .8) inset; -webkit-box-shadow: 0 0 .5em rgba(0, 0, 0, .8) inset; box-shadow: 0 0 .5em rgba(0, 0, 0, .8) inset;}input[type="button"] { background: #f33;}/* Header/footer boxes */.wideBox { clear: both; text-align: center; margin: 70px; padding: 10px; background: #ebedf2; border: 1px solid #333;}.wideBox h1 { font-weight: bold; margin: 20px; color: #666; font-size: 1.5em;}</style><!-- Some IE7 hacks and workarounds --><!--[if lt IE 8]><style>/* IE7 needs the fields to be floated as well as the labels */input, textarea { float: right;}#formButtons { clear: both;}/* IE7 needs an ickier approach to vertical/horizontal centring with fixed positioning. The negative margins are half the element's width/height.*/#contactForm.positioned, .statusMessage { left: 50%; top: 50%;}#contactForm.positioned { margin-left: -20em; margin-top: -16.5em;}.statusMessage { margin-left: -15em; margin-top: -1em;}</style><![endif]--> |
Let’s look at some interesting sections of the CSS:
- Style for the contact form and status messages
We give the form and status boxes a nice gentle top-to-bottom gradient using-webkit-gradientand-moz-linear-gradient, and we also add a drop shadow withbox-shadow(and its vendor-specific variants). Finally, we give the form and message boxes an opacity of .95 (95%), which makes the page content just show through — a nice subtle effect. - Position the form in the middle of the window (if JavaScript is enabled)
Initially, we simply place the form inline after the page content. This is so that the form can be used for non-JavaScript-enabled browsers without getting in the way of the content. However, for JavaScript browsers, we want the form to appear in the centre of the window, over the top of the content.Our#contactForm.positionedrule does just that. It uses fixed positioning, sets thetop,bottom,leftandrightvalues all to zero, and ensures that all 4 margins are set toauto. This centres the element both horizontally and vertically in most modern browsers. Later we’ll use our JavaScript to add thepositionedclass to the form.We also position the status message boxes in the same way. - The header at the top of the form
Our form includes a nice “Send us an email…” header with an image of a postage stamp. Our#contactForm h2rule styles this header. We give the text a large italic style and space the letters out slightly. We also add margin and padding to create space around and inside the header. We use some negative left margin (-.75em) on the header to bypass the padding on the form, so that the header goes right to the left edge of the form. We also set the width of the header to 19.5em so that it exactly matches the width of the form.Why -.75em and 19.5em? Because ems cascade, and we’ve set our font size to 2em. So -.75em actually becomes -1.5em (the width of the form’s padding), and 19.5em becomes 39em (the width of the form, minus 1em for theh2‘s padding). Phew! Maybe I’ll use pixels next time… :)We also set the heading’s colour, give it a dark background, position the postage stamp image in the top right corner, add a thin bottom border, and add curved top corners. - The fields
We give theinputandtextareafields an attractive font, a rounded border usingborder-radius, and a gentle inner shadow usingbox-shadow. We also float the field labels left so that they sit alongside the fields. When a field is focused (clicked on or moved to with the Tab key), we give it a blue border and remove the shadow. We also setoutline: noneto remove the blue outline added by some browsers. Finally, we use the:validpseudo-class to give correctly completed fields a green background, for those browsers that support HTML5 form validation. - The Send and Cancel buttons
input[type="submit"]selects the Send Email button, whileinput[type="button"]selects the Cancel button. We float them right to position them side by side, and add some margin to give them space. We give them a fixed width, and some padding to make them a decent size. We add a rounded border and subtle drop shadow, and specify text and background colours. We also make the buttons slightly transparent (opacity: .7), and make them fully transparent when hovered over to highlight them. We use a CSS transition to fade the opacity slowly. Finally, when the buttons are clicked (:active) we move the shadow inside the buttons to give a “pressed” appearance, and give them a black-on-white colour scheme.
Step 3: Build the PHP form mailer
We’ve now created our form page, and styled the form. The next step is to build a short PHP script to actually send the email messages. This script will reside on the web server. When the user submits the form, the form’s data is sent to the PHP script, which then sends the email and returns a response indicating whether or not the email was sent successfully.
Here’s the PHP script — call it processForm.php, and save it in the same folder as the form page you created in Steps 1 and 2:
|
1
2
3
4
5
6
7
8
9
10
11
12
13
14
15
16
17
18
19
20
21
22
23
24
25
26
27
28
29
30
31
32
33
34
35
36
37
38
|
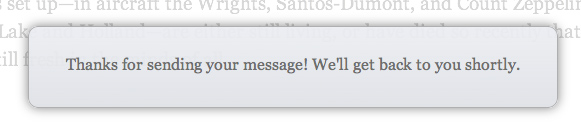
<?php// Define some constantsdefine( "RECIPIENT_NAME", "John Smith" );define( "RECIPIENT_EMAIL", "john@example.com" );define( "EMAIL_SUBJECT", "Visitor Message" );// Read the form values$success = false;$senderName = isset( $_POST['senderName'] ) ? preg_replace( "/[^\.\-\' a-zA-Z0-9]/", "", $_POST['senderName'] ) : "";$senderEmail = isset( $_POST['senderEmail'] ) ? preg_replace( "/[^\.\-\_\@a-zA-Z0-9]/", "", $_POST['senderEmail'] ) : "";$message = isset( $_POST['message'] ) ? preg_replace( "/(From:|To:|BCC:|CC:|Subject:|Content-Type:)/", "", $_POST['message'] ) : "";// If all values exist, send the emailif ( $senderName && $senderEmail && $message ) { $recipient = RECIPIENT_NAME . " <" . RECIPIENT_EMAIL . ">"; $headers = "From: " . $senderName . " <" . $senderEmail . ">"; $success = mail( $recipient, EMAIL_SUBJECT, $message, $headers );}// Return an appropriate response to the browserif ( isset($_GET["ajax"]) ) { echo $success ? "success" : "error";} else {?><html> <head> <title>Thanks!</title> </head> <body> <?php if ( $success ) echo "<p>Thanks for sending your message! We'll get back to you shortly.</p>" ?> <?php if ( !$success ) echo "<p>There was a problem sending your message. Please try again.</p>" ?> <p>Click your browser's Back button to return to the page.</p> </body></html><?php}?> |
This script is fairly straightforward. Let’s break it down:
- Define some constants
First we define some config options for the name and email address of the person who will receive the email message. (Change these to your own name and email address.) We also set a subject for the message. - Read the form values
Next we check for our 3 form fields,senderName,senderEmailandmessage, in the posted form data. For each field, we check if it exists. If it does then we pass its value through a regular expression to remove any potentially malicious characters that a spammer might try to use, and store the result in a variable. If it doesn’t exist then we set the variable to an empty value. - If all values exist, send the email
If the 3 field values all contain data then we send the email. First we construct the recipient string from the recipient name and email address. Then we add a"From:"header to the message using the name and email address that the visitor entered in the form. This is the “From:” value that the recipient will see in their email program. Finally, we use the PHPmail()function to send the email message, storing the return value in the variable$success. (mail()returnstrueif it managed to send the email, orfalseotherwise.) - Return an appropriate response to the browser
Once we’ve attempted to send the email, we send a “success” or “error” message back to the browser as appropriate. If the request URL contained an"ajax"parameter then we know the form was submitted via Ajax using our JavaScript code, so we simply return the value"success"or"error"to the JavaScript, which will then display an appropriate message to the user. However, if the form was submitted without using Ajax then the user must have JavaScript turned off in their browser. In this situation, we display a more helpful error message in the browser, with instructions to the user to use their Back button to return to the page.Our JavaScript will add theajaxparameter to the URL when it submits the form, as you’ll see in Step 6.
Step 4: Include the jQuery library and set the delay
Our form is actually functional now. You can open the page in a browser, click the “Send us an email” link to jump to the form, fill in the fields, and submit the form to send the message.
However, we’re now going to enhance our form using JavaScript to make the experience nicer for the user.
We’ll use jQuery to do most of the heavy lifting, so the first step is to include the jQuery library in the page’s head element:
|
1
|
<script type="text/javascript" src="http://ajax.googleapis.com/ajax/libs/jquery/1.5.1/jquery.min.js"></script> |
Here we’ve linked directly to the jQuery library on Google’s CDN, but you can download the library and host it on your own server if you prefer.
We’ll also add a global config variable, messageDelay, to control how long the message boxes appear on the screen. This value is in milliseconds. Feel free to change it to a shorter or longer time:
|
1
2
3
|
<script type="text/javascript">var messageDelay = 2000; // How long to display status messages (in milliseconds) |
Step 5: Write the init() function
The first stage of our form-enhancing JavaScript is the init() function. This sets up the form so that it can be shown and hidden on demand, and also modifies the form so that it will be submitted using our JavaScript, rather than sent natively by the browser.
Here’s the code:
|
1
2
3
4
5
6
7
8
9
10
11
12
13
14
15
16
17
18
19
20
21
22
23
24
25
26
27
28
29
30
31
32
33
34
35
36
37
38
39
40
41
42
43
|
// Init the form once the document is ready$( init );// Initialize the formfunction init() { // Hide the form initially. // Make submitForm() the form’s submit handler. // Position the form so it sits in the centre of the browser window. $('#contactForm').hide().submit( submitForm ).addClass( 'positioned' ); // When the "Send us an email" link is clicked: // 1. Fade the content out // 2. Display the form // 3. Move focus to the first field // 4. Prevent the link being followed $('a[href="#contactForm"]').click( function() { $('#content').fadeTo( 'slow', .2 ); $('#contactForm').fadeIn( 'slow', function() { $('#senderName').focus(); } ) return false; } ); // When the "Cancel" button is clicked, close the form $('#cancel').click( function() { $('#contactForm').fadeOut(); $('#content').fadeTo( 'slow', 1 ); } ); // When the "Escape" key is pressed, close the form $('#contactForm').keydown( function( event ) { if ( event.which == 27 ) { $('#contactForm').fadeOut(); $('#content').fadeTo( 'slow', 1 ); } } );} |
Let’s look at each chunk of the above code:
- Init the form once the document is ready
We use the jQuery object,$, to trigger ourinit()function once the DOM is ready. - Hide the form, set the submit handler, and position the form
The first thing we do inside theinit()function itself is make some changes to our form,#contactForm.First we hide it from the page using the jQueryhide()method. Then we set itssubmitevent handler to oursubmitForm()function (which we’ll write in a moment). This ensures that, when the user submits the form,submitForm()is called instead of the native browser form submission kicking in. Finally, we add thepositionedCSS class to the form to reposition it in the centre of the browser window. - Make the “Send us an email” links open the form
Next we bind an anonymous event handler function to the “Send us an email” links’clickevents. This function fades out the page content so it’s only just visible in the background; fades the contact form in; and sets the focus on the “Your Name” field, ready for the user to start filling in the form. Finally, the function returnsfalseto prevent the links from being followed. - When the “Cancel” button is clicked, close the form
Now we bind another anonymous function to the “Cancel” button’sclickevent, so that the user can close the form by clicking the button. The function simply fades the form out, and fades the page content back in. - When the “Escape” key is pressed, close the form
Similarly we bind a function to the contact form’skeydownevent, so that we can read any key the user presses when they’re viewing the form. In this function, we check if the user has pressed the “Escape” key (character code: 27). If they have then we close the form by fading it out, and fading the content in.
Step 6: Write the submitForm() function

We’ve now set up our form so that, rather than being submitted in the usual fashion, it will trigger the submitForm() function when the user submits it. This function needs to do some validation and, if all is well, submit the form data to the PHP script via Ajax.
Here’s the function in full:
|
1
2
3
4
5
6
7
8
9
10
11
12
13
14
15
16
17
18
19
20
21
22
23
24
25
26
27
28
29
30
31
|
// Submit the form via Ajaxfunction submitForm() { var contactForm = $(this); // Are all the fields filled in? if ( !$('#senderName').val() || !$('#senderEmail').val() || !$('#message').val() ) { // No; display a warning message and return to the form $('#incompleteMessage').fadeIn().delay(messageDelay).fadeOut(); contactForm.fadeOut().delay(messageDelay).fadeIn(); } else { // Yes; submit the form to the PHP script via Ajax $('#sendingMessage').fadeIn(); contactForm.fadeOut(); $.ajax( { url: contactForm.attr( 'action' ) + "?ajax=true", type: contactForm.attr( 'method' ), data: contactForm.serialize(), success: submitFinished } ); } // Prevent the default form submission occurring return false;} |
Here’s how the function works:
- Store the contact form in a variable
Since we’ll be using it a lot throughout the function, we start off by storing the contact form element in acontactFormvariable. This element is available to our function as thethisvariable, since the function is the event handler for the element’ssubmitevent. We wrap the element in a jQuery object to make it easier to work with. - Check all the fields are filled in
Now we check that each field’s value is not empty by using the jQueryval()method on each field. - Display a warning if the form isn’t completed
If 1 or more of the fields are empty, we fade out the form, then fade in the#incompleteMessagediv, which contains the “Please complete all the fields…” message. We keep the message there for the time specified by themessageDelayvariable, then fade it out again. Once it’s faded out, we fade the form back in so that the user can complete it. - Submit the form if it is completed
Now we get to the meat of the JavaScript. If the form is completed then we first fade out the form, and fade in the “Sending your message…” box. Now we call the jQueryajax()method to submit the form via Ajax to the PHP script. We pass the following arguments to the method:url- The URL to send the form to. We grab this from the form’s
actionattribute, and append anajax=trueparameter to the query string so that our PHP script knows the form was sent via Ajax, rather than via the usual method. type- The type of request to make (
"POST"or"GET"). We grab this from the form’smethodattribute, which in this case is set to"POST". data- The data to send with the request. For this, we call the jQuery
serialize()method on the contact form object. This method takes all the field names and values in the form and encodes the data in a query string. We then pass this string to theajax()method so it can send the data to the PHP script. success- This is a callback function that will be called once the Ajax request has finished and the browser has received the response from the server. We set this to our
submitFinished()function, which we’ll write in a moment.
- Prevent the default form submission occurring
Finally, our event handler returnsfalseto prevent the form being submitted in the usual way.
Step 7: Write the submitFinished() function
The last function we need to write is submitFinished(), which is called once the Ajax response from the PHP script has been received by the browser. This function needs to check the response and display a success or error message as appropriate:
|
1
2
3
4
5
6
7
8
9
10
11
12
13
14
15
16
17
18
19
20
21
22
23
24
25
26
27
28
29
30
|
// Handle the Ajax responsefunction submitFinished( response ) { response = $.trim( response ); $('#sendingMessage').fadeOut(); if ( response == "success" ) { // Form submitted successfully: // 1. Display the success message // 2. Clear the form fields // 3. Fade the content back in $('#successMessage').fadeIn().delay(messageDelay).fadeOut(); $('#senderName').val( "" ); $('#senderEmail').val( "" ); $('#message').val( "" ); $('#content').delay(messageDelay+500).fadeTo( 'slow', 1 ); } else { // Form submission failed: Display the failure message, // then redisplay the form $('#failureMessage').fadeIn().delay(messageDelay).fadeOut(); $('#contactForm').delay(messageDelay+500).fadeIn(); }}</script> |
The function works as follows:
- Get the response
jQuery passes the response from the PHP script as an argument to thesubmitFinished()function. We take this string and pass it through the jQuerytrim()method to remove any whitespace. - Fade out the “sending” message
Next we fade out the “Sending your message…” box by calling the jQueryfadeOut()method. - If email was sent successfully, display a success message
If theresponsevariable holds the string"success", as returned by our PHP script, then we know that the email was successfully queued for delivery. So we fade in the success message, hold it for a couple of seconds, then fade it out. We also reset the form fields to empty values, in case the user wants to send another message. Finally, once the success message has faded out, we fade the page content back in. - If there was a problem, display a failure message
If the PHP script returned anything other than"success"then we know there was a problem with the submission, so we display the failure message stored in the#failureMessagediv, then fade the form back in so that the user can correct any problems with the form.
And that’s the end of our JavaScript!
Summary
We’ve now built our slick Ajax contact form. Not only does it look good, but it’s easy to use, and the visitor can send an email without ever having to leave the page they are reading. Nice!
Related articles
- AjaxQ jQuery Plugin – A Tiny, Simple jQuery Plugin For Sequential Ajax Requests (functionn.blogspot.com)
- jQuery Roundup: Joconut, jQuery Table Sort, jQuery.pushevent (dailyjs.com)
- useful php,jquery scripts (bput4all.wordpress.com)
How to Count Visitors Using PHP & MySQL
This example tutorial will show how to count visitors by using PHP and MySLQ, you can count all visitor visited your website by ip, hour, minute, date, month, year, page, browser, referrer and it is stored in MySQL. So you can get detail information about your visitors.
Tracking our website’s visitors is a very important step if you’re serious enough about analyzing your traffic and optimizing your pages to get the most of your visitors. There are many reasons why you should think of implementic tracking scripts (it’s crucial to know where your traffic is coming from and where it goes, wha people search, how long they stay etc.), you could increase sales, you could optimize your pages to increase page hits, you could make lots of changes to increase your Adsense profits and the list goes on and on.
Bellow is tutorial how to count visitors using php and MySQL, follow with this step :
First step you need create visitors_table. Copy code bellow and pasted it Query SQL, you will get a table “visitors_table’.
CREATE TABLE `visitors_table` (
`ID` INT( 11 ) NOT NULL AUTO_INCREMENT PRIMARY KEY ,
`visitor_ip` VARCHAR( 32 ) NULL ,
`visitor_browser` VARCHAR( 255 ) NULL ,
`visitor_hour` SMALLINT( 2 ) NOT NULL DEFAULT '00',
`visitor_minute` SMALLINT( 2 ) NOT NULL DEFAULT '00',
`visitor_date` TIMESTAMP( 32 ) NOT NULL DEFAULT CURRENT_TIMESTAMP ,
`visitor_day` SMALLINT( 2 ) NOT NULL ,
`visitor_month` SMALLINT( 2 ) NOT NULL ,
`visitor_year` SMALLINT( 4 ) NOT NULL ,
`visitor_refferer` VARCHAR( 255 ) NULL ,
`visitor_page` VARCHAR( 255 ) NULL
) TYPE = MYISAM ;
Ok. We have our database ready for storing our visitors info We will need to setup a script which will store the visitor’s info in our database so let’s start writing it. We need the ip address of our visitor so we will get it using the following method.
function getBrowserType () {
if (!empty($_SERVER['HTTP_USER_AGENT']))
{
   $HTTP_USER_AGENT = $_SERVER['HTTP_USER_AGENT'];
}
else if (!empty($HTTP_SERVER_VARS['HTTP_USER_AGENT']))
{
   $HTTP_USER_AGENT = $HTTP_SERVER_VARS['HTTP_USER_AGENT'];
}
else if (!isset($HTTP_USER_AGENT))
{
   $HTTP_USER_AGENT = '';
}
if (ereg('Opera(/| )([0-9].[0-9]{1,2})', $HTTP_USER_AGENT, $log_version))
{
   $browser_version = $log_version[2];
   $browser_agent = 'opera';
}
else if (ereg('MSIE ([0-9].[0-9]{1,2})', $HTTP_USER_AGENT, $log_version))
{
   $browser_version = $log_version[1];
   $browser_agent = 'ie';
}
else if (ereg('OmniWeb/([0-9].[0-9]{1,2})', $HTTP_USER_AGENT, $log_version))
{
   $browser_version = $log_version[1];
   $browser_agent = 'omniweb';
}
else if (ereg('Netscape([0-9]{1})', $HTTP_USER_AGENT, $log_version))
{
   $browser_version = $log_version[1];
   $browser_agent = 'netscape';
}
else if (ereg('Mozilla/([0-9].[0-9]{1,2})', $HTTP_USER_AGENT, $log_version))
{
   $browser_version = $log_version[1];
   $browser_agent = 'mozilla';
}
else if (ereg('Konqueror/([0-9].[0-9]{1,2})', $HTTP_USER_AGENT, $log_version))
{
   $browser_version = $log_version[1];
   $browser_agent = 'konqueror';
}
else
{
   $browser_version = 0;
   $browser_agent = 'other';
}
return $browser_agent;
}

Here is browser types code:
$visitor_browser = getBrowserType();
Now we need to define hour, minute, day, month and year of visitors:

$visitor_hour = date("h");
$visitor_minute = date("i");
$visitor_day = date("d");
$visitor_month = date("m");
$visitor_year = date("y");
And next we need to find out who is sending us visitors so we can thank them.
$visitor_refferer = gethostbyname($HTTP_REFERER);So to get the full url of our page we will use this function:
function selfURL() {
$s = empty($_SERVER["HTTPS"]) ? '' : ($_SERVER["HTTPS"] == "on") ? "s" : "";
$protocol = strleft(strtolower($_SERVER["SERVER_PROTOCOL"]), "/").$s;
$port = ($_SERVER["SERVER_PORT"] == "80") ? "" : (":".$_SERVER["SERVER_PORT"]);
return $protocol."://".$_SERVER['SERVER_NAME'].$port.$_SERVER['REQUEST_URI'];
}
function strleft($s1, $s2) { return substr($s1, 0, strpos($s1, $s2));
}
Now we have our page, we will store it on a variable:
$visited_page = selfURL();We need to create a new page which will be used to connect to the database.
It is visitors_connections.php. Copy this code and save it:
$hostname_visitors = "host";
$database_visitors = "database";
$username_visitors = "username";
$password_visitors = "password";

$visitors = mysql_connect($hostname_visitors, $username_visitors,
 $password_visitors) or rigger_error(mysql_error(),E_USER_ERROR);

function getBrowserType () {
if (!empty($_SERVER['HTTP_USER_AGENT']))
{
   $HTTP_USER_AGENT = $_SERVER['HTTP_USER_AGENT'];
}
else if (!empty($HTTP_SERVER_VARS['HTTP_USER_AGENT']))
{
   $HTTP_USER_AGENT = $HTTP_SERVER_VARS['HTTP_USER_AGENT'];
}
else if (!isset($HTTP_USER_AGENT))
{
   $HTTP_USER_AGENT = '';
}
if (ereg('Opera(/| )([0-9].[0-9]{1,2})', $HTTP_USER_AGENT, $log_version))
{
   $browser_version = $log_version[2];
   $browser_agent = 'opera';
}
else if (ereg('MSIE ([0-9].[0-9]{1,2})', $HTTP_USER_AGENT, $log_version))
{
   $browser_version = $log_version[1];
   $browser_agent = 'ie';
}
else if (ereg('OmniWeb/([0-9].[0-9]{1,2})', $HTTP_USER_AGENT, $log_version))
{
   $browser_version = $log_version[1];
   $browser_agent = 'omniweb';
}
else if (ereg('Netscape([0-9]{1})', $HTTP_USER_AGENT, $log_version))
{
   $browser_version = $log_version[1];
   $browser_agent = 'netscape';
}
else if (ereg('Mozilla/([0-9].[0-9]{1,2})', $HTTP_USER_AGENT, $log_version))
{
   $browser_version = $log_version[1];
   $browser_agent = 'mozilla';
}
else if (ereg('Konqueror/([0-9].[0-9]{1,2})', $HTTP_USER_AGENT, $log_version))
{
   $browser_version = $log_version[1];
   $browser_agent = 'konqueror';
}
else
{
   $browser_version = 0;
   $browser_agent = 'other';
}
return $browser_agent;
}

function selfURL() {
$s = empty($_SERVER["HTTPS"]) ? '' : ($_SERVER["HTTPS"] == "on") ? "s" : "";
$protocol = strleft(strtolower($_SERVER["SERVER_PROTOCOL"]), "/").$s;
$port = ($_SERVER["SERVER_PORT"] == "80") ? "" : (":".$_SERVER["SERVER_PORT"]);
return $protocol."://".$_SERVER['SERVER_NAME'].$port.$_SERVER['REQUEST_URI'];
}

function strleft($s1, $s2) { return substr($s1, 0, strpos($s1, $s2)); }

function paginate($start,$limit,$total,$filePath,$otherParams) {
    global $lang;

    $allPages = ceil($total/$limit);

    $currentPage = floor($start/$limit) + 1;

    $pagination = "";
    if ($allPages>10) {
        $maxPages = ($allPages>9) ? 9 : $allPages;

        if ($allPages>9) {
            if ($currentPage>=1&&$currentPage<=$allPages) {
                $pagination .= ($currentPage>4) ? " ... " : " ";

                $minPages = ($currentPage>4) ? $currentPage : 5;
                $maxPages = ($currentPage<$allPages-4) ? $currentPage : $allPages - 4;

                for($i=$minPages-4; $i<$maxPages+5; $i++) {
                    $pagination .= ($i == $currentPage) ? "<a href=\"#\"
                    class=\"current\">".$i."</a> " : "<a href=\"".$filePath."?
                    start=".(($i-1)*$limit).$otherParams."\">".$i."</a> ";
                }
                $pagination .= ($currentPage<$allPages-4) ? " ... " : " ";
            } else {
                $pagination .= " ... ";
            }
        }
    } else {
        for($i=1; $i<$allPages+1; $i++) {
        $pagination .= ($i==$currentPage) ? "<a href=\"#\" class=\"current\">".$i."</a> "
        : "<a href=\"".$filePath."?start=".(($i-1)*$limit).$otherParams."\">".$i."</a> ";
        }
    }

    if ($currentPage>1) $pagination = "<a href=\"".$filePath."?
    start=0".$otherParams."\">FIRST</a> <a href=\"".$filePath."?
    start=".(($currentPage-2)*$limit).$otherParams."\"><</a> ".$pagination;
    if ($currentPage<$allPages) $pagination .= "<a href=\"".$filePath."?
    start=".($currentPage*$limit).$otherParams."\">></a> <a href=\"".$filePath."?
    start=".(($allPages-1)*$limit).$otherParams."\">LAST</a>";

    echo '<div>' . $pagination . '</div>';
}
Now we have all the details information for store in MySQL, So we need to write them into our database. We will create a new file called “visitor_tracking.php” and include it in every page that we want to track:
require_once('visitors_connections.php');//the file with connection code and functions
//get the required data

$visitor_ip = GetHostByName($REMOTE_ADDR);
$visitor_browser = getBrowserType();
$visitor_hour = date("h");
$visitor_minute = date("i");
$visitor_day = date("d");
$visitor_month = date("m");
$visitor_year = date("Y");
$visitor_refferer = GetHostByName($HTTP_REFERER);
$visited_page = selfURL();

//write the required data to database
mysql_select_db($database_visitors, $visitors);
$sql = "INSERT INTO visitors_table (visitor_ip, visitor_browser, visitor_hour,
 visitor_minute, visitor_date, visitor_day, visitor_month, visitor_year,
 visitor_refferer, visitor_page) VALUES ('$visitor_ip', '$visitor_browser',
 '$visitor_hour', '$visitor_minute', '$visitor_date', '$visitor_day', '$visitor_month',
 '$visitor_year', '$visitor_refferer', '$visitor_page')";
$result = mysql_query($sql) or trigger_error(mysql_error(),E_USER_ERROR);
To display information detail about visitors, we need to create a new page called “display_visits.php”
Go to create new page PHP and then copy code bellow and save it.
require_once('visitors_connections.php');//the file with connection code and functions

if ($_GET['start'] == "") $start = 0;
else $start = $_GET['start'];
$limit = 15;

$additionalQuery = "SQL_CALC_FOUND_ROWS ";

mysql_select_db($database_visitors, $visitors);
$query_visitors = "(SELECT ".$additionalQuery." * FROM visitors_table WHERE";

if ($_POST['day']!="") {
$query_visitors .= " visitor_day = '".$_POST['day']."'";
} else {
$query_visitors .= " visitor_day = ".date("d")."";

if ($_POST['month']!="") {
$query_visitors .= " AND visitor_month = '".$_POST['month']."'";
} else {
$query_visitors .= " AND visitor_month = ".date("m")."";
}

if ($_POST['year']!="") {
$query_visitors .= " AND visitor_year = '".$_POST['year']."'";
} else {
$query_visitors .= " AND visitor_year = ".date("Y")."";
}}
$query_visitors .= " LIMIT $start,$limit)";
$insert_visitors = mysql_query($query_visitors, $visitors) or die(mysql_error());
$row_visitors = mysql_fetch_assoc($insert_visitors);
$totalRows_visitors = mysql_num_rows($insert_visitors);

$nbItems = mysql_result(mysql_query("Select FOUND_ROWS() AS nbr"),0,"nbr");
if ($nbItems>($start+$limit)) $final = $start+$limit;
else $final = $nbItems;

echo '<table style="width:100%; border:1px dashed #CCC" cellpadding="3">
      <form id="form1" name="form1" method="post" action="display_visits.php">
       <tr>
        <td>day
        <select name="day" id="day">
          <option value="" selected="selected"></option>
          <option value="01">01</option>
          <option value="02">02</option>
          <option value="03">03</option>
          <option value="04">04</option>
          <option value="05">05</option>
          <option value="06">06</option>
          <option value="07">07</option>
          <option value="08">08</option>
          <option value="09">09</option>
          <option value="10">10</option>
          <option value="11">11</option>
          <option value="12">12</option>
          <option value="13">13</option>
          <option value="14">14</option>
          <option value="15">15</option>
          <option value="16">16</option>
          <option value="17">17</option>
          <option value="18">18</option>
          <option value="19">19</option>
          <option value="20">20</option>
          <option value="21">21</option>
          <option value="22">22</option>
          <option value="23">23</option>
          <option value="24">24</option>
          <option value="25">25</option>
          <option value="26">26</option>
          <option value="27">27</option>
          <option value="28">28</option>
          <option value="29">29</option>
          <option value="30">30</option>
          <option value="31">31</option>
        </select></td>
        <td>Month
        <select name="month" id="month">
          <option value="" selected="selected"></option>
          <option value="1">1</option>
          <option value="2">2</option>
          <option value="3">3</option>
          <option value="4">4</option>
          <option value="5">5</option>
          <option value="6">6</option>
          <option value="7">7</option>
          <option value="8">8</option>
          <option value="9">9</option>
          <option value="10">10</option>
          <option value="11">11</option>
          <option value="12">12</option>
        </select></td>
        <td>Year
        <select name="year" id="year">
          <option value="" selected="selected"></option>
          <option value="2007">2007</option>
        </select></td>
        <td><input type="submit" name="Submit" value="Submit" /></td>
        <td></td>
       </tr>';

echo '<tr>
        <td style="width:15%;border-bottom:1px solid #CCC">IP</td>
        <td style="width:15%;border-bottom:1px solid #CCC">Browser</td>
        <td style="width:15%;border-bottom:1px solid #CCC">Time</td>
        <td style="width:30%;border-bottom:1px solid #CCC">Refferer</td>
        <td style="width:25%;border-bottom:1px solid #CCC">Page</td>
       </tr>';

do {

echo '<tr onmouseout="this.style.backgroundColor=\'\'"
      onmouseover="this.style.backgroundColor=\'#EAFFEA\'">
        <td>'.$row_visitors['visitor_ip'].'</td>
        <td>'.$row_visitors['visitor_browser'].'</td>
        <td>'.$row_visitors['visitor_hour'].':'.$row_visitors['visitor_minute'].'</td>
        <td>'.$row_visitors['visitor_refferer'].'</td>
        <td>'.$row_visitors['visitor_page'].'</td>
       </tr>';
} while ($row_visitors = mysql_fetch_assoc($insert_visitors));
paginate($start,$limit,$nbItems,"display_visits.php","");
There’s only one small step to do and we’re ready to see some results. We need to include the following line in every page that we need to track results for:
include('visitor_tracking.php');To see the results please call page “display_visits.php” in your browser. Ok now I’m testing it, it works fine, I hope you will find it useful somewhere in your website. Good Luck…!
GOOGLE DRIVE
A few years ago, many storage online appeared on the web. The first one, in 2005, was Box.net, followed in 2008 by Dropbox.net, including the multi-platform synchronization.
In parallel, we also saw huge OS editors, like Apple, Microsoft, … providing their own solution as SkyDrive, iCloud, Ubuntu One.
Today, after so many years of rumors, GOOGLE DRIVE is born. It is presented basically as an upgrade of Google documents, and allows user to get, for free, up to 5Go of online disc space. User can also choose another month to month plan between those proposed: 25 Go for $ 2,49 per month, 100 Go for $4,99 per month, and up to 1To for $49.99 dollars per month.
But what distinguish this plateforme from others?
Google includes a lot of search tools, character recognition system, and a tools able to analyse the photos stored on its servers. More over, when Google Documents proposed to virtualize about 15 files directly on your browser, Google drive will allow you to open more than 30 files,also Illustrator, Photoshop, or HD video, even if you don’t have the adequat softwares on your computer.
Google Drive will also includes a lot of differents tools and useful applications: you will ba ble to synchronize your documents in order to find them really easily on your computer. If you have an Android phone, just download a small application, and all your files will be available on your phone. You will also be able to share photos made with your phone with all your contact through your personal space.
https://developers.google.com/drive/examples/php
https://developers.google.com/drive/
https://developers.google.com/drive/get_started
Related articles
- Comparing Google Drive, SkyDrive, and Dropbox storage (cbsnews.com)
- Google Drive, iCloud, Dropbox and More Compared: What’s the Best Cloud Option? [Google Drive] (gizmodo.com)
- What Is Google Drive? (gizmodo.com.au)
- Google Drive Launched With 5GB Free Storage (techmadly.com)
- Encryptors scramble to support Google Drive, SkyDrive (gigaom.com)
Social Gestures and the Social Web – Part I
FROM the Below Article was Copied from the website http://blog.engag.io/2012/04/15/social-gestures-and-the-social-web-part-i/
The Original Author – MR. William Mougayar
Social Gesturing is at the heart of the social web. Those little signals have a small footprint but a large impact.
The crowd-sourced nature of social gestures adds up to a lot of value. After all, Facebook with all its might was mostly based and founded on 3 basic social gestures: liking, sharing and linking, each taking a fraction of a second to accomplish.
I’ve been thinking a lot about the hierarchy of social gestures in terms of value and potential. And I came-up with the following way to organize them into a taxonomy where certain gestures are grouped with each other according to the objective they are meant to achieve and the purpose they target: People, Interests or Content.
The graph below is self-explanatory. The objective of social gesturing is to a) grab Attention, b) Express yourself, c) Curate interests (or content), d) develop Relationships, or e) Engage with people.
The most commonly used Social Gestures are Sharing, Linking and Liking when it comes to Content, and Following or Friending when it comes to People. But the area that holds the most promise is Engagement with People.
There is an ascending amount of time it takes to accomplish each gesture. If you look at the two extremes, Discussing something with someone is a lot more time-consuming than Clicking on content or Sharing it.
Personally, and for Engagio, I’m very interested in the gestures around Social Engagement. I think we’re just getting started in that segment, and I plan to cover more on that topic in Part II of this post.
In the meantime, what is your opinion on the following 3 questions:
- Are there other Social Gestures that you are seeing?
- Do you see new ones that are emerging?
- Which ones do you use the most?
Related articles
- Engagio: A Canadian Startup Story and the future of the Social Web (startupnorth.ca)
- Engagio wants to be your one-stop social inbox (gigaom.com)
- How to swear in Italian (afrahm.wordpress.com)
- Don’t Export Your American Hand Gestures [Infographic] (communicationstudies.com)
- ShadowPuppets prototype lets you pinch-to-zoom, click, and scroll with shadow gestures (theverge.com)
Engagio: Recognize & Build Relationships On Social Network Easily

Engagio helps you to track your online conversations and allows you to develop meaningful relationships from them. In short, it is your tool to find quality relationships.
Pitched as ‘Your inbox for online conversations and relationships’, it is a tool much like Gmail, but is for managing your conversations in social networking sites and commenting systems. Engagio gives you visibility about the people behind these conversations and reveals their social identities profile. It saves you much time and allows you to connect with others in a much better and deeper way.
Although social media has many advantages, sometimes we fall short of managing our many relationships on social networking sites. With so many friends, family members, colleagues, classmates and relatives in our contacts list, we miss out on building quality relationships with people who matter. Engagio helps you to do that and more.
Engagio believes that commenting and conversations are strong social signals. They are stronger than likes, shares and links. Comments are implicit linkages about people. After all, you only care to comment on somebody’s post and take time to do it when you like that person or what s/he has to say. Like is easy, commenting takes time and thought. Engagio studies all that and more, and give you full visibility into the potential relationships behind your comments and conversations.
The service is frictionless and derives implicit data from your normal, everyday interactions. It does not matter whether your conversations are on social networks or inside your Engagio inbox, Engagio tracks them all. You connect to your social networks and Engagio starts to track, record, analyze and report on your interaction activity.
All you need to do is to signup from the entry page or jump to your inbox. You can easily track your conversations on Facebook, LinkedIn, Twitter, Google+, Disqus-enabled sites, Hacker news comments, Foursquare and more. This is a wonderful service for everybody who wishes to build up on great relationships without putting in much time and effort.
Billa II – Teaser Promo
 Ajith is back with Billa II after the successful 2007 flick Billa which was directed by Vishnuvardhan. Expected to release on 25th May, Billa II is supposed to be a prequel to Billa ( unlike Don-2 which was a sequel ) and talks about how David, an ordinary man from coastal Tamil Nadu becomes the dreaded don Billa. Directed by Chakri Toleti and also starring Parvathy Omanakuttan, Bruna Abdullah, Vidyut Jamwal and Sudhanshu Pandey in supporting roles who all make their debut in Tamil cinema, the film has music by Yuvan Shankar Raja and R.D.Rajasekharis the DOP.
Expected to be the big ticket summer Tamil release, watch this interesting teaser for now.
Explore the REST API

I have had the pleasure of working with the WordPress.com REST API over the past few weeks and am very excited to start “dogfooding” this resource everywhere I can.
One cool feature is that all the endpoints are self-documenting. In fact, the documentation for the REST API is built by the API itself! With this information we were able to build a console to help debug and explore the various resources that are now available through the new API. So let me introduce you to the new REST console for WordPress.com.
A word of caution: the console is only available when you are logged into WordPress.com and is hooked up to the live system, so be careful with your POST requests!
At its simplest you can supply the method, path, query, and body for the resource you wish to examine (it’s pre-populated with /me). Press “Submit” to see the response status for your request and an expandable JSON object that you can explore. All links listed under meta are active, so click one to make another request.
To get a better idea of what kind of parameters a request can take, select it under the “Reference” section. It will then provide an interface with some contextual help to let you know which path, query, and body parameters it accepts, what each of those parameters are for, and a field for you to provide the value.
Related articles
- Explore the REST API (developer.wordpress.com)
- How to analyze your Blog Traffic using WordPress Stats API (selvabalaji.wordpress.com)
- Apigee v2 Console: Making learning APIs as simple as possible, but not simpler (apigee.com)
- Phasing out old API, upgrade your WordPress plugins! (flattr.net)
- REST easy with JIRA 5 (blogs.atlassian.com)
Driving Traffic To Your Website
eMarketing and SEO (Search Engine Optimization)
People need to know who you are, and the products and services that you provide. This is accomplished in four strategic areas:
- SEO (Search Engine Optimization)
- Online advertising
- Links from other websites or Blogs
- Social Networks
SEO (Search Engine Optimization) is a way of adding strategic content to your webpages. These are keywords or phrases that pertain to your products or services. They may also be relevant to any value content that you provide, such as “how to guides”, video, white papers, etc. We’ll cover these later when we discuss capturing leads.

SEO is a process, not a one time job. It needs to be monitored and changed as needed. The goal is to raise your search engine rankings.
SEO is also about good coding, tags, and metadata. These elements are not seen, but are used by search engines to return SERP’s (Search Engine Result Pages) to Internet searches. This is what we call “organic” drivers, or a kind of “free advertising”. Basically relevant content and code for internet searches.
Incoming links from other websites are also very important, and rated highly among search engines. We will show you how to obtain more incoming links from larger websites.
Online advertising is crucial to the success of any eMarketing strategy. This is paid advertising with the major or local search engines such as Google, Yahoo, MSN, AOL, etc. Many large companies have full departments dedicated to creating and tracking online advertising campaigns. Online advertising is much more than creating an ad and letting it go. You can waste a lot of money if you don’t properly define your campaign, test it, and than track results. This requires constant monitoring and adjustment to maximize your investment and results.

A Sturm Media online advertising campaign consists of:
- Analysis of competition online advertising
- Development of keywords and phrases
- Creation of a landing pages with “Call to Action” (CTA)
- Ad copy for three test ads
- Automated lead capture and follow-up
Advertising can also be negotiated with other large websites that have extremely high traffic counts, or media buys for banner placement on groups of web pages or high traffic blogs. This is usually more expensive and done as a phase two or three implementation, after several successful search engine campaigns.
Links from other websites or blogs are not only important for SEO and search engine ranking, but as a direct connection to your website. A question we get often is how can we get more links to our website? The answer to the question is simple, but the implementation is not. Content, content, content… content is king and everyone wants it. Once you have compelling value content, you will see links from other websites and blogs increase.
Sturm Media has a proprietary blog creation tool that aggregates data in any targeted vertical. We can create blogs that augment advertising campaigns, and provide additional incoming links. The blogs are completely independent, and as such can provide company reviews and resource guides that promote our clients. This is our competition killer, and since we developed the methodology, we are the preeminent source for this type of online marketing.
Social Networking is popular and growing at exponential rates. Websites like Facebook, Linkedin, YouTube, Twitter, and many more are a way to reach hundreds of thousands of potential customers. Often, our clients think that they don’t have the time or the bandwidth for this type of marketing. We can show ways of implementing social networking into your plan that will take very little time. Social networking is a vital component of any strategic eMarketing plan.


Related articles
- The Logic Behind Search Engine Optimization Techniques (ronmedlin.com)
- What are best practice SEO techniques? (marketing.yell.com)
- What is pay-per-click advertising? (marketing.yell.com)
- What are backlinks and how can they improve SEO? (marketing.yell.com)
- Will custom web design help drive traffic? (marketing.yell.com)
How to analyze your Blog Traffic using WordPress Stats API

Analyzing my blog traffic is one of my favorite past times. Seeing traffic surge and strangers using my posts gives me gratification. Initially, my analysis was fairly low tech – checking WordPress stats page periodically. After doing it a few times, I realized I could do more methodically – and I can use the statistics to do some rudimentary data mining.
As you know, I have a WordPress.com blog. WordPress exposes the statistics in two ways : As a flash chart in the dashboard and as API service.
Viewing Blog Stats – Low Tech Way
If you want to take a look at your blog’s stats today , then you can do it in the dashboard. Assuming you are logged into your WordPress login, go to your blog. You will see WordPress toolbar at the top of the page. Click “My Dashboard“. It will show a chart of total daily visits for the past 15 days. If you want more details, hover your mouse over “My Account” and select “Stats”.
This page shows a wealth of information about your blog but it is limited to 2 days – today and yesterday. There are atleast 6 important statistics in that page.
WordPress Stats Sections
a) Views Per Day
This is probably the statistic you are most interested in. This plots the total number of visits each day for the last 30 days. This also has multiple tabs which allows you to aggregate the statistics information. For example you can view the total weekly and monthly visits . This gives a basic view about how your blog is faring.
b) Referrers
Referrers are basically web pages from which visitors reached your blog. There are different types of referrers : pingbacks, related posts, explicit linking etc. If a certain website is driving lot of visitors to your blog , it is time to notice ! Referrers allows you to get that insight. This panel shows the top 10 referrers. You can click on the “Referrers” link to get the full listing.
c) Top Posts and Pages
This shows the top 10 posts for the given day. One interesting thing is that they track home page separately. Also if you have different pages (eg About), then visits to these pages are also tracked. Again, if you want to see the number of visits to each page, you can click on the title link.
One interesting thing is that each of the posts/pages in this section also has an addition chart icon near them. Clicking on them gives the stats for that particular post alone. The new page shows a chart detailing how many visits occurred to that page in the last few weeks. Most interestingly , they also show the average visits per day for the last few weeks and months. This gives a glimpse into the lasting popularity of your post.
d) Search Engine Terms
I am not very clear what this exactly means – The instruction says “These are terms people used to find your blog.” . I am not sure if this corresponds to search terms typed in search engines or in WordPress search boxes etc . Anyway, this panel gives information about the search terms that fetch visits to your blog.
e) Clicks
Clicks panel shows the list of links in your blog that your visitors clicked. In a way , you can consider it as an inverse of referrers. In this case, you act as a referrer for some other blog. This post gives some hints about the type of visitors to your blog.
f) Aggregate Statistics
There is also another panel that shows some aggregate stats. This shows the total number of views to your blog so far , number of blogs and posts , email subscribers etc.
A Better Way
Using WordPress Stats page to get your data is fairly low tech. This gives some data which can only give you an instinct of how things go. But it will not give you any deeper insights. For doing more data mining, you need data – lots of data. Fortunately, WordPress makes available a stats API which you can query to get regular data. In the rest of the post , we will talk about the API and how to use the data that you get out of it.
Using WordPress Stats API
The primary url which provides the stats is http://stats.wordpress.com/csv.php . You can click on it to see the required parameters. There are 4 important parameters to this API.
a) api_key : api_key is a mandatory parameter and ensures that only owner queries the website. There are three ways to get this information. This key is emailed to you at the time you created your blog. Or you can access it at My Dashboard -> Users -> Personal Settings. This will show your api key. For the truly lazy click this url .
b) blog_id : This is a number which uniquely identifies your blog. Either blog_id or blog_uri is mandatory. I generally prefer blog_id. Finding blog_id is a bit tricky. Go to the blog stats page (My Account -> Stats). Click on the title link of “Top Posts and Pages”. This will open a new page which shows the statistics for last 7 days. If you look at the page’s url, it will have a parameter called blog. The value of this parameter is the blog_id . Atleast for my blog , it is a 8 digit number.
c) blog_uri : If you do not want to take all the trouble of getting blog_id , use blog_uri. This is nothing but the url of your blog (http://blah.wordpress.com).
d) table : This field identifies the exact statistic you want. One of views, postviews, referrers, searchterms, clicks. Each of these correspond to the sections of WordPress stats discussed above. If table is not specified , views is selected as the default table.
You can get more details from the stats API page given above.
Sample Python Scripts to fetch WordPress Stats
I have written a few scripts which fetch each of the WordPress stats. One of them run every hour and gets the total number of views so far for the whole blog. The other scripts runs once a day and fetch the total clicks, search terms, referrer and top posts for that day. All of these store the data as a csv file which lends itself to analysis.
If you are interested in the scripts , the links to them are :
1. getBlogDaysStats.py : Fetches the total views for the whole blog at the current time. For best results run every hour.
2. getBlogReferrers.py : Fetches all the referrers to your blog.
3. getBlogPostViews.py : Fetches the number of views for individual blog posts and pages.
4. getBlogSearchTerms.py : Fetches all the search terms used to find your blog today.
5. getBlogClicks.py : Fetches the urls that people who visited your blog clicked.
How to Collect WordPress Statistics
The first step is of course to collect data periodically. I use cron to run the scripts. My crontab file looks like this :
11 * * * * /usr/bin/python scriptpath/getBlogDaysStats.py
12 0 * * * /usr/bin/python scriptpath/getBlogClicks.py
14 0 * * * /usr/bin/python scriptpath/getBlogPostViews.py
15 0 * * * /usr/bin/python scriptpath/getBlogReferrers.py
16 0 * * * /usr/bin/python scriptpath/getBlogSearchTerms.py
Basically, I run the getBlogDaysStats every hour and other scripts every day. I also run the rest of scripts at early morning so that it fetches the previous day’s data.
How to Use WordPress Statistics
If you run the scripts for few days, you will have lot of data. The amount of analysis you can make is limited only by your creativity. In this section, I will tell some of the ways I use the stats instead of giving an explicit how-to.
1. Views per day : It is collected by getBlogDaysStats.py. The most basic stuff is to chart them. This will give a glimpse of your trend – If it is static or climbing, then good news. If it is falling down it is something to worry about. I must also mention that have a more or less a plateau in your chart happens often. For eg in my blog, the charts follow a pattern – It increases for quite some time , then stays at the same level for a long time and then increases again. Also , worrying about individual day’s statistics is not a good idea. Try to aggregate them into weekly and monthly values as they give a less noisy view of your blog traffic.
Another common thing to do is to analyze per hour traffic. This can be easily derived from the output of the script. Basically, if m is the number of views at time a and n is the number of views at time b , then you received n-m views in b-a hours. I usually calculate it for every hour. This gives a *basic* idea of peak time for your blog – You can also infer your primary audience , although the interpretation is ambiguous. As an example , I get most of my traffic at night – especially between 1 AM – 9 AM. Morning time traffic is pretty weak and it picks up again in the evening. Interpreting this is hard as my blog covers a lot of topics – but if your blog is more focused you learn a lot about your visitors.
2. Referrers : This is a very useful statistic if you do some marketing for your blog. For best results, you may want to use just the domain of the url instead of the whole url for analysis. Using it you can figure out which sites drive traffic to your blog. If it is another blog, then it is a good idea to cultivate some friendship with that blog’s owner. For eg, for my blog , I found that digg drives more traffic that reddit. Also facebook drives some traffic to my blog – so I use WordPress’s facebook publicize feature. I also find that I get some traffic due to WordPress’s related posts feature which means that I must use good use of categories and tags. Your mileage may vary but I hope the basic idea is clear.
3. Individual Post Views : This is probably the most useful set of statistics. Basically , it allows you to analyze the traffic of individual posts over a period of time. I have a file which associates a blog post with extra information : For eg it stores the categories, tags, original creation date, all modification dates etc. (If you are curious , I store the information in JSON format). Once you have this information lot of analysis is possible.
a. You can figure out your audience type. If for a post, you have lot of audience in the first week and almost no audience from then on – then most likely your audience is driven by subscription. If it keeps having a regular traffic, then probably it has some useful stuff and traffic is constantly driven to it by search engines. For eg, my Biweekly links belong to the first scenario : When I publish one, lot of people visit it and then after a few days it gets practically no visits. In the other case, my post of Mean Shift gets a steady stream of views every week. If you want to sustain a good viewership, you may want to write more posts which can attract long term views.
b. If you use categories and tags wisely, you can tally the number of views per each category. This will give you an idea of the blog posts which users prefer. I noticed that my audience seems to like my Linux / Data Mining posts than other categories. So it is a good idea to write more of those posts.
c. You can kind of see a pareto effect in your blog posts. For eg, my top 10 blogs account for atleast 70% of my blog traffic. So if I could identify them correctly, I can write lesser posts but still maintain my blog traffic 😉
You can do lot more than these simple analysis but this is just a start.
4. Search Terms : This is another neat statistic. You can use it to figure out the primary way in which users access your blog. For eg, the ratio of total blog post view for a day and number of search terms for the day is quite interesting. If the ratio is high, then most of the people find your blog using search engines. In a way , this a potential transient audience whom you can convert to regular audience. If the ratio is small , then your blog gets views by referrers and regular viewers. This will assure you a steady audience , but it is slightly hard to get new people “find” your blog.
This statistic also tells you which keywords the viewers use to find my blog. You can gleam lot of interesting things from this. For eg, almost all of my search terms are 3-5 words long and usually very specific. This either means that the user is an expert and has crafted specific query. It may also mean that user rewrote the query and my blog was not found in the general query. I also use the terms to figure out if the user would have been satisfied with my blog. For eg, I know that a user searching “install matlab to 64-bit” will be satisfied while some one who searches “k means determine k” will not be. You can do either of two things : augment your blog post to add information that users are searching , or point users to resources that satisfies their query. For eg, I found lot of people reached my blog searching for how to find k. I found geomblog had couple of good posts on it and updated my blog to link to these posts. Some times, I may add a FAQ if same search query comes multiple times and if my page contains the information but is obscure. Eg : lot of people reached my blog searching for Empathy’s chat log location. My post of Empathy had it but not in a prominent fashion. So I added a FAQ which points the answer immediately.
5. Clicks : This statistic is tangentially useful in finding out which links the user clicks. One way I use it is to gauge the “tech” level of my reader who visits my blog using search engines. I usually link to Wikipedia articles for common terms. If the user clicks on these basic terms often ,then it might mean that I write articles at a level higher that the typical user and I have to explain it better. For eg , in my post of K-Means , this was the reason I explain supervised and unsupervised learning at the start even though most people learning k-means already know it.
Other Resources for Blog Traffic
There are other locations that give some useful information about your traffic. Some of them are :
a. Google Web Master Site : This is arguably one of the most comprehensive information about your blog post’s performance in Google. You can see it a Google Webmaster Page -> Your site on web -> Search queries. It has information like impressions, click throughs, average position etc. You can download all of them in a csv file too ! Literally a gold mine for data lovers.
b. Feedburner : Even though, WordPress has a feed, I switched to FeedBurner. One of the main reason was that it gave me a csv file detailing the number of views by my subscribers.
c. Quantcast : Useful for aggregate information. It has multiple charts that detail the number of views, unique visitors etc. The Quantcast data might not be accurate as it is usually estimated – but it gives a broad gauge of your blog. It also has some statistic which says how many of your visitors are addicts , how many are pass throughs etc. Quite useful !
d. Alexa : Similar to Quantcast . I primarily use my Alexa Rank for motivation to improve my blog ranking.
Pivot Tables
I primarily use Python prompt to play with data. If you are not comfortable with programmatic tweaking, use spreadsheets to do these analysis. If you have Windows, you can do lot of powerful analysis by importing the statistics obtained by the scripts into Microsoft Excel. Excel has a neat feature called Pivot tables. It is also an advanced topic that I will not discuss here. You can do some fantastic analysis using pivots. They also give you the ability to view the same data from multiple perspectives.
In this post, I have barely scratched the surface – You can do lot of amazing analysis using WordPress Stats API . I will talk about more complex analysis in a later post. Have fun with the data !
Related articles
- WordPress Stats and Numbers: Breaking Their Own Records (lorelle.wordpress.com)
- Blog Referrers: DesignSponge vs. WordPress (projectpalermo.com)
- To Use WordPress or Blogger… That is the Question (wisdomofjen.wordpress.com)
- WordPress.com vs. WordPress.org (bradyszabo.com)

Mobile phone evolution Русский: Эволюция мобильных телефонов (Photo credit: Wikipedia)
| Facebook available in 8 Indian languages on mobile | |
 |
Social networking website Facebook today announced a facility for its users to access the site in eight Indian languages from mobile phones.
This will be rolled out in phases over the next few weeks, it said. “With over 5..more |
| Found: All Your Local & Cloud Documents in One Pla | |
 |
Files are not going away anytime soon. Apple, Google and Microsoft can try as hard as they want to push users and our stuff into their clouds, but we still need files for a reason those companies won’t face: We’re not just Apple users or Google users..more |
| 5 Ways to Keep Your Google Browsing Private | |
 |
Google’s one unified privacy policy went into effect on March 1. The new privacy policy makes it easier for Google to bring user data across its services, but the actual privacy preferences remained unchanged. Google has integrated search, email, You..more |
| Facebook vs. Yahoo Round 2: Social Network Files a | |
 |
The Facebook-Yahoo grudge match continues. Now Facebook is countersuing Yahoo, denying Yahoo’s allegations that Facebook infringed on the company’s patents — and claiming Yahoo is actually infringing on Facebook’s patents. F..more |
| Phase One launch $60,000 aerial camera | |
 |
Phase One has created the iXA, a new medium format aerial camera system manufactured to streamline image capture and process workflow.Users have a choice of 80 or 60 megapixel models in either RGB or NIR versions, allowing it to be used with existing..more |
Related articles
- Indian Facebook Now in ten Indian languages (facebookindya.wordpress.com)
- Indian Facebook Now in ten Indian languages (marathifb.wordpress.com)
- Indian Facebook Now in ten Indian languages (marathifacebook.wordpress.com)
- Personal search app Found scans cloud and local data (news.cnet.com)
- Found: All Your Local & Cloud Documents in One Place (readwriteweb.com)
Share API
Share API
Reading and Creating Shares
Use the Share API to have a member share content with their network or with all of LinkedIn. This can be a simple short text update, similar to Twitter. Or a URL with a title and optional photo. Or both.
You can also forward the shared content to Twitter and reshare another member’s share.
Adding New Shares
To add a new share, you markup the content in XML and issue a HTTP POST to the following URL:
URL
To have LinkedIn pass the status message along to a member’s tethered Twitter account, if they have one, modify the URL to include a query string of twitter-post=true.
Fields for the XML Body
| Node | Parent Node | Required? | Value | Notes |
|---|---|---|---|---|
| share | — | Yes | Child nodes of share | Parent node for all share content |
| comment | share | Conditional | Text of member’s comment. (Similar to deprecated current-status field.) | Post must contain comment and/or (content/title and content/submitted-url). Max length is 700 characters. |
| content | share | Conditional | Parent node for information on shared document | |
| title | share/content | Conditional | Title of shared document | Post must contain comment and/or (content/title and content/submitted-url). Max length is 200 characters. |
| submitted-url | share/content | Conditional | URL for shared content | Post must contain comment and/or (content/title and content/submitted-url). |
| submitted-image-url | share/content | Optional | URL for image of shared content | Invalid without (content/title and content/submitted-url). |
| description | share/content | Option | Description of shared content | Max length of 256 characters. |
| visibility | share | Yes | Parent node for visibility information | |
| code | share/visibility | Yes | One of anyone: all members or connections-only: connections only. |
Sample XML
Here is an example XML document:
<!--?xml version="1.0" encoding="UTF-8"?> 83% of employers will use social media to hire: 78% LinkedIn, 55% Facebook, 45% Twitter [SF Biz Times] -->http://bit.ly/cCpeOD Survey: Social networks top hiring tool - San Francisco Business Times http://sanfrancisco.bizjournals.com/sanfrancisco/stories/2010/06/28/daily34.html</submitted-url> <submitted-image-url>http://images.bizjournals.com/travel/cityscapes/thumbs/sm_sanfrancisco.jpg</submitted-image-url> </content> <visibility> <code>anyone</code> </visibility> </share>
Response
Returns 201 Created on success. It will also provide a Location HTTP header with a URL for the created resource. However, at this time, you cannot retrieve the Share from that location. It’s there for future compatibility.
Resharing An Existing Share
When a member does a reshare, they can pass along a previously shared item to their network. This can either be as-is, or they can annotate the share to provide their own thoughts. The process is similar to creating a new share, but you provide an attribution/id value instead of a content block.
You can only reshare a share with a content block. If this block is empty, you will get a 400 error saying “Specified share {s28311617} has no content”.
Read Retrieving Share Information for instructions to retrieve these value using the API.
URL
Fields for the XML Body
| Node | Parent Node | Required? | Value | Notes |
|---|---|---|---|---|
| share | — | Yes | Child nodes of share | Parent node for all share content |
| comment | share | No | Text of member’s comment. (Similar to deprecated current-status field.) | Max length is 700 characters. |
| attribution | share | Yes | Parent node for information on reshared document | |
| id | share/attribution/share | Yes | id of reshared document | Currently in the format of s12345678, so is not guaranteed to be an integer.Post must contain id if it does not contain content and id must be from a share with a content block. |
| visibility | share | Yes | Parent node for visibility information | |
| code | share/visibility | Yes | One of anyone: all members or connections-only: connections only. |
Sample XML
Here is an example XML document:
<!--?xml version="1.0" encoding="UTF-8"?> Check out this story! I can't believe it. s24681357 -->connections-only
Response
Returns 201 Created on success. It will also provide a Location HTTP header with a URL for the created resource. However, at this time, you cannot retrieve the Share from that location. It’s there for future compatibility.
Retrieving Share Information
A particular member’s current share is detailed in their Profile API, so you can get a member’s current share by requesting:
Use the ~, id, or public profile URL to identify the user.
To retrieve a stream of shares for the member or their member first degree network, use the Get Network Updates API resource requesting the SHAR update type.
For the specified member also use a query parameter of scope=self:
Omit the scope for their first degree network:
You will receive:
<!--?xml version="1.0" encoding="UTF-8"?> s12345678 1279577156654 83% of employers will use social media to hire: 78% LinkedIn, 55% Facebook, 45% Twitter [SF Biz Times] -->http://bit.ly/cCpeOD</comment> <content> <id>123456789</id> <title>Survey: Social networks top hiring tool - San Francisco Business Times</title> <submitted-url>http://sanfrancisco.bizjournals.com/sanfrancisco/stories/2010/06/28/daily34.html</submitted-url> <shortened-url>lnkd.in/abc123</shortened-url> <submitted-image-url>http://images.bizjournals.com/travel/cityscapes/thumbs/sm_sanfrancisco.jpg</submitted-image-url> <thumbnail-url>http://media.linkedin.com/media-proxy/ext...</thumbnail-url> </content> <visibility> <code>anyone</code> </visibility> <source> <service-provider> <name>LINKEDIN</name> </service-provider> <application> <name>Your Cool App</name> </application> </source> <current-share>
Fields for the XML Body
Beyond the fields listed above, you also receive:
| Node | Parent Node | Value | Notes |
|---|---|---|---|
| id | share | Identifier for share. | |
| timestamp | share | Time of posting in miliseconds since UTC. (Divide this number by 1000 to get the standard Unix timestamp.) | |
| shortened-url | share/content | Short version of the submitted-url. If the submitted-url is generated via a URL shortener, this is the original URL and the submitted URL is the expanded version. Otherwise, this is a LinkedIn generated short URL using http://lnkd.in/. | |
| resolved-url | share/content | The submitted-url unwound from any URL shortener services. | |
| author | share/attribution/share | Information on the author of the original shared item. | Only appears when retrieving a reshare, not an original share. |
| name | share/source/service-provider | Platform where the share came from, such as LINKEDIN or TWITTER. | |
| name | share/source/application | Application where the share came from, such as the name of your application. |
Reblogging is Back!
As we mentioned last week, you can like and reblog posts directly from your reader, which displays a stream of all the updates published on all the blogs you follow from your WordPress.com account.

We’ve also brought the reblog button back to the toolbar that appears at the top of the screen when you’re logged into WordPress.com. Note that you’ll only see the like and reblog options while you’re looking at individual posts.
For example, you’ll see this on the left side of your toolbar while viewing http://en.blog.wordpress.com/2012/01/20/read-blogs:

And your toolbar will look like this while you’re browsing the home page of en.blog.wordpress.com:

How does reblogging work?
Reblogging is a quick way to share posts published by other WordPress.com users on your own blog. People have been reblogging others’ posts since blogging started, but our new reblogging system enables authors to retain greater control over their content.
When a post is reblogged, it shows up with a link back to the blog it came from, the first image in the post, an excerpt of the post’s introduction (if it contains text), and thumbnails of any other images that the post contains. It also shows any comments left by the person who reblogged the post:

Reblogs published on blogs you follow will also appear in your reader:

<h3>What happens when my posts get reblogged?</h3>
An excerpt of your post will be published on the reblogger’s site (with a link back to your original post), and you’ll receive a reblog notification in the post comments (you might need to approve it first):

14px;line-height:1.4em;color:#444444;font-family:”Helvetica Neue“,Helvetica,Arial,sans-serif;margin:0 0 1em 0″>You’ll also receive an email notification of the reblog.
Do I get credit when someone else reblogs one of my posts?
Absolutely! All reblogs contain a link back to your original post, so the more people reblog your posts, the more likely it is that you’ll attract new visitors (and perhaps new followers, too!).
What happens if I reblog a reblog?
If, for example, Stephane reblogs a WordPress.com announcement on his site and Lori reblogs Stephane’s reblog, Lori only re-publishes any comments Stephane made about the announcement. If Lori wants to share the original announcement, she should reblog the post from en.blog.wordpress.com, not from Stephane’s reblog. But if Stephane leaves a really clever comment, Lori might want to share it by reblogging his reblog on her site.
<h3>Can I edit a post I’ve reblogged?</h3>
You can go back and edit the comments you left when you reblogged a post, but you cannot edit any parts of the original post excerpt (including the post title). If you like, you can add categories or tags to the post. Reblogs show up under Posts → All Posts in your dashboard, and they can be edited the same way you edit your own posts.
<div style=”clear:both”></div>
</div>
Related articles
- Reblogging is Back! (360hcopa.wordpress.com)
- Reblogging is Back! (gojaimas.wordpress.com)
- Reblogging is Back! (debpentland.wordpress.com)
immediate opening for PHP Developers
We have immediate opening for PHP Developers in our company. Please check the job description below and kindly refer your friends for these openings.
No Of Openings : 4
Experience : 2+ years
Qualification: BE / Msc(CS) / MCA
Primary Skills : PHP, MYSQL, Jquery, CSS, HTML, Ajax
Secondary Skills :
1) Smarty template
2) Any MVC frame work (Zend or codeigniter or cake)
3) Any opensource CMS like (Drupal or wordpress or joomla)
If you know any of your friends who are having 2+ years of experience in core php and can join within one week kindly rush their profiles to my mail.
We want to close this recruitment in a week’s time and hence would appreciate a quick response!..
Thank you for attracting and referring good talents to our company..!
Changing Backgrounds with body class()
The body_class() WordPress function attaches a list of classes to the <body> element according to what type of page is being displayed.
These classes can be used — in conjunction with your theme’s stylesheet — to display different backgrounds on different pages.
Let’s assume your header.php template file contains:
<body <?php body_class(); ?>>And your current CSS for the background looks like:
body {background:#fff url(images/bg.jpg);}
In a single post, your body tag would look like:
postid-188 single-format-standard logged-in admin-bar">A category page could have:
<body class="archive category category-cat-a category-9 logged-in admin-bar">whilst a tag page might generate:
tag-tag1 tag-92 logged-in admin-bar">The CSS
You can add some new rules to your theme’s CSS to target specific backgrounds at particular pages.
Default Single Post
body.single {background:#ccc url(images/bg-single.jpg);}Single Post with an ID of 188
body.postid-188 {background:#999 url(images/bg-special.jpg);}Default Category Background
body.category {background:#eee url(images/bg-cat.jpg);}Category A Only
body.category-cat-a {background:#ddd url(images/bg-cat-a.jpg);}The possibilities are almost endless.
You can find a full list of the classes generated by the body_class() function in the WordPress Codex.
Subscribe Via Email

Agaram Foundation

29,Vijay Enclave Krishna Street,
T.Nagar, Chennai - 600 017
Tamil Nadu, India.
Telephone : +91 44 4350 6361
Mobile : +91 98418 91000
Email : info@agaram.in
Site Info

![]()
 SELVABALAJI NEWS
- An error has occurred; the feed is probably down. Try again later.
Vistor Location
Unknown Feed
- An error has occurred; the feed is probably down. Try again later.
Unknown Feed
- An error has occurred; the feed is probably down. Try again later.
Unknown Feed
- An error has occurred; the feed is probably down. Try again later.
LeadSquared
- 10 Effective Real-World Customer Loyalty Programs Examples
- Customer Support x AI: Explore the Future of Support
- 5 Best CRM for Startups
- How to Reduce Patient Acquisition Cost
- Real Estate Evolution in India: A Glimpse into the Future
- 21 Real-life Customer Centricity Examples
- How to Reduce Student Acquisition Cost
- 7 Most Profitable Sales Channel Examples
- Into the Unknown: Embracing a Bold, Student-First Strategy for Enrollment Success
- Top 10 Sales Gamification Tools For 2024
singershalini
- Untitled
- Pop Shalini Verified #Spotify Artist Playlist
- Pop Shalini's Interesting reads #Murakami
- Pop Shalini performs for Harris Jeyraj's concert with Benny Dayal and Haricharan
- Pop Shalini sings Vandhe Mataram
- Pop Shalini Sings her famous song Mudhal Naal Indru - Unaale Unaale
- Pop Shalini wishes Superstar RajiniKanth on the Dada Saheb Phalke Award
- A song for a Rainy day from my first album #Shalini - Chinna Chinna Mazhai thooral
- ipopshalini Verified Artiste sings Ranjha from Shershaah
- Chennai Floods
Flickr Photos


Advertsiment


Recent Comments