Archive
Step-by-Step guide to Facebook Conversion Tracking
Step 1: Once you log in to your ‘Ads Manager’ tab, click on the Conversion Tracking button on the left side bar.

Step 2: Then click on the ‘Create Conversion Pixel’ tab to begin the process.

Step 3: You will be directed to this pop-up, which will ask you for a:
1. Name: An appropriate name will help you remember what you are tracking. (Example: Lead Generation – GATE Ad)
2. Category: This will help you decide the type of action that you want to track on your site. You can choose from the following:
1. Checkouts
2. Registrations
3. Leads
4. Key Page Views
5. Adds to Cart
6. Other Website Conversions
(For the purpose of this example, we have selected ‘Leads’).

Step 4: You will be able to see a pop-up window with a JavaScript code. This is the code that you will have to add to the page where the conversion will happen. This will let you track the conversions back to ads which you are running on Facebook.

The code should be placed on the page that a user will finally see when the transaction is complete.
Here is the tricky part. The code should not go on all pages. For that matter, it should not even go to the landing page of your product. The code should be placed on the page that a user will finally see when the transaction is complete.
For Example: If you want to track when students register for your GATE coaching, paste the code on the registration confirmation page/thank you page and not on the form that they need to submit.
How do you confirm that your conversion is working properly?
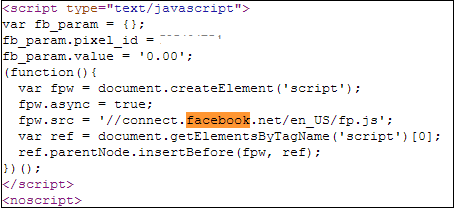
1. Check that the javascript snippet has been placed on the correct conversion page. Visit the page where the pixel has been embedded, right click and go to ‘View Page Source’ to find the pixel. The code should have the tag of the HTML. See image below.
2. Check that Facebook is receiving the conversion events from your website. Go to the conversion tracking tab in your Ads Manager account. There you will see a list of the conversion tracking pixels that you have created. If the conversion tracking pixel has been successfully implemented and a conversion event has been recorded, it will be reflected in the Pixel Status column. If the status shows active, it means that the page which contains the pixel has been viewed by users. If it shows inactive, it means that over the last 24 hours, the page with the pixel has not been viewed.

3.Later, when you create your Facebook ad , you need to check the track conversions box under the campaign, pricing and schedule tab to enable tracking.

Payment System with Paypal
I received a tutorial requests from my reader that asked to me how to implement payment gateway system with Paypal API. In this post I want to explain how to work with Paypal Sandbox test accounts for payment system development and sending arguments while click buy now button. It’s simple and very easy to integrate in your web projects.
Sample database design for Payment system. Contains there table users,products and sales.
Users
`uid` int(11) AUTO_INCREMENT PRIMARY KEY,
`username` varchar(255) UNIQUE KEY,
`password` varchar(255),
`email` varchar(255) UNIQUE KEY,
)
Products
(
`pid` int(11) AUTO_INCREMENT PRIMARY KEY,
`product` varchar(255),
‘product_img` varchar(100),
`price` int(11),
`currency` varchar(10),
)
Sales
(
`sid` int(11) AUTO_INCREMENT PRIMARY KEY,
`pid` int(11),
`uid` int(11),
`saledate` date,
`transactionid` varchar(125),
FOREIGN KEY(uid) REFERENCES users(uid),
FOREIGN KEY(pid) REFERENCES products(pid)
)
Create a Paypal Sandbox account at https://developer.paypal.com/
Now create test accounts for payment system. Take a look at Sandbox menu left-side top Sandbox->Test Accounts
Here I have created two accounts Buyer (personal) and Seller(merchant/business)
products.php
Contains PHP code. Displaying records from products table product image,product name and product price. Here you have to give your business(seller)$paypal_id id. Modify paypal button form return and cancel_return URLs.

<?php
session_start();
require ‘db_config.php’;
$uid=$_SESSION[‘uid’];
$username=$_SESSION[‘username’];
$paypal_url=’https://www.sandbox.paypal.com/cgi-bin/webscr‘; // Test Paypal API URL
$paypal_id=’your_seller_id‘; // Business email ID
?>
<body>
<h2>Welcome, <?php echo $username;?></h2>
<?php
$result = mysql_query(“SELECT * from products”);
while($row = mysql_fetch_array($result))
{
?>
<img src=”images/<?php echo $row[‘product_img’];?>” />
Name: <?php echo $row[‘product’];?>
Price: <?php echo $row[‘price’];?>$
// Paypal Button
<form action=’<?php echo $paypal_url; ?>‘ method=’post’ name=’form<?php echo $row[‘pid’]; ?>’>
<input type=’hidden’ name=’business’ value=’<?php echo $paypal_id; ?>‘>
<input type=’hidden’ name=’cmd’ value=’_xclick’>
<input type=’hidden’ name=’item_name’ value=’<?php echo$row[‘product’];?>‘>
<input type=’hidden’ name=’item_number’ value=’<?php echo$row[‘pid’];?>‘>
<input type=’hidden’ name=’amount’ value=’<?php echo $row[‘price’];?>‘>
<input type=’hidden’ name=’no_shipping’ value=’1′>
<input type=’hidden’ name=’currency_code’ value=’USD‘>
<input type=’hidden’ name=’cancel_return‘ value=’http://yoursite.com/cancel.php’>
<input type=’hidden’ name=’return‘ value=’http://yoursite.com/success.php’>
<input type=”image” src=”https://paypal.com/en_US/i/btn/btn_buynowCC_LG.gif” name=”submit”>
</form>
<?php
}
?>
</body>
success.php
Paypal payment success return file. Getting Paypal argument like item_number. Paypal data success.php?tx=270233304D340491B&st=Completed&amt=22.00&cc=USD&cm=&item_number=1
session_start();
require ‘db_config.php’;
$uid = $_SESSION[‘uid’];
$username=$_SESSION[‘username’];
$item_no = $_GET[‘item_number’];
$item_transaction = $_GET[‘tx’]; // Paypal transaction ID
$item_price = $_GET[‘amt’]; // Paypal received amount
$item_currency = $_GET[‘cc’]; // Paypal received currency type//Getting product details
$sql=mysql_query(“select product,price,currency from producst where pid=’$item_no'”);
$row=mysql_fetch_array($sql);
$price=$row[‘price’];
$currency=$row[‘currency’];//Rechecking the product price and currency details
if($item_price==$price && item_currency==$currency)
{
$result = mysql_query(“INSERT INTO sales(pid, uid, saledate,transactionid) VALUES(‘$item_no’, ‘$uid’, NOW(),’$item_transaction’)”);
if($result)
{
echo “<h1>Welcome, $username</h1>”;
echo “<h1>Payment Successful</h1>”;
}
}
else
{
echo “Payment Failed”;
}
?>
Login with Google Account OAuth
Sample database design
(
id INT PRIMARY KEY AUTO_INCREMENT,
email VARCHAR(50) UNIQUE,
fullname VARCHAR(100),
firstname VARCHAR(50),
lastname VARCHAR(50),
google_id VARCHAR(50),
gender VARCHAR(10),
dob VARCHAR(15),
profile_image TEXT,
gpluslink TEXT
)
Verify your domain ownership with HTML file upload or including META tag.
Google will provide you OAuth consumer key and OAuth consumer secret key.
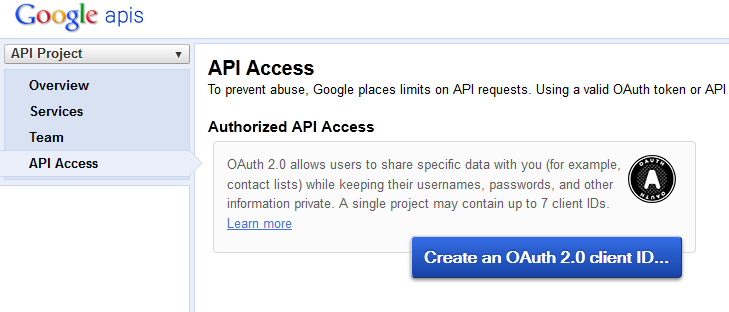
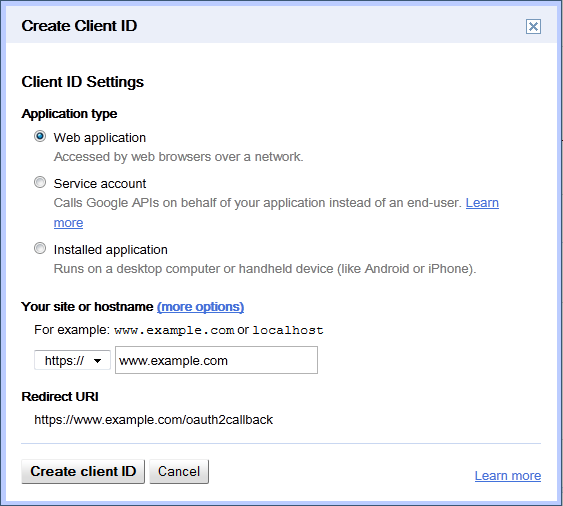
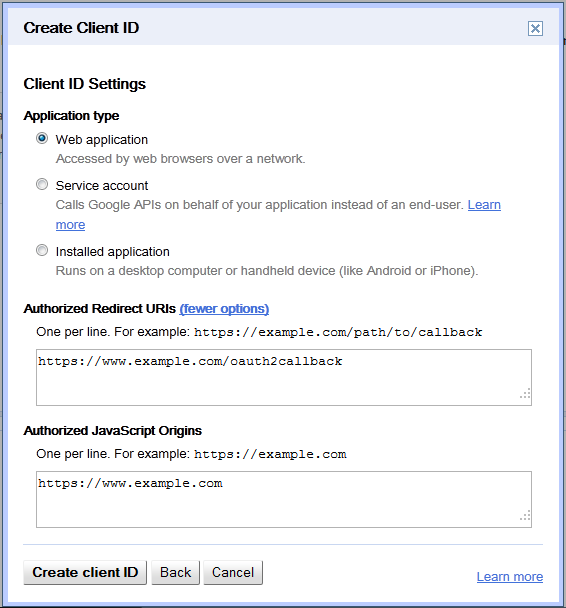
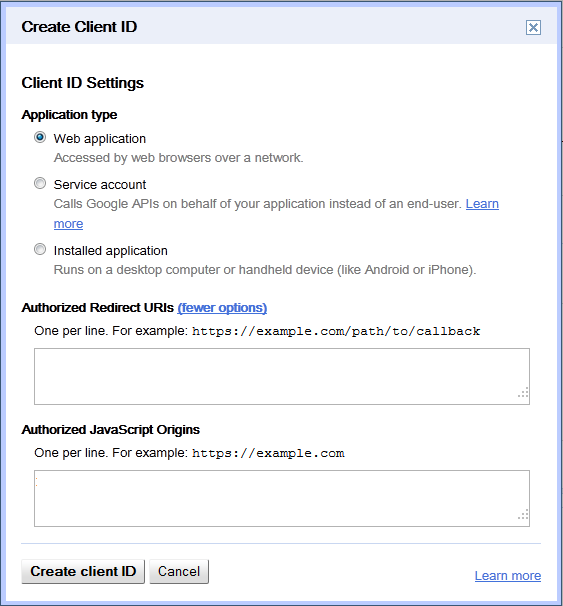
Create client ID OAuth Console here.
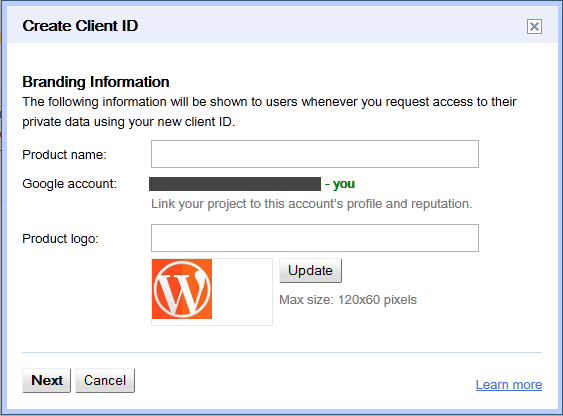
Create client ID.
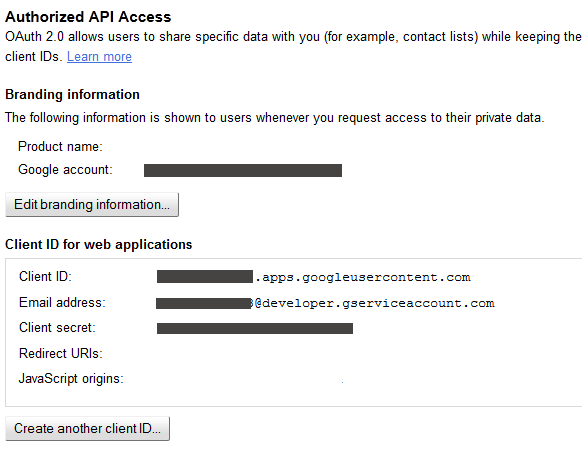
Here the application OAuth client ID and client secret.
You can find this in srcfolder, here you have to configure application OAuth keys, Consumer keys and redirection callback URL.
// OAuth2 Settings, you can get these keys at https://code.google.com/apis/console Step 6 keys ‘oauth2_client_id’ => ‘App Client ID’, ‘oauth2_client_secret’ => ‘App Client Secret’,’oauth2_redirect_uri’ => ‘http://yoursite.com/gplus/index.php’,// OAuth1 Settings Step 3 keys.
‘oauth_consumer_key’ => ‘OAuth Consumer Key’,
‘oauth_consumer_secret’ => ‘OAuth Consumer Secret’,
google_login.php
Google plus login system. Just include the file in index.php
<?php require_once ‘src/apiClient.php’; require_once ‘src/contrib/apiOauth2Service.php’; session_start(); $client = new apiClient(); setApplicationName(“Google Account Login”); $oauth2 = new apiOauth2Service($client); if (isset($_GET[‘code’])) { $client->authenticate(); $_SESSION[‘token’] = $client->getAccessToken(); $redirect = ‘http://’ . $_SERVER[‘HTTP_HOST’] . $_SERVER[‘PHP_SELF’]; header(‘Location: ‘ . filter_var($redirect, FILTER_SANITIZE_URL));}if (isset($_SESSION[‘token’])) {
$client->setAccessToken($_SESSION[‘token’]);
}if (isset($_REQUEST[‘logout’])) {
unset($_SESSION[‘token’]);
unset($_SESSION[‘google_data’]); //Google session data unset
$client->revokeToken();
}if ($client->getAccessToken())
{
$user = $oauth2->userinfo->get();
$_SESSION[‘google_data’]=$user; // Storing Google User Data in Session
header(“location: home.php”);
$_SESSION[‘token’] = $client->getAccessToken();
} else {
$authUrl = $client->createAuthUrl();
}if(isset($personMarkup)):
print $personMarkup;
endifif(isset($authUrl))
{
echo “<a href=”$authUrl”>Google Account Login</a>”;
} else {
echo “Logout“;
}
?>
home.php
Contains PHP code inserting Google plus session details into users table.
<?php
session_start();
include(‘db.php’); //Database Connection.
if (!isset($_SESSION[‘google_data’])) {
// Redirection to application home page.
header(“location: index.php”);
}
else
{
//echo print_r($userdata);
$userdata=$_SESSION[‘google_data’];
$email =$userdata[’email’];
$googleid =$userdata[‘id’];
$fullName =$userdata[‘name’];
$firstName=$userdata[‘given_name’];
$lastName=$userdata[‘family_name’];
$gplusURL=$userdata[‘link’];
$avatar=$userdata[‘picture’];
$gender=$userdata[‘gender’];
$dob=$userdata[‘birthday’];
//Execture query
$sql=mysql_query(“insert into users(email,fullname,firstname,lastname,google_id,gender,dob,profile_image,gpluslink) values(‘$email’,’$fullName’,’$firstName’,’$lastName’,’$googleid’,’$gender’,’$dob’,’$avatar’,’$gplusURL’)”);
?>db.php
Database Configuration file.<?php
$mysql_hostname = “localhost”;
$mysql_user = “username”;
$mysql_password = “password”;
$mysql_database = “databasename”;
$bd = mysql_connect($mysql_hostname, $mysql_user, $mysql_password) or die(“Could not connect database”);
mysql_select_db($mysql_database, $bd) or die(“Could not select database”);
?>
Related articles
- PHP OAuth API (phpclasses.org)
- basic_oauth 0.1.5 (pypi.python.org)
- How to store sensitive userdata in mysql using php (stackoverflow.com)
Import Yahoo contact to website / download CSV
Written in PHP and using cURL, this script imports the names and email addresses from your yahoo account (yahoo id and password needed to login to yahoo from the script and retreive the address book).
<!–?php–>
ob_start();
session_start();
require ‘globals.php’;
require ‘oauth_helper.php’;
require ‘yahoo_function.php’;// Callback can either be ‘oob’ or a url whose domain must match
// the domain that you entered when registering your application$callback='<your call back URL>’;
if($_REQUEST[‘oauth_verifier’] != ”) {
$request_token = $_REQUEST[‘oauth_token’];
$oauth_verifier = $_REQUEST[‘oauth_verifier’];
$request_token_secret = $_SESSION[‘request_token_secret’];$accessToken = get_access_token(OAUTH_CONSUMER_KEY, OAUTH_CONSUMER_SECRET,$request_token, $request_token_secret,$oauth_verifier, false, true, true);
$access_token = urldecode($accessToken[3][‘oauth_token’]);
$access_token_secret = urldecode($accessToken[3][‘oauth_token_secret’]);
$guid = $accessToken[3][‘xoauth_yahoo_guid’];$callcont = callcontact(OAUTH_CONSUMER_KEY, OAUTH_CONSUMER_SECRET, $guid, $access_token, $access_token_secret, false, true);
print ‘Total Email COntact :’ .$callcont[‘contacts’][‘total’];
print ‘<br/><br/>’;print ‘asda’.($callcont[‘contacts’][‘total’]);
for($i=0; $i<=$callcont[‘contacts’][‘total’];$i++) {
print ‘<br/><br/>’;
print $callcont[‘contacts’][‘contact’][$i][‘fields’][0][‘value’];
print ‘<br/><br/>’;
}}else{
$retarr = get_request_token(OAUTH_CONSUMER_KEY, OAUTH_CONSUMER_SECRET,$callback, false, true, true);
if (! empty($retarr)){
$request_token = $retarr[3][‘oauth_token’];
$request_token_secret = $retarr[3][‘oauth_token_secret’];
$request_url = urldecode($retarr[3][‘xoauth_request_auth_url’]);
$_SESSION[‘request_token_secret’] = $request_token_secret;
header(“location:https://api.login.yahoo.com/oauth/v2/request_auth?oauth_token=”.$request_token);
}
exit(0);
}
?>
Yahoo_function.php
<?php
function get_request_token($consumer_key, $consumer_secret, $callback, $usePost=false, $useHmacSha1Sig=true, $passOAuthInHeader=false)
{
$retarr = array(); // return value
$response = array();$url = ‘https://api.login.yahoo.com/oauth/v2/get_request_token’;
$params[‘oauth_version’] = ‘1.0’;
$params[‘oauth_nonce’] = mt_rand();
$params[‘oauth_timestamp’] = time();
$params[‘oauth_consumer_key’] = $consumer_key;
$params[‘oauth_callback’] = $callback;// compute signature and add it to the params list
if ($useHmacSha1Sig) {
$params[‘oauth_signature_method’] = ‘HMAC-SHA1‘;
$params[‘oauth_signature’] =
oauth_compute_hmac_sig($usePost? ‘POST‘ : ‘GET’, $url, $params,
$consumer_secret, null);
} else {
$params[‘oauth_signature_method’] = ‘PLAINTEXT‘;
$params[‘oauth_signature’] =
oauth_compute_plaintext_sig($consumer_secret, null);
}// Pass OAuth credentials in a separate header or in the query string
if ($passOAuthInHeader) {$query_parameter_string = oauth_http_build_query($params, FALSE);
$header = build_oauth_header($params, “yahooapis.com”);
$headers[] = $header;
} else {
$query_parameter_string = oauth_http_build_query($params);
}// POST or GET the request
if ($usePost) {
$request_url = $url;
logit(“getreqtok:INFO:request_url:$request_url”);
logit(“getreqtok:INFO:post_body:$query_parameter_string”);
$headers[] = ‘Content-Type: application/x-www-form-urlencoded‘;
$response = do_post($request_url, $query_parameter_string, 443, $headers);
} else {
$request_url = $url . ($query_parameter_string ?
(‘?’ . $query_parameter_string) : ” );logit(“getreqtok:INFO:request_url:$request_url”);
$response = do_get($request_url, 443, $headers);
}
// extract successful response
if (! empty($response)) {
list($info, $header, $body) = $response;
$body_parsed = oauth_parse_str($body);
if (! empty($body_parsed)) {
logit(“getreqtok:INFO:response_body_parsed:”);}
$retarr = $response;
$retarr[] = $body_parsed;
}return $retarr;
}
function get_access_token($consumer_key, $consumer_secret, $request_token, $request_token_secret, $oauth_verifier, $usePost=false, $useHmacSha1Sig=true, $passOAuthInHeader=true)
{
$retarr = array(); // return value
$response = array();$url = ‘https://api.login.yahoo.com/oauth/v2/get_token’;
$params[‘oauth_version’] = ‘1.0’;
$params[‘oauth_nonce’] = mt_rand();
$params[‘oauth_timestamp’] = time();
$params[‘oauth_consumer_key’] = $consumer_key;
$params[‘oauth_token’]= $request_token;
$params[‘oauth_verifier’] = $oauth_verifier;// compute signature and add it to the params list
if ($useHmacSha1Sig) {
$params[‘oauth_signature_method’] = ‘HMAC-SHA1’;
$params[‘oauth_signature’] =
oauth_compute_hmac_sig($usePost? ‘POST’ : ‘GET’, $url, $params,
$consumer_secret, $request_token_secret);
} else {
$params[‘oauth_signature_method’] = ‘PLAINTEXT’;
$params[‘oauth_signature’] =
oauth_compute_plaintext_sig($consumer_secret, $request_token_secret);
}// Pass OAuth credentials in a separate header or in the query string
if ($passOAuthInHeader) {
$query_parameter_string = oauth_http_build_query($params, false);
$header = build_oauth_header($params, “yahooapis.com”);
$headers[] = $header;
} else {
$query_parameter_string = oauth_http_build_query($params);
}// POST or GET the request
if ($usePost) {
$request_url = $url;
logit(“getacctok:INFO:request_url:$request_url”);
logit(“getacctok:INFO:post_body:$query_parameter_string”);
$headers[] = ‘Content-Type: application/x-www-form-urlencoded’;
$response = do_post($request_url, $query_parameter_string, 443, $headers);
} else {
$request_url = $url . ($query_parameter_string ?
(‘?’ . $query_parameter_string) : ” );
logit(“getacctok:INFO:request_url:$request_url”);
$response = do_get($request_url, 443, $headers);
}// extract successful response
if (! empty($response)) {
list($info, $header, $body) = $response;
$body_parsed = oauth_parse_str($body);
if (! empty($body_parsed)) {
logit(“getacctok:INFO:response_body_parsed:”);
//print_r($body_parsed);
}
$retarr = $response;
$retarr[] = $body_parsed;
}
return $retarr;
}
function callcontact($consumer_key, $consumer_secret, $guid, $access_token, $access_token_secret, $usePost=false, $passOAuthInHeader=true)
{
$retarr = array(); // return value
$response = array();$url = ‘http://social.yahooapis.com/v1/user/’ . $guid . ‘/contacts’;
$params[‘format’] = ‘json’;
$params[‘view’] = ‘compact’;
$params[‘oauth_version’] = ‘1.0’;
$params[‘oauth_nonce’] = mt_rand();
$params[‘oauth_timestamp’] = time();
$params[‘oauth_consumer_key’] = $consumer_key;
$params[‘oauth_token’] = $access_token;// compute hmac-sha1 signature and add it to the params list
$params[‘oauth_signature_method’] = ‘HMAC-SHA1’;
$params[‘oauth_signature’] =
oauth_compute_hmac_sig($usePost? ‘POST’ : ‘GET’, $url, $params,
$consumer_secret, $access_token_secret);// Pass OAuth credentials in a separate header or in the query string
if ($passOAuthInHeader) {
$query_parameter_string = oauth_http_build_query($params, true);
$header = build_oauth_header($params, “yahooapis.com”);
$headers[] = $header;
} else {
$query_parameter_string = oauth_http_build_query($params);
}// POST or GET the request
if ($usePost) {
$request_url = $url;
logit(“callcontact:INFO:request_url:$request_url”);
logit(“callcontact:INFO:post_body:$query_parameter_string”);
$headers[] = ‘Content-Type: application/x-www-form-urlencoded’;
$response = do_post($request_url, $query_parameter_string, 80, $headers);
} else {
$request_url = $url . ($query_parameter_string ?
(‘?’ . $query_parameter_string) : ” );
logit(“callcontact:INFO:request_url:$request_url”);
$response = do_get($request_url, 80, $headers);
}// extract successful response
if (! empty($response)) {
list($info, $header, $body) = $response;
if ($body) {
logit(“callcontact:INFO:response:”);json_pretty_print($body);
}
$retarr = $response;
}
$contactsRes = json_decode($retarr[2],true);
return $contactsRes;
}
?>
Related articles
- Google OAuth for Installed Apps PHP Example (ioncannon.net)
- 2-legged OAuth with OAuth 1.0 and 2.0 (architects.dzone.com)
- Enterprise APIs and OAuth: Have it All (sys-con.com)
- Introduction to the Magento REST APIs with oAuth in Version 1.7 (aschroder.com)
How to analyze your Blog Traffic using WordPress Stats API
Analyzing my blog traffic is one of my favorite past times. Seeing traffic surge and strangers using my posts gives me gratification. Initially, my analysis was fairly low tech – checking WordPress stats page periodically. After doing it a few times, I realized I could do more methodically – and I can use the statistics to do some rudimentary data mining.
As you know, I have a WordPress.com blog. WordPress exposes the statistics in two ways : As a flash chart in the dashboard and as API service.
Viewing Blog Stats – Low Tech Way
If you want to take a look at your blog’s stats today , then you can do it in the dashboard. Assuming you are logged into your WordPress login, go to your blog. You will see WordPress toolbar at the top of the page. Click “My Dashboard“. It will show a chart of total daily visits for the past 15 days. If you want more details, hover your mouse over “My Account” and select “Stats”.
This page shows a wealth of information about your blog but it is limited to 2 days – today and yesterday. There are atleast 6 important statistics in that page.
WordPress Stats Sections
a) Views Per Day
This is probably the statistic you are most interested in. This plots the total number of visits each day for the last 30 days. This also has multiple tabs which allows you to aggregate the statistics information. For example you can view the total weekly and monthly visits . This gives a basic view about how your blog is faring.
b) Referrers
Referrers are basically web pages from which visitors reached your blog. There are different types of referrers : pingbacks, related posts, explicit linking etc. If a certain website is driving lot of visitors to your blog , it is time to notice ! Referrers allows you to get that insight. This panel shows the top 10 referrers. You can click on the “Referrers” link to get the full listing.
c) Top Posts and Pages
This shows the top 10 posts for the given day. One interesting thing is that they track home page separately. Also if you have different pages (eg About), then visits to these pages are also tracked. Again, if you want to see the number of visits to each page, you can click on the title link.
One interesting thing is that each of the posts/pages in this section also has an addition chart icon near them. Clicking on them gives the stats for that particular post alone. The new page shows a chart detailing how many visits occurred to that page in the last few weeks. Most interestingly , they also show the average visits per day for the last few weeks and months. This gives a glimpse into the lasting popularity of your post.
d) Search Engine Terms
I am not very clear what this exactly means – The instruction says “These are terms people used to find your blog.” . I am not sure if this corresponds to search terms typed in search engines or in WordPress search boxes etc . Anyway, this panel gives information about the search terms that fetch visits to your blog.
e) Clicks
Clicks panel shows the list of links in your blog that your visitors clicked. In a way , you can consider it as an inverse of referrers. In this case, you act as a referrer for some other blog. This post gives some hints about the type of visitors to your blog.
f) Aggregate Statistics
There is also another panel that shows some aggregate stats. This shows the total number of views to your blog so far , number of blogs and posts , email subscribers etc.
A Better Way
Using WordPress Stats page to get your data is fairly low tech. This gives some data which can only give you an instinct of how things go. But it will not give you any deeper insights. For doing more data mining, you need data – lots of data. Fortunately, WordPress makes available a stats API which you can query to get regular data. In the rest of the post , we will talk about the API and how to use the data that you get out of it.
Using WordPress Stats API
The primary url which provides the stats is http://stats.wordpress.com/csv.php . You can click on it to see the required parameters. There are 4 important parameters to this API.
a) api_key : api_key is a mandatory parameter and ensures that only owner queries the website. There are three ways to get this information. This key is emailed to you at the time you created your blog. Or you can access it at My Dashboard -> Users -> Personal Settings. This will show your api key. For the truly lazy click this url .
b) blog_id : This is a number which uniquely identifies your blog. Either blog_id or blog_uri is mandatory. I generally prefer blog_id. Finding blog_id is a bit tricky. Go to the blog stats page (My Account -> Stats). Click on the title link of “Top Posts and Pages”. This will open a new page which shows the statistics for last 7 days. If you look at the page’s url, it will have a parameter called blog. The value of this parameter is the blog_id . Atleast for my blog , it is a 8 digit number.
c) blog_uri : If you do not want to take all the trouble of getting blog_id , use blog_uri. This is nothing but the url of your blog (http://blah.wordpress.com).
d) table : This field identifies the exact statistic you want. One of views, postviews, referrers, searchterms, clicks. Each of these correspond to the sections of WordPress stats discussed above. If table is not specified , views is selected as the default table.
You can get more details from the stats API page given above.
Sample Python Scripts to fetch WordPress Stats
I have written a few scripts which fetch each of the WordPress stats. One of them run every hour and gets the total number of views so far for the whole blog. The other scripts runs once a day and fetch the total clicks, search terms, referrer and top posts for that day. All of these store the data as a csv file which lends itself to analysis.
If you are interested in the scripts , the links to them are :
1. getBlogDaysStats.py : Fetches the total views for the whole blog at the current time. For best results run every hour.
2. getBlogReferrers.py : Fetches all the referrers to your blog.
3. getBlogPostViews.py : Fetches the number of views for individual blog posts and pages.
4. getBlogSearchTerms.py : Fetches all the search terms used to find your blog today.
5. getBlogClicks.py : Fetches the urls that people who visited your blog clicked.
How to Collect WordPress Statistics
The first step is of course to collect data periodically. I use cron to run the scripts. My crontab file looks like this :
11 * * * * /usr/bin/python scriptpath/getBlogDaysStats.py
12 0 * * * /usr/bin/python scriptpath/getBlogClicks.py
14 0 * * * /usr/bin/python scriptpath/getBlogPostViews.py
15 0 * * * /usr/bin/python scriptpath/getBlogReferrers.py
16 0 * * * /usr/bin/python scriptpath/getBlogSearchTerms.py
Basically, I run the getBlogDaysStats every hour and other scripts every day. I also run the rest of scripts at early morning so that it fetches the previous day’s data.
How to Use WordPress Statistics
If you run the scripts for few days, you will have lot of data. The amount of analysis you can make is limited only by your creativity. In this section, I will tell some of the ways I use the stats instead of giving an explicit how-to.
1. Views per day : It is collected by getBlogDaysStats.py. The most basic stuff is to chart them. This will give a glimpse of your trend – If it is static or climbing, then good news. If it is falling down it is something to worry about. I must also mention that have a more or less a plateau in your chart happens often. For eg in my blog, the charts follow a pattern – It increases for quite some time , then stays at the same level for a long time and then increases again. Also , worrying about individual day’s statistics is not a good idea. Try to aggregate them into weekly and monthly values as they give a less noisy view of your blog traffic.
Another common thing to do is to analyze per hour traffic. This can be easily derived from the output of the script. Basically, if m is the number of views at time a and n is the number of views at time b , then you received n-m views in b-a hours. I usually calculate it for every hour. This gives a *basic* idea of peak time for your blog – You can also infer your primary audience , although the interpretation is ambiguous. As an example , I get most of my traffic at night – especially between 1 AM – 9 AM. Morning time traffic is pretty weak and it picks up again in the evening. Interpreting this is hard as my blog covers a lot of topics – but if your blog is more focused you learn a lot about your visitors.
2. Referrers : This is a very useful statistic if you do some marketing for your blog. For best results, you may want to use just the domain of the url instead of the whole url for analysis. Using it you can figure out which sites drive traffic to your blog. If it is another blog, then it is a good idea to cultivate some friendship with that blog’s owner. For eg, for my blog , I found that digg drives more traffic that reddit. Also facebook drives some traffic to my blog – so I use WordPress’s facebook publicize feature. I also find that I get some traffic due to WordPress’s related posts feature which means that I must use good use of categories and tags. Your mileage may vary but I hope the basic idea is clear.
3. Individual Post Views : This is probably the most useful set of statistics. Basically , it allows you to analyze the traffic of individual posts over a period of time. I have a file which associates a blog post with extra information : For eg it stores the categories, tags, original creation date, all modification dates etc. (If you are curious , I store the information in JSON format). Once you have this information lot of analysis is possible.
a. You can figure out your audience type. If for a post, you have lot of audience in the first week and almost no audience from then on – then most likely your audience is driven by subscription. If it keeps having a regular traffic, then probably it has some useful stuff and traffic is constantly driven to it by search engines. For eg, my Biweekly links belong to the first scenario : When I publish one, lot of people visit it and then after a few days it gets practically no visits. In the other case, my post of Mean Shift gets a steady stream of views every week. If you want to sustain a good viewership, you may want to write more posts which can attract long term views.
b. If you use categories and tags wisely, you can tally the number of views per each category. This will give you an idea of the blog posts which users prefer. I noticed that my audience seems to like my Linux / Data Mining posts than other categories. So it is a good idea to write more of those posts.
c. You can kind of see a pareto effect in your blog posts. For eg, my top 10 blogs account for atleast 70% of my blog traffic. So if I could identify them correctly, I can write lesser posts but still maintain my blog traffic 😉
You can do lot more than these simple analysis but this is just a start.
4. Search Terms : This is another neat statistic. You can use it to figure out the primary way in which users access your blog. For eg, the ratio of total blog post view for a day and number of search terms for the day is quite interesting. If the ratio is high, then most of the people find your blog using search engines. In a way , this a potential transient audience whom you can convert to regular audience. If the ratio is small , then your blog gets views by referrers and regular viewers. This will assure you a steady audience , but it is slightly hard to get new people “find” your blog.
This statistic also tells you which keywords the viewers use to find my blog. You can gleam lot of interesting things from this. For eg, almost all of my search terms are 3-5 words long and usually very specific. This either means that the user is an expert and has crafted specific query. It may also mean that user rewrote the query and my blog was not found in the general query. I also use the terms to figure out if the user would have been satisfied with my blog. For eg, I know that a user searching “install matlab to 64-bit” will be satisfied while some one who searches “k means determine k” will not be. You can do either of two things : augment your blog post to add information that users are searching , or point users to resources that satisfies their query. For eg, I found lot of people reached my blog searching for how to find k. I found geomblog had couple of good posts on it and updated my blog to link to these posts. Some times, I may add a FAQ if same search query comes multiple times and if my page contains the information but is obscure. Eg : lot of people reached my blog searching for Empathy’s chat log location. My post of Empathy had it but not in a prominent fashion. So I added a FAQ which points the answer immediately.
5. Clicks : This statistic is tangentially useful in finding out which links the user clicks. One way I use it is to gauge the “tech” level of my reader who visits my blog using search engines. I usually link to Wikipedia articles for common terms. If the user clicks on these basic terms often ,then it might mean that I write articles at a level higher that the typical user and I have to explain it better. For eg , in my post of K-Means , this was the reason I explain supervised and unsupervised learning at the start even though most people learning k-means already know it.
Other Resources for Blog Traffic
There are other locations that give some useful information about your traffic. Some of them are :
a. Google Web Master Site : This is arguably one of the most comprehensive information about your blog post’s performance in Google. You can see it a Google Webmaster Page -> Your site on web -> Search queries. It has information like impressions, click throughs, average position etc. You can download all of them in a csv file too ! Literally a gold mine for data lovers.
b. Feedburner : Even though, WordPress has a feed, I switched to FeedBurner. One of the main reason was that it gave me a csv file detailing the number of views by my subscribers.
c. Quantcast : Useful for aggregate information. It has multiple charts that detail the number of views, unique visitors etc. The Quantcast data might not be accurate as it is usually estimated – but it gives a broad gauge of your blog. It also has some statistic which says how many of your visitors are addicts , how many are pass throughs etc. Quite useful !
d. Alexa : Similar to Quantcast . I primarily use my Alexa Rank for motivation to improve my blog ranking.
Pivot Tables
I primarily use Python prompt to play with data. If you are not comfortable with programmatic tweaking, use spreadsheets to do these analysis. If you have Windows, you can do lot of powerful analysis by importing the statistics obtained by the scripts into Microsoft Excel. Excel has a neat feature called Pivot tables. It is also an advanced topic that I will not discuss here. You can do some fantastic analysis using pivots. They also give you the ability to view the same data from multiple perspectives.
In this post, I have barely scratched the surface – You can do lot of amazing analysis using WordPress Stats API . I will talk about more complex analysis in a later post. Have fun with the data !
Related articles
- WordPress Stats and Numbers: Breaking Their Own Records (lorelle.wordpress.com)
- Blog Referrers: DesignSponge vs. WordPress (projectpalermo.com)
- To Use WordPress or Blogger… That is the Question (wisdomofjen.wordpress.com)
- WordPress.com vs. WordPress.org (bradyszabo.com)
Share API
Share API
Reading and Creating Shares
Use the Share API to have a member share content with their network or with all of LinkedIn. This can be a simple short text update, similar to Twitter. Or a URL with a title and optional photo. Or both.
You can also forward the shared content to Twitter and reshare another member’s share.
Adding New Shares
To add a new share, you markup the content in XML and issue a HTTP POST to the following URL:
URL
To have LinkedIn pass the status message along to a member’s tethered Twitter account, if they have one, modify the URL to include a query string of twitter-post=true.
Fields for the XML Body
| Node | Parent Node | Required? | Value | Notes |
|---|---|---|---|---|
| share | — | Yes | Child nodes of share | Parent node for all share content |
| comment | share | Conditional | Text of member’s comment. (Similar to deprecated current-status field.) | Post must contain comment and/or (content/title and content/submitted-url). Max length is 700 characters. |
| content | share | Conditional | Parent node for information on shared document | |
| title | share/content | Conditional | Title of shared document | Post must contain comment and/or (content/title and content/submitted-url). Max length is 200 characters. |
| submitted-url | share/content | Conditional | URL for shared content | Post must contain comment and/or (content/title and content/submitted-url). |
| submitted-image-url | share/content | Optional | URL for image of shared content | Invalid without (content/title and content/submitted-url). |
| description | share/content | Option | Description of shared content | Max length of 256 characters. |
| visibility | share | Yes | Parent node for visibility information | |
| code | share/visibility | Yes | One of anyone: all members or connections-only: connections only. |
Sample XML
Here is an example XML document:
<!--?xml version="1.0" encoding="UTF-8"?> 83% of employers will use social media to hire: 78% LinkedIn, 55% Facebook, 45% Twitter [SF Biz Times] -->http://bit.ly/cCpeOD Survey: Social networks top hiring tool - San Francisco Business Times http://sanfrancisco.bizjournals.com/sanfrancisco/stories/2010/06/28/daily34.html</submitted-url> <submitted-image-url>http://images.bizjournals.com/travel/cityscapes/thumbs/sm_sanfrancisco.jpg</submitted-image-url> </content> <visibility> <code>anyone</code> </visibility> </share>
Response
Returns 201 Created on success. It will also provide a Location HTTP header with a URL for the created resource. However, at this time, you cannot retrieve the Share from that location. It’s there for future compatibility.
Resharing An Existing Share
When a member does a reshare, they can pass along a previously shared item to their network. This can either be as-is, or they can annotate the share to provide their own thoughts. The process is similar to creating a new share, but you provide an attribution/id value instead of a content block.
You can only reshare a share with a content block. If this block is empty, you will get a 400 error saying “Specified share {s28311617} has no content”.
Read Retrieving Share Information for instructions to retrieve these value using the API.
URL
Fields for the XML Body
| Node | Parent Node | Required? | Value | Notes |
|---|---|---|---|---|
| share | — | Yes | Child nodes of share | Parent node for all share content |
| comment | share | No | Text of member’s comment. (Similar to deprecated current-status field.) | Max length is 700 characters. |
| attribution | share | Yes | Parent node for information on reshared document | |
| id | share/attribution/share | Yes | id of reshared document | Currently in the format of s12345678, so is not guaranteed to be an integer.Post must contain id if it does not contain content and id must be from a share with a content block. |
| visibility | share | Yes | Parent node for visibility information | |
| code | share/visibility | Yes | One of anyone: all members or connections-only: connections only. |
Sample XML
Here is an example XML document:
<!--?xml version="1.0" encoding="UTF-8"?> Check out this story! I can't believe it. s24681357 -->connections-only
Response
Returns 201 Created on success. It will also provide a Location HTTP header with a URL for the created resource. However, at this time, you cannot retrieve the Share from that location. It’s there for future compatibility.
Retrieving Share Information
A particular member’s current share is detailed in their Profile API, so you can get a member’s current share by requesting:
Use the ~, id, or public profile URL to identify the user.
To retrieve a stream of shares for the member or their member first degree network, use the Get Network Updates API resource requesting the SHAR update type.
For the specified member also use a query parameter of scope=self:
Omit the scope for their first degree network:
You will receive:
<!--?xml version="1.0" encoding="UTF-8"?> s12345678 1279577156654 83% of employers will use social media to hire: 78% LinkedIn, 55% Facebook, 45% Twitter [SF Biz Times] -->http://bit.ly/cCpeOD</comment> <content> <id>123456789</id> <title>Survey: Social networks top hiring tool - San Francisco Business Times</title> <submitted-url>http://sanfrancisco.bizjournals.com/sanfrancisco/stories/2010/06/28/daily34.html</submitted-url> <shortened-url>lnkd.in/abc123</shortened-url> <submitted-image-url>http://images.bizjournals.com/travel/cityscapes/thumbs/sm_sanfrancisco.jpg</submitted-image-url> <thumbnail-url>http://media.linkedin.com/media-proxy/ext...</thumbnail-url> </content> <visibility> <code>anyone</code> </visibility> <source> <service-provider> <name>LINKEDIN</name> </service-provider> <application> <name>Your Cool App</name> </application> </source> <current-share>
Fields for the XML Body
Beyond the fields listed above, you also receive:
| Node | Parent Node | Value | Notes |
|---|---|---|---|
| id | share | Identifier for share. | |
| timestamp | share | Time of posting in miliseconds since UTC. (Divide this number by 1000 to get the standard Unix timestamp.) | |
| shortened-url | share/content | Short version of the submitted-url. If the submitted-url is generated via a URL shortener, this is the original URL and the submitted URL is the expanded version. Otherwise, this is a LinkedIn generated short URL using http://lnkd.in/. | |
| resolved-url | share/content | The submitted-url unwound from any URL shortener services. | |
| author | share/attribution/share | Information on the author of the original shared item. | Only appears when retrieving a reshare, not an original share. |
| name | share/source/service-provider | Platform where the share came from, such as LINKEDIN or TWITTER. | |
| name | share/source/application | Application where the share came from, such as the name of your application. |
Adding your Twitter feed to your website with jQuery
If you or your company has a Twitter account, chances are you’d like to promote it and display your latest tweets from your website. Since many websites – both personal and increasingly business – are built on blogging software such as WordPress, this is usually achieved via a plugin, of which there are many out there.
But what if you simply want to add your live Twitter feed to a “normal” web page? Twitter itself provides a number of HTML widgets, but in this article I’ll show you how easy it is to achieve with a little bit of JavaScript, CSS, and jQuery.
In case you haven’t come across it before:
What is jQuery?
jQuery is a fast and concise JavaScript Library that simplifies HTML document traversing, event handling, animating, and Ajax interactions for rapid web development. It’s very powerful and makes life a whole lot easier when writing JavaScript. To include jQuery in your webpage, simply add the following within the <head> tags:
// <![CDATA[javascript" src="http://jqueryjs.google]]>

code.com/files/jquery-1.3.2.min.js"></script>
This uses the version that is hosted on Google Code, which saves you having to download the file.
Twitter API
Twitter itself provides a complicated API to allow access to all sorts of things. A lot of this complication arises around authentication, and necessarily so, but thankfully to simply retrieve a stream of tweets, authentication isn’t required (as long as the user in question hasn’t hidden their tweets).
First of all the API provides many different ways to obtain a user’s statuses. I won’t go into any of them other than the one that I favour, and this is the one that I’ll talk about here: user_timeline.
user_timeline
This returns a number of the most recent statuses posted by the user. It can return the data in different formats: XML, JSON, RSS and Atom. I favour JSON, a lightweight data-interchange format, so this is the one that I will talk about.
You can use a number of parameters, and a full list of what they can do can be found on the Twitter API description for user_timeline. For now, I will only use a few relevant ones.
Give me the Tweets!
To retrieve the data for a particular Twitter account (I will use pcpro in this example here) you call the following:
$.getJSON(“http://twitter.com/statuses/user_timeline.json?
screen_name=pc_pro&count=10&callback=?”,
function(tweetdata) {
// do some stuff here
});
This will return the last 10 tweets from the pc_pro account in JSON format in the tweetdata variable. By default, retweeted tweets are not included in this feed, but to include them, add the &include_rts=1 parameter above, and they will be returned.
Of course we now have to make sense of this data, parse it and actually do something with it.
On our HTML page, define a <ul> and give it the id tweet-list. This is where we will hold our tweets. The above code is then extended to do the following:
$.getJSON(“http://twitter.com/statuses/user_timeline.json?screen_name=pc_pro&count=1O&callback=?”, function(tweetdata) {
var tl = $(“#tweet-list”);
$.each(tweetdata, function(i,tweet) {
tl.append(“<li>“” + tweet.text + “”– ” + tweet.created_at + “</li>”);
});
});
Some explanations: var tl = $(“#tweet-list”); grabs a reference to the <ul> element that we created above. We need this as we will add each tweet to it.
$.each(tweetdata, function(i,tweet) {… is the start of a jQuery loop, in this case iterating through each item in tweetdata and storing it temporarily in tweet. The following line then adds the tweet within an
This will now display the last 10 tweets in list format on the relevant HTML page.
However, if there are links contained in the tweet, they won’t be clickable, and the created date is a bit long and not like the Twitter standard timelines such as “about a minute ago” or “two hours ago”. We can fix this with the following two functions urlToLink(); which we call on tweet.text:
function urlToLink(text) {
var exp = /(\b(https?|ftp|file):\/\/[-A-Z0-9+&@#\/%?=~_|!:,.;]*[-A-Z0-9+&@#\/%=~_|])/ig;
return text.replace(exp,”$1“);
}
and relTime(); which we call on tweet.created_at:
function relTime(time_value) {
time_value = time_value.replace(/(\+[0-9]{4}\s)/ig,””);
var parsed_date = Date.parse(time_value);
var relative_to = (arguments.length > 1) ? arguments[1] : new Date();
var timeago = parseInt((relative_to.getTime() – parsed_date) / 1000);
if (timeago < 60) return ‘less than a minute ago’;
else if(timeago < 120) return ‘about a minute ago’;
else if(timeago < (45*60)) return (parseInt(timeago / 60)).toString() + ‘ minutes ago’;
else if(timeago < (90*60)) return ‘about an hour ago’;
else if(timeago < (24*60*60)) return ‘about ‘ + (parseInt(timeago / 3600)).toString() + ‘ hours ago’;
else if(timeago < (48*60*60)) return ‘1 day ago’;
else return (parseInt(timeago / 86400)).toString() + ‘ days ago’;
}
So we need to change the above line to the following:
tl.append(”
“);
This will be called when the HTML page is loaded (or you can load it some other time, it’s up to you of course) and this is done using jQuery by inserting the code within:
$(document).ready(function() {
// code here
});
which basically calls the code when the entire DOM has been loaded.
End Result
The main difference is the URL in included in the &.getJSON() call which should be:
http://api.twitter.com/1/account-name/lists/list-name/statuses.json?callback=?
where account-name is the name of the account, in this case pc_pro, and list-name is the name of the list, in this case staff.
Related Articles
- Tech Note: Creating Tweet Buttons Dynamically (littlegreenfootballs.com)
- JQuery Templates, Data Link, and Globalization (weblogs.asp.net)
- Real Time Twitter Search via Websocket or Comet using the Atmosphere Framework (jfarcand.wordpress.com)
- 15 Way Cool and Useful jQuery Plugins For Web Design and Development | CreativeFan (creativefan.com)
- Cached Commons (cachedcommons.org)
- Tech Tweets for 4-Oct-2010 (elijahmanor.com)
Quick tip: paths and URLs in WordPress
define(‘MY_WORDPRESS_FOLDER’,$_SERVER[‘DOCUMENT_ROOT’]);define(‘MY_THEME_FOLDER’,str_replace(“”,’/’,dirname(__FILE__)));define(‘MY_THEME_PATH’,‘/’ . substr(MY_THEME_FOLDER,stripos(MY_THEME_FOLDER,’wp-content’)
ABSPATH constant
TEMPLATEPATH constant
get_template_directory_uri()
/home/user/public_html/wp/wp-content/themes/example-theme
/wp-content/themes/example-theme
/wp-content/themes/example-theme/custom/book_panel.css
/wp/wp-content/themes/example-theme/custom/book_panel.css
wp_enqueue_style(‘my_meta_css’,get_template_directory_uri(). ‘/custom/book_panel.css’);
Conclusion
Related Articles
- How to Setup Multiuser in WordPress 3.0 (kimwoodbridge.com)
- 16 Vital Checks Before Releasing a WordPress Theme (net.tutsplus.com)
- How to Disable and Remove Shortlink Link Rel Hook in WordPress Header (mydigitallife.info)
- WordPress SEO Optimization: Enable Gzip Encoding and Caching (seochat.com)
- WordPress Fat-Loss Diet to Speed Up & Ease Load (line25.com)






Mobypicture Photo post with API method php
Image via CrunchBase
Related articles
Rate this:
Share this: