Archive
How to Hunt for a Job Using Social Media

Securing a job is the tough part, but scouting an open position? All it takes is a strategic scroll through your favorite social media accounts.
Sites like Twitter and Facebook can be fun and frivolous, but they’re also viable business opportunities. Plumbing through accounts, hashtags and personal pages could help launch next potential career.
Want to find a writing opportunity in a town near you? Just look up a hashtag on Twitter. Want to stay up to date with a company’s career openings? “Like” them on Facebook. Want to create a beautiful resume that’ll catch a recruiter’s or hiring manager’s eye? Head over to Pinterest.
Here’s how to land your perfect job via social media.
1. Twitter

In 140 characters or less, Twitter can help you find your dream gig. It’s teeming with job applications and professional networking pages, if you know where to find them.
a. Searches: Use that search bar to look for terms that apply to the job you want. For best results, type in words like “jobs,” “hiring” and other specifics that apply to your desired field and location; for example, “writer” and “New York City.”
b. Hashtags: Typing #jobs and #hiring will result in a plethora of tweets from those seeking employees. Employers who want to cast a wide net will often tweet out job applications, with accompanying hashtags.
c. Tweet often: Though it depends on your career of choice, tweeting is a great way to network with like-minded folks in your profession. Follow businesses and people you’re interested in and don’t be afraid to send them the occasional tweet. (On that note, make sure your Twitter account is polished and professional).
d. Follow away: There are dozens and dozens of Twitter accounts dedicated to posting job applications. Go to the search bar and type in “jobs,” then click “People” on the left-hand side. You’ll soon see all the Twitter accounts with “jobs” in the username and can gleefully press the “Follow” button.
2. Facebook
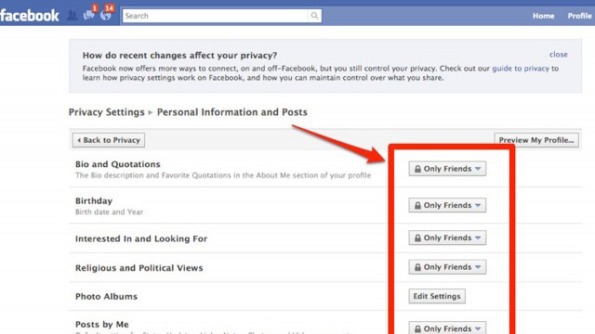
Facebook is an undeniable social media juggernaut. According to its representatives, these are the top tips for trying to get a job through Facebook:
a. “Like” some pages: Most companies strive for dynamic social media presences, and Facebook Pages are engagement 101. By “Liking” them, you can get daily updates about their activity. Plus, they will likely post links to available job applications.
b. Private/Public: Take a thorough look at your privacy settings on Facebook, and make sure you know exactly how others view your Timeline. However, you should consider setting your work and education info public, enabling others to see your professional history.
c. Stay updated: Make sure all of your work and education info is up to date and reflects your current position and past experience.
d. Add “Professional Skills:” A few months ago, Facebook added a “Professional Skills” portion to the “About” section. Underneath work and education, add skills you’ve acquired, optimizing your professional appeal.
3. LinkedIn
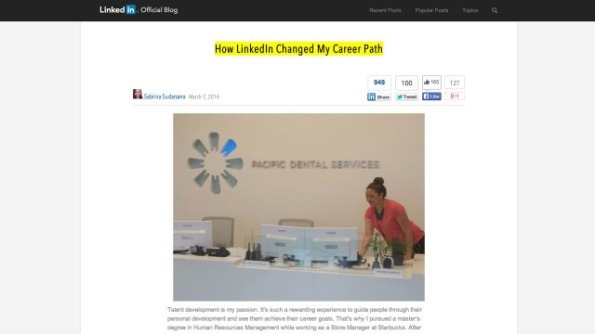
Perhaps the most obvious of job hunting sites, LinkedIn is the network of choice for professionals.
a. Connect: Unlike Facebook, it’s a little less creepy to connect with strangers on LinkedIn, because everyone there is looking for networking opportunities. Connect to people who have careers you’re interested in, and search around for those who might only be one degree away from you. For inspiration, check out the member stories portion of LinkedIn’s blog, where users share their success anecdotes about networking through the site.
b. Jobs Board: Not only does the site provide you with advice and connections, but it also has a jobs board highlighting available opportunities in nearly every field.
c. Endorsements and recommendations: There’s a portion of your profile dedicated to glowing recommendations and endorsements from your peers. Try to get as many as you can, and your page’s likability will instantly boost.
d. Share more: According to LinkedIn’s Career Expert, Nicole Williams, sharing articles or content with your network boosts your chances 10 times for getting contacted by a recruiter. When you share content, it proves your knowledge in the industry.
e. List all the things: Your profile is 12 times more likely to be viewed by a hiring manager if you have a detailed list of work experience, Williams says. The more robust your profile is, the more experienced and hirable you look.
4. Tumblr
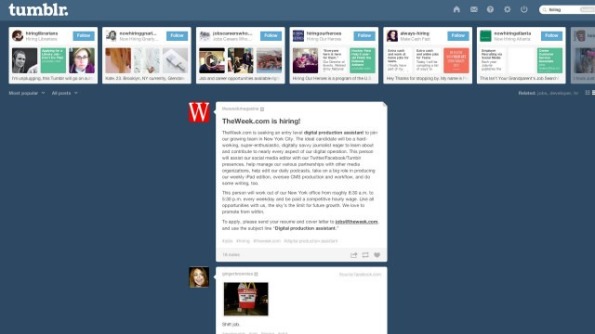
You can use Tumblr, that vast Internet playground of GIFs and rabid fandoms, for help in the job search.
a. Search tags: In the search bar, look for tagged terms like “hiring” and “jobs.” It’s a bit harder to separate the wheat from the chaff in the tag-happy blogging community, but you’ll still be able to find plenty of cool companies advertising open jobs via Tumblr.
b. Start Tumbling: This is especially important if you’re the creative type. A Tumblr account attuned to your interests, and full of your own original content, automatically ups your unique appeal to employers. In addition, a good Tumblr following can lead to job offers from employers who happened to stumble upon your site.
5. Pinterest

Yes, Pinterest is more than just a pretty place to find wedding inspiration and delicious recipes.
a. Pin your résumé: Tired of the standard, one-sheet format? Use a Pinterest board to “pin” your résumé. You can highlight certain aspects of your experience and add photos and links. See Rachael G. King, a social media manager at Sidecar who created a “living résumé.”
b. Follow these pages: For a never-ending well of job tips and opportunities, follow these seven helpful Pinterest boards.
Login with Facebook using PHP SDK in CakePHP
Here we used PHP SDK 3.0 and CakePHP 2.X for the process of authentication and authorizing users for your app.
For Creating an App, which you can obtain from the App Dashboard.
You need App Id and App Secret for integration of the facebook login in cakephp.
In this CakePHP module we included the Facebook PHP SDK 3.0 in vendors of the app directory.And we define Some variables in Core.php
And We create one file which is facebook.php in config folder for the define of AppId and Appsecret.
$config=array('Facebook'=>array('appId'=>'YOUR APP ID','secret'=>'YOUR APP SECRET',));
We create one Controller which is FacebookCpsController.php
<?phpApp::uses('Controller','Controller');App::import('Vendor','Facebook',array('file'=>'Facebook'.DS.'facebook.php'));classFacebookCpsControllerextendsAppController {public$name='FacebookCps';public$uses=array();publicfunctionindex(){$this->layout=false;}functionlogin(){Configure::load('facebook');$appId=Configure::read('Facebook.appId');$app_secret=Configure::read('Facebook.secret');=newFacebook(array('appId'=>$appId,'secret'=>$app_secret,));$loginUrl=->getLoginUrl(array('scope'=>'email,read_stream, publish_stream, user_birthday, user_location, user_work_history, user_hometown, user_photos','redirect_uri'=> BASE_URL.'facebook_cps/facebook_connect','display'=>'popup'));$this->redirect($loginUrl);}functionfacebook_connect(){Configure::load('facebook');$appId=Configure::read('Facebook.appId');$app_secret=Configure::read('Facebook.secret');=newFacebook(array('appId'=>$appId,'secret'=>$app_secret,));$user=->getUser();if($user){try{$user_profile=->api('/me');$params=array('next'=> BASE_URL.'facebook_cps/facebook_logout');$logout=->getLogoutUrl($params);$this->Session->write('logout',$logout);}catch(FacebookApiException$e){error_log($e);$user= NULL;}}else{$this->Session->setFlash('Sorry.Please try again','default',array('class'=>'msg_req'));$this->redirect(array('action'=>'index'));}}functionfacebook_logout(){$this->Session->delete('User');$this->Session->delete('logout');$this->redirect(array('action'=>'index'));}}?>
Here We create two view files for the FacebookCpsController which are located in app/View/FacebookCps directory.
index.ctp
<!--DOCTYPE html PUBLIC"-//W3C//DTD XHTML 1.0 Transitional//EN""http://www.w3.org/TR/xhtml1/DTD/xhtml1-transitional.dtd"><head><meta http-equiv="Content-Type"content="text/html; charset=utf-8"/><title>Login with Facebook In CakePHP</title><?phpecho$this->Html->script('oauthpopup'); ?><script type="text/javascript">$(document).ready(function(){$('#facebook').click(function(e){$.oauthpopup({path:'facebook_cps/login',width:600,height:300,callback:function(){window.location.reload();}});e.preventDefault();});});</script></head><body><?php$ses_user=$this->Session->read('User');$logout=$this->Session->read('logout');if(!$this->Session->check('User') &&empty($ses_user)) {echo$this->Html->image('facebook.png',array('id'=>'facebook','style'=>'cursor:pointer;float:left;margin-left:550px;'));}else{echo'<img src="https://graph.facebook.com/'.$ses_user['id'] .'/picture" width="30" height="30"/><div>'.$ses_user['name'].'</div>';echo'<a href="'.$logout.'">Logout</a>';}?></body></html>
facebook_connect.ctp
<script type="text/javascript">window.close();</script>
Here I used one jquery plugin oauthpopup.jswhich is used for popup
(this file is located in app/webroot/js directory)
oauthpopup.js
(function (jQuery) {
jQuery.oauthpopup = function (options) {
options.windowName = options.windowName || ‘ConnectWithOAuth’;
options.windowOptions = options.windowOptions || ‘location=0,status=0,width=’+options.width+’,height=’+options.height+’,scrollbars=1′;
options.callback = options.callback || function () {
window.location.reload();
};
var that = this;
that._oauthWindow = window.open(options.path, options.windowName, options.windowOptions);
that._oauthInterval = window.setInterval(function () {
if (that._oauthWindow.closed) {
window.clearInterval(that._oauthInterval);
options.callback();
}
}, 1000);
};
})(jQuery);
In the PHP SDK 3.0,we change the facebook.php file.For the Session We uses the CakePHP core data source which is CakeSession. facebook.php file is located at app/Vendor/Facebook directory
facebook.php
//included this line the above classApp::uses('CakeSession','Model/Datasource');publicfunction__construct($config) {if(!session_id()) {//insted of session_start() we used CakeSession::start()CakeSession::start();}parent::__construct($config);if(!empty($config['sharedSession'])) {$this->initSharedSession();}}
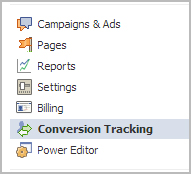
Step-by-Step guide to Facebook Conversion Tracking
Step 1: Once you log in to your ‘Ads Manager’ tab, click on the Conversion Tracking button on the left side bar.
Step 2: Then click on the ‘Create Conversion Pixel’ tab to begin the process.

Step 3: You will be directed to this pop-up, which will ask you for a:
1. Name: An appropriate name will help you remember what you are tracking. (Example: Lead Generation – GATE Ad)
2. Category: This will help you decide the type of action that you want to track on your site. You can choose from the following:
1. Checkouts
2. Registrations
3. Leads
4. Key Page Views
5. Adds to Cart
6. Other Website Conversions
(For the purpose of this example, we have selected ‘Leads’).

Step 4: You will be able to see a pop-up window with a JavaScript code. This is the code that you will have to add to the page where the conversion will happen. This will let you track the conversions back to ads which you are running on Facebook.

The code should be placed on the page that a user will finally see when the transaction is complete.
Here is the tricky part. The code should not go on all pages. For that matter, it should not even go to the landing page of your product. The code should be placed on the page that a user will finally see when the transaction is complete.
For Example: If you want to track when students register for your GATE coaching, paste the code on the registration confirmation page/thank you page and not on the form that they need to submit.
How do you confirm that your conversion is working properly?
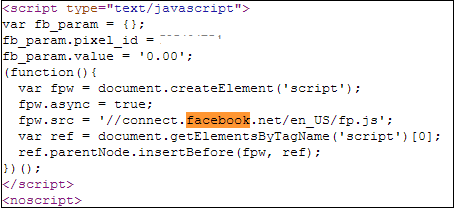
1. Check that the javascript snippet has been placed on the correct conversion page. Visit the page where the pixel has been embedded, right click and go to ‘View Page Source’ to find the pixel. The code should have the tag of the HTML. See image below.
2. Check that Facebook is receiving the conversion events from your website. Go to the conversion tracking tab in your Ads Manager account. There you will see a list of the conversion tracking pixels that you have created. If the conversion tracking pixel has been successfully implemented and a conversion event has been recorded, it will be reflected in the Pixel Status column. If the status shows active, it means that the page which contains the pixel has been viewed by users. If it shows inactive, it means that over the last 24 hours, the page with the pixel has not been viewed.

3.Later, when you create your Facebook ad , you need to check the track conversions box under the campaign, pricing and schedule tab to enable tracking.

How to create Facebook Ads in 8 Steps
Like Facebook says it, “Over 1 billion people. We’ll help you reach the right ones.”
The ultimate goal for any marketer/business owner is to convert his leads into customers. However, for leads to convert, you need to get hold of them first, right? Running ads on social media biggie, Facebook is a time tested approach to grab attention and get more leads for your business.
There are multiple ways to run ads/promoted posts on Facebook. Today, I will discuss how to create Facebook ads in 8 simple steps. Let us take the example of a GATE coaching institute trying to capture student leads through Facebook. For those of you who don’t know, GATE stands for Graduate Aptitude Test in Engineering, and is an all India examination for Engineering in MSc, MTech and PhD programmes. (This article is relevant for Facebook beginners).
Here is how to create Facebook ads
Step 1 – Logging into Facebook
Log into your Facebook account using your personal or business profile and go to the ‘Advertise’ page. You will get this in the drop down menu next to the settings button on your home page.

Step 2 – Start Creating Your Ad
You will be led to this page as shown below. Click on the “Create an Ad” tab to begin the process of creating an ad for Facebook.

Step 3 – Select Facebook Page/Landing Page to Promote
The words, ‘What do you want to advertise?’ in the next section are pretty much comprehensible. This is where you choose the place, page, app or event that you would like to promote. For example: Here we are advertising a page which is dedicated toward GATE coaching.You can also add your own URL or landing page. Check out how you can create a Facebook Landing Page for lead capture.

Step 4 – Set the Ad Objective
Your next step is named, ‘What would you like to do?’ Here you can choose to:
- Get more page likes: Drive more Facebook users to your ad/page.
- Promote page posts: Promote a particular post out of all the posts that you have made on your page, ex. a blog post, picture etc. This will not only enhance your reach, but also your chances to be placed in news feeds – the center column of your home page.
- See advanced options: Drive traffic to your website. You can configure your advanced creative and pricing options. This is so intricate that you can also bid for the number of clicks on a particular post. (Remember, each category is different and offers different features to help you target your audience better.)
Since our main goal here is to collect leads and get better control over our ads, we will opt for the ‘See Advanced Options’.

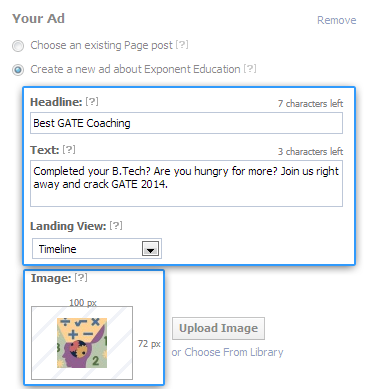
Step 5 – Create the Ad copy
You begin designing ‘Your ad’ here. FB ads are simple, comprising 25 character headline and a 90 character description. You can also add a thumbnail photograph measuring 100 pixels x 72 pixels here. Make sure to keep it very relevant for your audience. For instance, if you are a GATE institute, this would be a good ad copy:
Looking for Best Coaching for GATE? Join Now – 1 Week Free Trial Period!
You can then set the landing page of the ad. For instance, you can choose to land the visitors on your Facebook Page’s timeline, or a lead capture page (when you are aiming at lead capture, it is recommended that you set a landing page, instead of directing people to the timeline). Here’s how you can create one and the image on your right shows how your ad will look.
*Do go through these guidelines before you create your ad copy.*
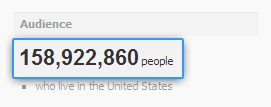
Step 6 – Choose your Audience
Next, you narrow down your target audience under the ‘Choose your audience’ category. Before we begin, in the image shown below, see the number of people under ‘Audience’ section before the filters have been set.
This is the most important step, as this is where you choose your perfect target.
- Location: You can micro target by location (state/city/zip code). Ex: Students on Facebook giving GATE ‘14 exams will be India specific only. If you are a physical institute based in Bangalore, you might want to choose by city: Bangalore, Nelamangala, Hosur etc.
- Age: You can also target by age. Ex: GATE will mostly include students who have completed/ pursuing their B.Tech – 22-24 years.
- Gender: You can also choose gender, based on the kind of ad you are advertising. Here, since we are talking about exam specific ads, gender will be categorized as ‘All’.
- Precise Interests: Under the ‘Precise Interests’ section, you can choose interests that you are looking for in your target audience. In this case, your interests can be Engineering, IIT, studies etc. Once you have entered precise interest, you don’t have to choose the broader interest.

If you have opted for the ‘Advanced options’ under the ad category, you can also detail down to relationship status, languages spoken, college attended and workplace. By the process of trial and error, you can boil down your audience from a whopping 167 million users in the US to as few as 1 lakh people in India or a particular city.
Now, take a look at the image shown below which shows the targeted audience once the filters have been set.

Step 7 – Campaign Pricing and Schedule Options
This step is ‘Campaign, Pricing and Schedule’ for your Facebook ad.
- Choose the currency, country and time zone in which you are placing your ad.
- The ‘New Campaign Name’ should be distinct and definite.
- Next, choose how much you are willing to spend for your ad campaign. You can choose from a daily budget or a lump sum amount that you will spend for as long as the ad runs. (Payments on Facebook are either pay-per-click – you pay every time someone clicks your ad or per thousand impressions – you pay every time 1000 people see your ad.) We have opted for the Pay-per-click payment service.

Step 8 – Review your Ad
Once you ‘Review your ad’, you will be able to see the details of your ads that you have fed and how your ad will look. Next, you will be prompted to make payments for your ad. You can use a credit/debit card, PayPal or Facebook ad coupon.

Facebook will hold your ad for review for a minimum of 24 hours. Your ad will either appear in news feeds or in the right column of any page in search results.Later, you can use the ‘Ads Manager tool’ to keep track of your ads’ progress.
So, this is how to create a Facebook ad: Basic News-feed ad. Be creative, think outside the box and you are good to go. For further queries, please do visit Facebook’s Help Centre or leave us a comment and we will get back to you ASAP.
Upload Cover Photo to Facebook via PHP
Here is a tutorial to upload a Cover Photo on Facebook via PHP. We will need Facebook Application ID and Secret, and Facebook files from Github.com then upload to your web space only the src folder. Now create a file called upload.php and upload it to your web space. Open upload.php with notepad and add this code:
<?php

ini_set('display_errors', 1);
 error_reporting(E_ALL);

 require 'src/facebook.php';

 $facebook = new Facebook(array(
 'appId' => "xxxxxxxxxxxxxxxxxxx", //Facebook App ID
 'secret' => "xxxxxxxxxxxxxxxxxxx", // Facebook App Secret
 "cookie" => true,
 'fileUpload' => true
 ));

 $user_id = $facebook->getUser();

 if($user_id == 0 || $user_id == "")
 {
 $login_url = $facebook->getLoginUrl(array(
 'redirect_uri' => 'https://selvabalaji.wordpress.com/upload.php?cover='.$_GET['cover'].'', // Replace with your site url
 'scope' => "publish_stream,user_photos"));

 echo "<script type='text/javascript'>top.location.href = '$login_url';</script>";
 exit();
 }

 //get user album
 $albums = $facebook->api("/me/albums");
 $album_id = "";
 foreach($albums["data"] as $item){
 if($item["type"] == "cover_photo"){
 $album_id = $item["id"];
 break;
 }
 }

 //set timeline cover atributes
 $full_image_path = realpath($_GET['cover']);
 $args = array('message' => 'Uploaded from hhttps://selvabalaji.wordpress.com/');
 $args['image'] = '@' . $full_image_path;

 //upload cover photo to Facebook
 $data = $facebook->api("/me/photos", 'post', $args);
 $picture = $facebook->api('/'.$data['id']);

 $fb_image_link = 'http://www.facebook.com/profile.php?preview_cover='.$data['id'].''; //redirect to uploaded facebook cover and change it
 echo "<script type='text/javascript'>top.location.href = '$fb_image_link';</script>";
?>
Now that just type in the URL of your site followed by the name of the image file and you’re done!
Example : http://yoursitename.com/upload.php?cover=selvabalaji.gif
Login with Google Account OAuth

Sample database design
(
id INT PRIMARY KEY AUTO_INCREMENT,
email VARCHAR(50) UNIQUE,
fullname VARCHAR(100),
firstname VARCHAR(50),
lastname VARCHAR(50),
google_id VARCHAR(50),
gender VARCHAR(10),
dob VARCHAR(15),
profile_image TEXT,
gpluslink TEXT
)


Verify your domain ownership with HTML file upload or including META tag.
Google will provide you OAuth consumer key and OAuth consumer secret key.
Create client ID OAuth Console here.

Create client ID.

Here the application OAuth client ID and client secret.

You can find this in srcfolder, here you have to configure application OAuth keys, Consumer keys and redirection callback URL.
// OAuth2 Settings, you can get these keys at https://code.google.com/apis/console Step 6 keys ‘oauth2_client_id’ => ‘App Client ID’, ‘oauth2_client_secret’ => ‘App Client Secret’,’oauth2_redirect_uri’ => ‘http://yoursite.com/gplus/index.php’,// OAuth1 Settings Step 3 keys.
‘oauth_consumer_key’ => ‘OAuth Consumer Key’,
‘oauth_consumer_secret’ => ‘OAuth Consumer Secret’,
google_login.php
Google plus login system. Just include the file in index.php
<?php require_once ‘src/apiClient.php’; require_once ‘src/contrib/apiOauth2Service.php’; session_start(); $client = new apiClient(); setApplicationName(“Google Account Login”); $oauth2 = new apiOauth2Service($client); if (isset($_GET[‘code’])) { $client->authenticate(); $_SESSION[‘token’] = $client->getAccessToken(); $redirect = ‘http://’ . $_SERVER[‘HTTP_HOST’] . $_SERVER[‘PHP_SELF’]; header(‘Location: ‘ . filter_var($redirect, FILTER_SANITIZE_URL));}if (isset($_SESSION[‘token’])) {
$client->setAccessToken($_SESSION[‘token’]);
}if (isset($_REQUEST[‘logout’])) {
unset($_SESSION[‘token’]);
unset($_SESSION[‘google_data’]); //Google session data unset
$client->revokeToken();
}if ($client->getAccessToken())
{
$user = $oauth2->userinfo->get();
$_SESSION[‘google_data’]=$user; // Storing Google User Data in Session
header(“location: home.php”);
$_SESSION[‘token’] = $client->getAccessToken();
} else {
$authUrl = $client->createAuthUrl();
}if(isset($personMarkup)):
print $personMarkup;
endifif(isset($authUrl))
{
echo “<a href=”$authUrl”>Google Account Login</a>”;
} else {
echo “Logout“;
}
?>
home.php
Contains PHP code inserting Google plus session details into users table.
<?php
session_start();
include(‘db.php’); //Database Connection.
if (!isset($_SESSION[‘google_data’])) {
// Redirection to application home page.
header(“location: index.php”);
}
else
{
//echo print_r($userdata);
$userdata=$_SESSION[‘google_data’];
$email =$userdata[’email’];
$googleid =$userdata[‘id’];
$fullName =$userdata[‘name’];
$firstName=$userdata[‘given_name’];
$lastName=$userdata[‘family_name’];
$gplusURL=$userdata[‘link’];
$avatar=$userdata[‘picture’];
$gender=$userdata[‘gender’];
$dob=$userdata[‘birthday’];
//Execture query
$sql=mysql_query(“insert into users(email,fullname,firstname,lastname,google_id,gender,dob,profile_image,gpluslink) values(‘$email’,’$fullName’,’$firstName’,’$lastName’,’$googleid’,’$gender’,’$dob’,’$avatar’,’$gplusURL’)”);
?>db.php
Database Configuration file.<?php
$mysql_hostname = “localhost”;
$mysql_user = “username”;
$mysql_password = “password”;
$mysql_database = “databasename”;
$bd = mysql_connect($mysql_hostname, $mysql_user, $mysql_password) or die(“Could not connect database”);
mysql_select_db($mysql_database, $bd) or die(“Could not select database”);
?>
Related articles
- PHP OAuth API (phpclasses.org)
- basic_oauth 0.1.5 (pypi.python.org)
- How to store sensitive userdata in mysql using php (stackoverflow.com)
Facebook buys facial-recognition startup

Image via CrunchBase

Image via CrunchBase
Facebook Inc (FB.O) is paying $55 million to $60 million to buy Face.com, according to people familiar with the matter, acquiring the company that provides the facial-recognition technology used by the world’s largest social network to help users identify and tag photos.
The deal bolsters one of Facebook’s most popular features — the sharing and handling of photos — but the use of the startup’s
has spurred concerns about user privacy.
The No. 1 social network will pay cash and stock for Face.com, potentially paying as much as $60 million, two sources with knowledge of the deal said. Media reports in past weeks have pegged the transaction at $80 million to $100 million.
Neither Facebook nor Face.com disclosed terms of the deal, which is expected to close in coming weeks.
Facebook, which will acquire the technology and the employees of the 11-person Israeli company, said in a statement that the deal allows the company to bring a “long-time technology vendor in house.”
Face.com, which has raised nearly $5 million from investors including Russian Web search site Yandex (YNDX.O), launched its first product in 2009. The company makes standalone applications that consumers can use to help them identify photos of themselves and of their friends on Facebook, as well as providing the technology that Facebook has integrated into its service.
Facebook uses the technology to scan a user’s newly uploaded photos, compares faces in the snapshots with previous pictures, then tries to match faces and suggest name tags. When a match is found, Facebook alerts the person uploading the photos and invites them to “tag,” or identify, the person in the photo.
Responding to inquiries from U.S. and European privacy advocates, Facebook last year made it easier for users to opt out of its controversial facial-recognition technology for photographs posted on the website, an effort to address concerns that it had violated consumers’ privacy.
The deal is the latest in a string of acquisitions by Facebook in recent months, including the $1 billion acquisition of mobile photo-sharing service Instagram. U.S. antitrust regulators are undertaking an extended review of the Instagram deal, which Facebook expects to close by the end of the year.
Shares of Facebook, which continue to trade below the price at which they were offered during the initial public offering in May, closed Monday’s regular session up 4.7 percent at $31.41.
Related articles
- Facebook buys Face.com facial recognition company (huffingtonpost.com)
- Facebook to buy facial-recognition startup (business.financialpost.com)
- Even bigger Big Brother: Facebook purchases Israeli facial recognition company Face.com (EndtheLie.com)
- Facebook buys facial recognition startup Face.com (venturebeat.com)
- Facebook buys facial-recognition startup (stuff.co.nz)
Social Gestures and the Social Web – Part I
FROM the Below Article was Copied from the website http://blog.engag.io/2012/04/15/social-gestures-and-the-social-web-part-i/
The Original Author – MR. William Mougayar
Social Gesturing is at the heart of the social web. Those little signals have a small footprint but a large impact.
The crowd-sourced nature of social gestures adds up to a lot of value. After all, Facebook with all its might was mostly based and founded on 3 basic social gestures: liking, sharing and linking, each taking a fraction of a second to accomplish.
I’ve been thinking a lot about the hierarchy of social gestures in terms of value and potential. And I came-up with the following way to organize them into a taxonomy where certain gestures are grouped with each other according to the objective they are meant to achieve and the purpose they target: People, Interests or Content.
The graph below is self-explanatory. The objective of social gesturing is to a) grab Attention, b) Express yourself, c) Curate interests (or content), d) develop Relationships, or e) Engage with people.
The most commonly used Social Gestures are Sharing, Linking and Liking when it comes to Content, and Following or Friending when it comes to People. But the area that holds the most promise is Engagement with People.
There is an ascending amount of time it takes to accomplish each gesture. If you look at the two extremes, Discussing something with someone is a lot more time-consuming than Clicking on content or Sharing it.
Personally, and for Engagio, I’m very interested in the gestures around Social Engagement. I think we’re just getting started in that segment, and I plan to cover more on that topic in Part II of this post.
In the meantime, what is your opinion on the following 3 questions:
- Are there other Social Gestures that you are seeing?
- Do you see new ones that are emerging?
- Which ones do you use the most?
Related articles
- Engagio: A Canadian Startup Story and the future of the Social Web (startupnorth.ca)
- Engagio wants to be your one-stop social inbox (gigaom.com)
- How to swear in Italian (afrahm.wordpress.com)
- Don’t Export Your American Hand Gestures [Infographic] (communicationstudies.com)
- ShadowPuppets prototype lets you pinch-to-zoom, click, and scroll with shadow gestures (theverge.com)
Engagio: Recognize & Build Relationships On Social Network Easily

Engagio helps you to track your online conversations and allows you to develop meaningful relationships from them. In short, it is your tool to find quality relationships.
Pitched as ‘Your inbox for online conversations and relationships’, it is a tool much like Gmail, but is for managing your conversations in social networking sites and commenting systems. Engagio gives you visibility about the people behind these conversations and reveals their social identities profile. It saves you much time and allows you to connect with others in a much better and deeper way.
Although social media has many advantages, sometimes we fall short of managing our many relationships on social networking sites. With so many friends, family members, colleagues, classmates and relatives in our contacts list, we miss out on building quality relationships with people who matter. Engagio helps you to do that and more.
Engagio believes that commenting and conversations are strong social signals. They are stronger than likes, shares and links. Comments are implicit linkages about people. After all, you only care to comment on somebody’s post and take time to do it when you like that person or what s/he has to say. Like is easy, commenting takes time and thought. Engagio studies all that and more, and give you full visibility into the potential relationships behind your comments and conversations.
The service is frictionless and derives implicit data from your normal, everyday interactions. It does not matter whether your conversations are on social networks or inside your Engagio inbox, Engagio tracks them all. You connect to your social networks and Engagio starts to track, record, analyze and report on your interaction activity.
All you need to do is to signup from the entry page or jump to your inbox. You can easily track your conversations on Facebook, LinkedIn, Twitter, Google+, Disqus-enabled sites, Hacker news comments, Foursquare and more. This is a wonderful service for everybody who wishes to build up on great relationships without putting in much time and effort.
Chat With Command Prompt
If you want personal chat with a friend

All you need is your friends IP address and Command Prompt.
Mobile Trading
The Procyon Holdings (PROHD) name is expanding again as we push out into another development area — the Android framework. When I abandoned my BlackBerry, the choice to move to the Android platform was an easy decision. Market saturation, the development community, and fluidity between devices make this platform shine.
I’ve been having a few end user problems with the current iteration of our trading website. First, the native Android Gingerbread browser lacks SVG support, an issue that has bewildered me since I read about it. I can solve this issue by using another browser such as Opera, but I would like to use the native one.
Also working with a HTML + Ajax website on a device with a touch interface feels like you are not getting the full user experience. I want to scroll down lists with my finder, click and hold to expose options, and speed around menus.
We had to expand our design and create a few new pieces to get data to the mobile world. New items include the creation of a daemon to simply database population, exposing data via XML, and working with an existing library to enable Push notifications.
Information Flow
The Daemon runs on our server, periodically pulls transactions from the Eve API, and places that information in our wallet table.
Our previous design was that you would have to hit the transactions webpage and it would trigger an update. Getting a page to refresh on a desktop connected via broadband versus a mobile phone is quite the different experience.
 Android has a framework called C2DM(Android Cloud to Device Messaging) which enables you to send lightweight push notifications to devices.
Our vision is that when a sell order clears, a large/special sale has occurred, or a significant milestone has been reached, we send a notice. This will be visible on phone’s Status Notification Bar and cause me to act if deemed important. I have been forgetting to buy or trade a particular item after the sell orders have cleared. Forget things — loose profit.
Getting data out of our database required the creation of a webservice to produce XML output from our wallet table.
Here is an example of the sale of one item in our XML feed:
<?xml version="1.0"?>
<TransactionList>
<Transaction>
<transactionDateTime>2012-04-19 06:21:04</transactionDateTime>
<typeID>21096</typeID>
<typeName>Cynosural Field Generator I</typeName>
<quantity>1</quantity>
<price>1948939.91</price>
<profit>147803</profit>
<stationName>STATION</stationName>
<icon>21096_32.png</icon>
</Transaction>
</TransactionList>
Alpha Screenshot
This screenshot is our first proof of concept. We’re able to get information from an XML feed, display it, and get/cache images from the Eve image server. Major credit goes to my trading and corporation partner James, who has been doing the development work and educating me on the Android framework.
There is a lot we want to do with the mobile version. Menus, tabs, charts, reports, and the ability to add items to a shopping cart/wish list are all things on the drawing board.
Future Collaboration
This project is our first exposure to the Android framework and after the initial learning curve, we might perhaps coolabrate with the Aideron Robotics team on Aura. So maybe some of our trading mechanics will make their way into the Aura application.
Google to bring cheap Android tablets
The internet giant is reportedly set to launch a sub-Rs 10,000 tablet later this year.

Google has said that it will focus more on lower end tablets.
“There’s been a lot of success on some lower-priced tablets that run Android, maybe not the full Google version of Android, but we definitely believe that there is going to be a lot of success at the lower end of the market. It’s definitely an area we think is important and we’re quite focused on,” Larry Page, Google’s chief executive officer, was reported as saying.
Currently, there are a lot of cheap Android tablets in the market but these are mostly from lesser known manufacturers.
Google’s direct involvement in low cost Android tablets could be revolutionary. In fact, the online giant is reportedly set to launch a sub $200 (Rs 10,000) device this year itself. The tablet is said to have a 7 inch display with Android 4.0 operating system, a quad core processor, and WiFi for internet access.
Ringmark is Now Open Source
At Mobile World Congress, we announced Ringmark, a browser test suite for building apps on the mobile web. We’ve received overwhelming feedback and interest in helping us build Ringmark in order to make the mobile web better.
Today, we’re excited to announce that we are open sourcing Ringmark so that anyone can contribute tests.
Very soon, we will also contribute Ringmark tests to the Core Mobile Web Platform Community Group in the W3C. Our hope is that that Ringmark becomes the canonical test suite for the group, with tests for the specs the specs and feedback of the group baked into Ringmark itself.
You can view the code immediately by going to the GitHub repo at https://github.com/coremob/ and the tests athttps://github.com/facebook/coremob-tests. Start to contribute by joining the Group discussions around the specifications.
It’s important to note that this is just a starting point. We fully expect the rings to evolve as the group makes progress.
This is the beginning of a process, starting with open sourcing the tests. As we continue to build, we’ll continue to open source even more of this work.
Why we Built Ringmark
Before we dive into the details of Ringmark, we’d like to share some perspective on why this is important for us at Facebook – and more importantly to our developers.
Ultimately, we believe that web technologies are important to the future of mobile and that we can help to make HTML5 a well-supported platform for mobile developers to build upon. For those that are building with the web today, it’s a major hurdle to learn native technologies like Objective-C and Java: and we hope that an improved mobile web can unlock a large contingency of developers that could, and will, be developing for mobile.
At Facebook, we work with hundreds of mobile developers, including all of our Platform launch partners and we know the web remains a vital target for many of you.

We learned a lot from these discussions. Most importantly, we learned that the mobile web has great potential, but still needs a lot of work. One of the most frustrating problems was that of fragmentation in mobile browser capabilities and of understanding what’s possible on any given mobile browser.
Ringmark and the Core Mobile Web Platform Community Group are designed to address this problem head-on.
The W3C Community Group includes the perspectives of app developers, browser vendors, OEMs, and carriers — all of the necessary ingredients to help make the mobile web better and raise awareness of our challenges.
Ringmark is designed to be the canonical testing suite for those mobile web browser capabilities. It will help developers know, in a glimpse, whether their app can or cannot run on any given mobile browser. It will help mobile browser vendors build browsers that better serve developer needs and bring better apps and games to consumers.
For example, when a developer hears of a new device running a Ring 1 browser, they’ll immediately understand that 2D games, audio, video, and camera apps can be built on that device.
We believe that Ringmark and the ring methodology bring an empirical tangibility to what HTML5 means on mobile devices.
Keep Focused
The W3C Community Group will now be selecting, augmenting and prioritizing the tests received via Ringmark. As those decisions are made, Ringmark will evolve to reflect the latest recommendations of the Community Group. In the spirit of making progress quickly, this initial version of Ringmark reflects our best attempt at this prioritization.
The test suite is focused on enabling the mobile web to be a viable platform for mobile web apps. It’s also important to outline what this initial version of Ringmark is not focused on. Operating system utility functionality, telephony, and niche apps like flashlight apps or battery monitoring apps are examples which are currently out of scope.
Let’s Move the Mobile Web Forward
We want the mobile web to be a viable platform for app developers to build upon. So let’s move fast, keep our focus, and deliver on that mission.
Get involved by contributing to the GitHub Ringmark repository and by joining the W3C Community Group. Have you runRingmark in a mobile web browser? Spread the word about rng.io and post a photo to the Ringmark Facebook Page or tweet using the hashtag #ringmark.
Tomorrow, in a follow up post, we’ll be posting detailed information about the methodology and rings.
Related articles
- In a commitment to the mobile web, Facebook open-sources Ringmark (venturebeat.com)
- Ringmark, a Mobile Browser Test Suite (tekartist.org)
- Facebook aims to whip the mobile Web into shape (reviews.cnet.com)
- Facebook aims to whip the mobile Web into shape (reviews.cnet.com)
- Facebook aims to whip the mobile Web into shape (reviews.cnet.com)

Mobile phone evolution Русский: Эволюция мобильных телефонов (Photo credit: Wikipedia)
| Facebook available in 8 Indian languages on mobile | |
 |
Social networking website Facebook today announced a facility for its users to access the site in eight Indian languages from mobile phones.
This will be rolled out in phases over the next few weeks, it said. “With over 5..more |
| Found: All Your Local & Cloud Documents in One Pla | |
 |
Files are not going away anytime soon. Apple, Google and Microsoft can try as hard as they want to push users and our stuff into their clouds, but we still need files for a reason those companies won’t face: We’re not just Apple users or Google users..more |
| 5 Ways to Keep Your Google Browsing Private | |
 |
Google’s one unified privacy policy went into effect on March 1. The new privacy policy makes it easier for Google to bring user data across its services, but the actual privacy preferences remained unchanged. Google has integrated search, email, You..more |
| Facebook vs. Yahoo Round 2: Social Network Files a | |
 |
The Facebook-Yahoo grudge match continues. Now Facebook is countersuing Yahoo, denying Yahoo’s allegations that Facebook infringed on the company’s patents — and claiming Yahoo is actually infringing on Facebook’s patents. F..more |
| Phase One launch $60,000 aerial camera | |
 |
Phase One has created the iXA, a new medium format aerial camera system manufactured to streamline image capture and process workflow.Users have a choice of 80 or 60 megapixel models in either RGB or NIR versions, allowing it to be used with existing..more |
Related articles
- Indian Facebook Now in ten Indian languages (facebookindya.wordpress.com)
- Indian Facebook Now in ten Indian languages (marathifb.wordpress.com)
- Indian Facebook Now in ten Indian languages (marathifacebook.wordpress.com)
- Personal search app Found scans cloud and local data (news.cnet.com)
- Found: All Your Local & Cloud Documents in One Place (readwriteweb.com)
vela vela song Lyrics from Velayudham
ada vela vela vela vela velayudham
nee otha paarva partha podhum nooraayudhamcoming down town, coming to the sea
he is the man like shiny bee
breaking to the barriers …..
gonna come and carry us
don shout out
come get some
you cant get down, he is velayuthamada vela vela vela vela velayutham
nee otha paarva partha podhum nooraayudham
chillax chillax song Lyrics From Velayutham

Image via Wikipedia
chillax chillax chillax chillax chillax..
chillax chillax chillax chillax chillax..manjanathi marathu katta
maiya vechi mayaki puta
naatu katta townu katta
rendum kalandha semma katta
kaiyu rendum urutu katta
kannu rendum vetta vetta
nenjukulla ratham sotta
eduku vara kitta..sooriyane thevaiyille vithudalama
rathiriya inga mattum inga vachukalama
thirupachi meesaiyile sikkikalama
neeyachu naanachu paathukalamamanjanathi marathu katta
maiya vechi mayaki puta
naatu katta townu katta
rendum kalandha semma katta
kaiyu rendum urutu katta
kannu rendum vetta vetta
nenjukulla ratham sotta
eduku vara kitta..dheem dheem thananam dheem dheem thananam
ah ah..ahhaaa..ah ah ahhaaen odhattu sayathula
ottikolla vaada ulla
patthu veral theekuchiya
pattha veika vaadi pulla
kattabomma peran ne katthi meesa veeran
muthan vechu kuthi kollu sethu poren
mayavi tha neeyum inga mayangiputta nanum
athangara moginiyum vaa nee enna katti pudikkachillax chillax chillax chillax chillax
chillax chillax chillax chillax chillax
chillax chillax chillax chillax chillax
chillax chillax chillax chillax chillax
chilllllaaaaa….x chillax babyen odambu panju metha
kitta vandhu kaatu vitha
un iduppu vaazha maata
naa pudicha thaanga maata
sandhu pondhu veedu nee vanthu vilayadu
patta vaanga thevaiyilla kotta podu
vetiya na sethu un marapula korthu
ennanamo pannuriye nenjukitta ketta kanava (ketta kanavu..)chillax chillax chilla chilla chillax
chillax chillax chilla chilla chillaxmanjanathi marathu katta
maiya vechi mayaki puta
naatu katta townu katta
rendum kalandha semma katta
kaiyu rendum urutu katta
kannu rendum vetta vetta
nenjukulla ratham sotta
eduku vara kitta..sooriyane thevaiyille vithudalama
rathiriya inga mattum inga vachukalama
thirupachi meesaiyile sikkikalama
neeyachu naanachu paathukalama
chillax chillax chillax chillax chillax..
chillax chillax chillax chillax chillax..
chillax chillax chillax chillax chillax..
chillax chillax chillax chillax chillax..
chillax chillax chillax
Subscribe Via Email

Agaram Foundation

29,Vijay Enclave Krishna Street,
T.Nagar, Chennai - 600 017
Tamil Nadu, India.
Telephone : +91 44 4350 6361
Mobile : +91 98418 91000
Email : info@agaram.in
Site Info

Recent Comments
 SELVABALAJI NEWS
- An error has occurred; the feed is probably down. Try again later.
Vistor Location
Unknown Feed
- An error has occurred; the feed is probably down. Try again later.
Unknown Feed
- An error has occurred; the feed is probably down. Try again later.
Unknown Feed
- An error has occurred; the feed is probably down. Try again later.
LeadSquared
- Into the Unknown: Embracing a Bold, Student-First Strategy for Enrollment Success
- Top 10 Sales Gamification Tools For 2024
- Top 9 CRMNext Alternatives in 2024
- Closing the Deal: 6 Surefire Strategies to Exceed Your Sales Targets
- Sales Automation 101:Unclog your Sales Pipeline
- KRA of Sales Manager and How to Track Performance
- Top 10 Healthcare CRM in the United States
- Why Do 70% of Online Inquiries Drop Off?
- Top 6 Paramantra Alternatives for Real-Estate Businesses in 2024
- Top 10 Spotio Alternatives for Field Reps
singershalini
- Untitled
- Pop Shalini Verified #Spotify Artist Playlist
- Pop Shalini's Interesting reads #Murakami
- Pop Shalini performs for Harris Jeyraj's concert with Benny Dayal and Haricharan
- Pop Shalini sings Vandhe Mataram
- Pop Shalini Sings her famous song Mudhal Naal Indru - Unaale Unaale
- Pop Shalini wishes Superstar RajiniKanth on the Dada Saheb Phalke Award
- A song for a Rainy day from my first album #Shalini - Chinna Chinna Mazhai thooral
- ipopshalini Verified Artiste sings Ranjha from Shershaah
- Chennai Floods
Flickr Photos


Advertsiment


Mobypicture Photo post with API method php
Image via CrunchBase
Related articles
Rate this:
Share this: